The Upper Exum Climb

The south-facing Upper Exum Ridge is one of the most popular routes in the Teton Range. It's a common alternative to the equally popular but shadier west-facing Owen-Spalding route. The climbing is longer, harder and more sustained on steep sections compared to the Owen and there's a short faith-based friction section. It's rated as a Class 5.5 climb and considered to be appropriate for "beginner to intermediate" climbers. In the 4th edition of A Climber's Guide to the Teton Range, Renny Jackson upped the rating of the route to 5.6 in 2023. Mountain Project has it at 5.5 as do most guidebooks. Your mileage may vary.
Free-Soloing the Upper Exum with no previous climbing experience is not recommended. Consider climbing the Owen-Spalding route when it's dry if you haven't done any climbing. If
that's easy for you, this is worth considering. It also helps to know
the Owen before soloing the Exum because most soloing climbers downclimb the Owen. That brings up another important point: If you're soloing the Exum Ridge and downclimbing the Owen, make sure conditions are passable on both routes. Conditions on the shady Owen-Spalding route can differ greatly from the Upper Exum. There are many days when both routes are dry during the summer, or the conditions only present modest challenges with an excess of dry rock.
If you're climbing with ropes, conditions on the Owen are less of an
issue. Roped parties will bypass most of the Owen's sketchier sections
by using the rappel to the Upper Saddle (AKA: the Owen Rappel).
The average free-soloing climber may find it very difficult or impossible to safely turn around and retreat down the Exum Ridge in a timely manner. Many escape further up the mountain if storm clouds are building and they descend the Owen-Spalding. This additional escape time is important to take into consideration when planning your climb.
Climbing advice and opinions should be taken with a grain of salt
when it comes to the highly personal experience of climbing. It's a puzzle and experience that's
different for every climber. It's impossible for us to know how hard the climb will be for you, how well you will manage the hazards or how elastic your comfort zone will be with or without a rope.
The Approach
Visit our webpage for The Hike to the Grand Teton's Lower Saddle if you need more details about the approach than what's covered here. It has some additional tips and info. Our homepage sometimes has updates and news.
Just south of Jenny Lake in GTNP is the Lupine Meadows Rd leading to the Lupine Meadows Trailhead. Almost everyone starts their trip from there. It's 21 miles from the Town of Jackson.
Just south of Jenny Lake in GTNP is the Lupine Meadows Rd leading to the Lupine Meadows Trailhead. Almost everyone starts their trip from there. It's 21 miles from the Town of Jackson.
More than a few people will follow other climbers all the way to the summit without gathering much beta. Nonetheless, it wiser to have a good feel for where you're going and the challenges.


Besides the backcountry camping zones in Garnet Canyon, technical climbing bivy sites are also available. To see the bivy locations on a map, follow this link and see if there's a map as you scroll down the page. You can also click on "Check Availability" then "Technical Climbing Sites" to view all of the bivy locations (this worked in 2025 but they keep changing stuff so it may not work in 2026). Bivy sites can be reserved online or acquired through a first-come, first-served, walk-in permit.
The dry summer trail to the Lower Saddle crosses two boulder fields where the trail disappears for over 200 ft (see above map). At both boulder fields, the trail resumes to your southwest as you ascend. The climbers' trail disappears in an insignificant way in a few spots. Usually, the trail continues just in front of you. Take the path of least resistance. If you're traveling when it's dark and you don't know the area, it helps to examine the approach to the Lower Saddle in more detail. Or use a tracking app.

The Lower Saddle's Fixed Rope is used once the snow burns off the headwall's summer trail. Before then, there's a bootpack over snow that runs up the saddle's headwall.

Before continuing, let's take a moment to share the following video:
VIDEO HIGHLIGHTS.jpg) Grand Teton's Southern Aspect
Grand Teton's Southern Aspect


 Typical approach to reach the Upper Exum Ridge


Scrambling up the slabs and ledges just to the left of the lower chimney is faster and easier for many climbers. They'll move into the chimney once they get past the lowest chockstones. That also helps them avoid some rockfall hazards in the chimney.

There are many sources of water along the trail. We never filtered our water but we choose the source carefully. Spalding Falls is fed by a spring at the top of the falls. The summer trail takes you to it. It's about 5 miles from the trailhead. There's a free outdoor water station at the South Jenny Lake Store if you need some clean tap water before leaving the trailhead.
You're heading for the Grand's Lower Saddle which sits between the Grand Teton and the Middle Teton in the North Fork of Garnet Canyon. Outside of a few exceptions, the approach is snow free at some point during the summer. Sometimes by mid-July, sometimes earlier, sometimes later.
You're heading for the Grand's Lower Saddle which sits between the Grand Teton and the Middle Teton in the North Fork of Garnet Canyon. Outside of a few exceptions, the approach is snow free at some point during the summer. Sometimes by mid-July, sometimes earlier, sometimes later.
Assuming you're walking fast, traveling light, and you're very fit, these are common split times and distances from Lupine Meadows to the Lower Saddle for strong athletes:
First Junction: 30 minutes, 0.5 hrs total, 1.7 miles
Second Junction: 30 minutes, 1 hr total, 3 miles
Platforms Camping Zone: 4.1 miles
Platforms Camping Zone: 4.1 miles
Meadows Camping Zone: 30 minutes, 1.5 hrs total, 4.5 miles
Caves Camping Zone: 5.2 miles
Moraines Camping Zone: 5.9 miles to sign
Lower Saddle: 60 minutes, 2.5 hrs total, 6.4 miles, 2.6 mph avg
Caves Camping Zone: 5.2 miles
Moraines Camping Zone: 5.9 miles to sign
Lower Saddle: 60 minutes, 2.5 hrs total, 6.4 miles, 2.6 mph avg
Summit: time varies with skill, fitness and route knowledge
(The above distances are estimated from GPS Tracks)
(The above distances are estimated from GPS Tracks)
It's 2,175 vertical feet to the Summit from Lower Saddle. The slope distance is longer. Some climbers do more zigzagging than others. Just for reference, local athletes who climb the Exum Ridge regularly can reach the summit in 4 hours or so from the trailhead. Others might take 24 hours to make a single-day round-trip. Indeed many do. Everyone's different.

Besides the backcountry camping zones in Garnet Canyon, technical climbing bivy sites are also available. To see the bivy locations on a map, follow this link and see if there's a map as you scroll down the page. You can also click on "Check Availability" then "Technical Climbing Sites" to view all of the bivy locations (this worked in 2025 but they keep changing stuff so it may not work in 2026). Bivy sites can be reserved online or acquired through a first-come, first-served, walk-in permit.
The dry summer trail to the Lower Saddle crosses two boulder fields where the trail disappears for over 200 ft (see above map). At both boulder fields, the trail resumes to your southwest as you ascend. The climbers' trail disappears in an insignificant way in a few spots. Usually, the trail continues just in front of you. Take the path of least resistance. If you're traveling when it's dark and you don't know the area, it helps to examine the approach to the Lower Saddle in more detail. Or use a tracking app.
The Approach
You'll see some side trails on the approach. Some go to camping spots & climbing objectives. Some spur trails are used to avoid early-season snow. Some are just a tangled mess of braided trails that were used as shortcuts.


Don't cut the summer switchbacks east of Spalding Falls. It leads to erosion, rockfall and damage to vegetation.

The Lower Saddle's Fixed Rope is used once the snow burns off the headwall's summer trail. Before then, there's a bootpack over snow that runs up the saddle's headwall.

Climbers occasionally kick rocks down the headwall. Stay alert and avoid being in the line of fire. Natural landslides & rockfall also occur on the headwall.
Never travel directly above the Fixed Rope to the west or northwest during the summer due to the high probability of causing rockfall on climbers below you. Climbers head toward the Middle Teton and follow a path to the southeast corner of the Lower Saddle.
Before continuing, let's take a moment to share the following video:
The Upper Exum with David, Ken & Lauren
David Gonzales
took his talents and a video camera up the Grand in 2007. The result was
this fine gem of cinematography which was also
YouTube's first video of free-soloing climbers on the Grand Teton. Google snapped up
YouTube for $1.65 billion in 2006 back when cynics questioned YouTube’s
staying power. According to Google, YouTube ad sales generated $10.5 billion in revenue in the 4th Quarter of 2024. For all we know it's a loss leader but it's a nice resource for climbers.
VIDEO HIGHLIGHTS
(links are to pictures, not video shortcuts)
Middle Teton shown at 0:28
Lower Saddle's Fixed Rope at 0:38
Lower Saddle at 0:51
Central Rib's Lower Crossover at 0:56
Wall Street's Step Across at 1:03
Golden Stair at 1:20
Jern Dihedral with Ken Jern climbing out of it at 1:31
Upper Friction Pitch at 1:43
V-Pitch at 1:52
West -Leaning Chimney at 2:03
Boulder Problem in the Sky at 2:07
.jpg)
Back in 1979, the Complete Exum Ridge (Lower & Upper, 5.7) was listed as one of Steve Roper and Allen Steck's Fifty Classic Climbs of North America.
A section of a garden hose allows you to collect drinking water
from a very small drainage near
the SE corner of the saddle. We drink the water unfiltered. Sometimes the hose will collect particulates if the hose is poorly arranged. The drainage is at the toe of
the
Middle Teton's north-facing slope. It's just south of a large seepage area. And it's about 50 feet southeast of the Lower Saddle's metal sign....


Climbers by the water hose

There's a 'rest stop' on the western aspect of the saddle that
provides a non-functioning fenced toilet area which is used for privacy. You're required to pack human waste off the saddle using wag bags. Do not piss anywhere near water sources, drainages to water sources, or near camping spots.
The rest stop is west of the two summer huts. One hut is used by the rangers, the other is used by Exum Mtn Guides. If you need a wag bag, the rangers might have a spare but don't count on it—and don't count on the rangers being at the saddle's hut.


The more
demanding & exposed climbing for Upper Exum climbers starts at
the end of Wall Street. It starts at the
Upper Saddle
for Owen-Spalding climbers.

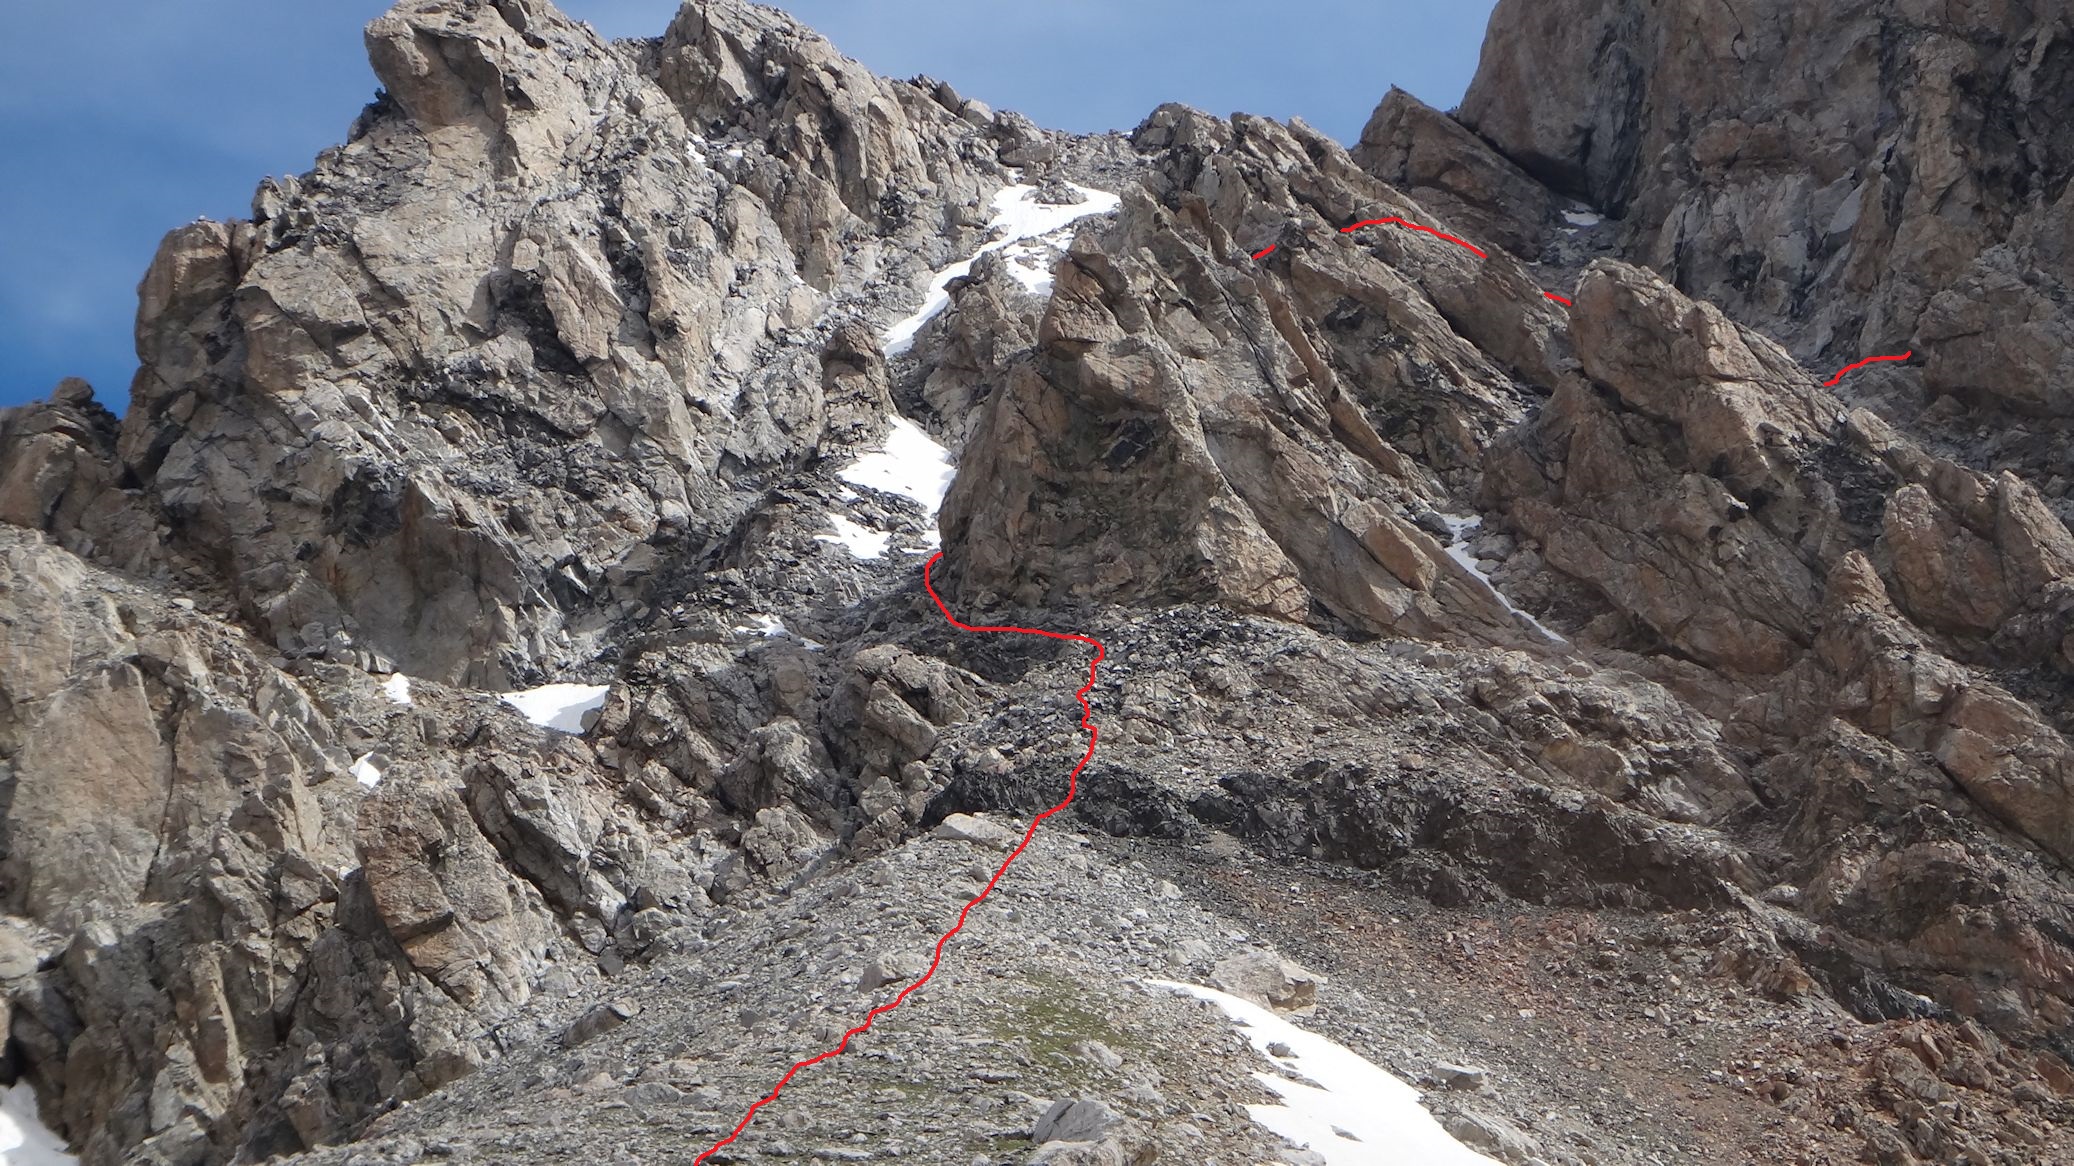
From the Lower Saddle, you're heading north toward the Black Dike. There's a trail with several spurs. The scrambling begins after passing the dike.

You're heading for the west side of the Needle. The Needle is a triangular tower at the very bottom of the Central Rib. Avoid the deeper drainages due to rockfall hazards. And watch for ice. It's very common along the western side of the Needle which is a seepage and drainage area.
Once on the western side of the Needle, you'll begin the process of crossing over the ridgeline of the Central Rib and making your way to the Exum Ridge.
Once on the western side of the Needle, you'll begin the process of crossing over the ridgeline of the Central Rib and making your way to the Exum Ridge.

You'll find the Chockstone Chimney at the first opening in the western aspect of the Needle. It takes you to the Eye of the Needle and over the Central Rib's ridgeline. No worries if you choose a different variation. There are many. We will look at a few.

Scrambling up the slabs and ledges just to the left of the lower chimney is faster and easier for many climbers. They'll move into the chimney once they get past the lowest chockstones. That also helps them avoid some rockfall hazards in the chimney.

Lower section of the Chockstone Chimney

(Red line is most common)
Once past the lower chimney, you'll quickly find
yourself at an obvious ramp heading south and out of the chimney.
Once out, make a gradual u-turn and go into a natural tunnel
called
The Eye of the Needle.
It's a tight fit with a pack. Watch your head. The Eye may be plugged
with snow early in the season. Sometimes there's a big snow step to help
you climb over the tunnel. It's also possible to utilize many other
lines of travel when conditions allow.
You're heading for the Belly-Roll Almost after leaving the tunnel. If you pass under the Belly-Roll Almost, you'll be looking for a small foothold that's hidden from view until you're on top of it. Good holds are everywhere when dry. Climbers have taken slips here so don't assume your inexperienced partner is going to find and use those good holds.

You're heading for the Belly-Roll Almost after leaving the tunnel. If you pass under the Belly-Roll Almost, you'll be looking for a small foothold that's hidden from view until you're on top of it. Good holds are everywhere when dry. Climbers have taken slips here so don't assume your inexperienced partner is going to find and use those good holds.
Different view

Head for the ridgeline of the
Central Rib once you pass the Belly-Roll Almost, or once you pass the Briggs' Slab. The Chockstone Chimney continues directly to the Rib's Lower Crossover as seen below...


Cross the ridge at either location
Before we cross the ridge, let's go back and look at a few variations in more detail.
If we must rope up, (with kids, whatever) we will use the Briggs' Slab. It's the easiest and safest option when using ropes.

Variations to access Central Rib's Bench

 Climber on the Briggs' Slab.
.jpg)

 These climbers are at the Central Rib's Upper Crossover

 The slabs just below the Lower Crossover
Let's get back to our standard route options....

There's a black alcove to your left as you ascend the gully which would, if you climbed it, take you to a ledge on the Grand's western face from which you can gain the entrance to the Upper Exum's Wind Tunnel. We don't recommend it. If you do try it, you'll probably want to avoid climbing directly under the access to the Wind Tunnel due to loose rocks. Try heading a tad bit further north at the top and take the ledge back south. Additionally, near the beginning of the Wall Street shelf is the two pitch Flipping Tokens To Hoboken 5.12B/C climb that Brady Johnston, Greg Collins and Kent McBride put up. That also leads to the Wind Tunnel.
BTW, the three couloirs between the Lower & Upper Saddle have enjoyed various names over time. Sometimes two couloirs shared the same name due to a misunderstanding of the couloir's location. It wasn't unusual for a different name to be used by different guidebook authors or climbing guides, etc. For example, Thomas Turiano calls the Wall Street Couloir the Central Rib Couloir in his Select Peaks guidebook.
On Sept. 11, 1985, the Wall Street Couloir was the site of one of the more dramatic rescues on the mountain which ended with the death of three men from hypothermia. Podcast story and AAC accident report.
BTW: Exiting the mountain down the Wall Street Couloir isn't a shortcut to save time. It cliffs out.


If we must rope up, (with kids, whatever) we will use the Briggs' Slab. It's the easiest and safest option when using ropes.

The Briggs' Slab is at southern end of the broken headwall and next to the Chockstone Chimney. The broken headwall makes up part of the Central Rib's "bench".

Variations to access Central Rib's Bench

The Mini Black Dike is a series of black stairs leading directly to the Sack of Potatoes.

You might wish to try the Middle Ledge of the Chockstone Chimney which takes you to the Eye of the Needle. It's a good option if conditions are poor on the slab, or it's busy with guided climbers.

Guides often run a rope around a rock feature and belay
clients on the Briggs' Slab. You can scramble directly up the slab or walk around the outside edges.
Variations that are less common to access the Central Rib's Bench:
The
Cracks of Doom
and the
Sack of Potatoes
are variations just north of the Briggs' Slab. They can be good options if the slab is backed up with climbers, or you prefer a different travel line. They're shown below.
The Cracks of Doom is harder than the Briggs' Slab; however, it can be climbed and downclimbed pretty quickly when dry.
The picture below also highlights the two locations that climbers use to cross over the Central Rib. Notice that the Upper Crossover drains down to the Sack of Potatoes Chimney and the Lower Crossover drains down the Chockstone Chimney.
The picture below also highlights the two locations that climbers use to cross over the Central Rib. Notice that the Upper Crossover drains down to the Sack of Potatoes Chimney and the Lower Crossover drains down the Chockstone Chimney.
.jpg)
Click to enlarge
The direct line in the Sack of Potatoes Chimney is not the fastest or easiest variation but it gets used every so often. Most climbers exit to the High Line from inside the chimney when everything's dry. That High Line is good for an ascent & descent but crossing over the chimney requires some extra attention. The High Line via the chimney was used by Michelino Sunseri on his FKT run. The Southern Line is another option. The loose rocks and loose dirt are a hazard. The well-shaded chimney can be icy for an extended period after a cold & wet spell.

Downclimbing from the High Line into the SOP chimney area
We're headed over the Central Rib's ridgeline using one of the two crossovers....


Click to enlarge
One reason for using using either crossover is that one of them might help avoid some spring snow hazards in the Wall Street Couloir. And climbers sometimes use the Upper Crossover when running a lap on the Exum as they're on our way down from the Upper Saddle.


From the Briggs Slab area, follow the extension of the Chockstone Chimney to the ridgeline. You'll see this fang-like rock at the Lower Crossover. There's a drop that may challenge a child after passing the Fang; however, there are variations on both sides of the drop. You can also scramble to the Upper Crossover and use it.
Variation that's usually avoided:
Just to the south of the Fang is a slab system that's part of a variation that's approached from the eastern side of the Needle. There's also a chimney just west of the Lower Crossover that runs up the eastern side. Easy climbing but some loose rocks. The off-route eastern variations have no real time advantage and they're not usually recommended. They're a possible substitute if you're bored.

Let's get back to our standard route options....

View from the Lower Crossover
Scramble down to the Wall Street Couloir and approach the north side of the gully leading to Wall Street. You're approaching the northern side of the gully from a higher position in the Wall Street Coulour. Avoid the Gully's lower bottom location where it drains into the couloir.
There's a black alcove to your left as you ascend the gully which would, if you climbed it, take you to a ledge on the Grand's western face from which you can gain the entrance to the Upper Exum's Wind Tunnel. We don't recommend it. If you do try it, you'll probably want to avoid climbing directly under the access to the Wind Tunnel due to loose rocks. Try heading a tad bit further north at the top and take the ledge back south. Additionally, near the beginning of the Wall Street shelf is the two pitch Flipping Tokens To Hoboken 5.12B/C climb that Brady Johnston, Greg Collins and Kent McBride put up. That also leads to the Wind Tunnel.
BTW, the three couloirs between the Lower & Upper Saddle have enjoyed various names over time. Sometimes two couloirs shared the same name due to a misunderstanding of the couloir's location. It wasn't unusual for a different name to be used by different guidebook authors or climbing guides, etc. For example, Thomas Turiano calls the Wall Street Couloir the Central Rib Couloir in his Select Peaks guidebook.
On Sept. 11, 1985, the Wall Street Couloir was the site of one of the more dramatic rescues on the mountain which ended with the death of three men from hypothermia. Podcast story and AAC accident report.
BTW: Exiting the mountain down the Wall Street Couloir isn't a shortcut to save time. It cliffs out.

Looking back west—before dropping into the Wall Street Couloir

Another look
Crossing the Wall Street Couloir can be challenging early in the summer with icy-hard snow, and sometimes the sloppy stuff.

Wall Street Gully - loose rocks everywhere. This gully drains to the
Wall Street Couloir.
The Climb


Escape Rap to Wall Street
This rap is mostly used by climbers on other routes like the Petzoldt Ridge. It's both an escape option and an exit off the ridge for climbers not going to the summit. The rap starts just above the
Golden Staircase. It's not maintained and it's unlikely you'll see any evidence of it.
Notice that this rap takes these climbers back to the fat part of Wall
Street and not the narrow upper end. You can visually check your landing zone from the rap station.

Wall Street
 Eastern end of Wall Street at the Step Across
 Wall Street's Step Across

At the narrow end of Wall Street, you'll work your way around a corner using one of two ledges; or, you'll step across a gap from the lower ledge.

Glen Exum leaped from the upper ledge across the gap on his first trip

Paul Petzoldt is the last one on the rope
"When you get to the eastern extremity of Wall Street, why there isn’t
any place to jump from! So I climbed as high as I could, until I was
sort of secure, and jumped from a standing start!” Glenn Exum
Glenn didn't carefully examine all his options before jumping. That's a common mistake with many novice climbers. Glenn was truly out of his comfort zone. The summit register for his first ascent is a real zinger. Petzoldt wisely rounded the corner later that day and soloed the ridge like Glenn. Stepping across the gap from the lower ledge became a popular guided option over time. No variation gets the most attention these days. You can back off the lower ledge before rounding the corner if you wish to examine it first. It's more awkward to back off the upper ledge.
Glenn didn't carefully examine all his options before jumping. That's a common mistake with many novice climbers. Glenn was truly out of his comfort zone. The summit register for his first ascent is a real zinger. Petzoldt wisely rounded the corner later that day and soloed the ridge like Glenn. Stepping across the gap from the lower ledge became a popular guided option over time. No variation gets the most attention these days. You can back off the lower ledge before rounding the corner if you wish to examine it first. It's more awkward to back off the upper ledge.
Glenn's first guided client was Coalter Huyler who owned the Bear Paw Ranch just south of Louis Joy's JY Ranch which was next to Phelps Lake. This was before the ranches were purchased by John D. Rockefeller, Jr. and eventually became a part of GTNP. Coalter's son Jack Huyler wrote a few short stories about the valley's characters, including Glenn and Paul. He had a romantic affinity for the days when gated areas were occupied by cattle, not trophy homes with trophy wives. It wasn't long before cattle were overtaken by "dudes": Life Magazine images of Jackson in 1948.
Let's start by looking at the variations that go around the corner at the end of Wall Street. We will look at the "Step Across" later.

Staying upright on the upper ledge - one variation.
When we're on the upper ledge, we stand totally upright and work our way around the
corner like this climber. The footholds are narrow but we
trust 'em. There are no great handholds. The biggest drawback to the upper ledge may be the possibility of a fall with the rope in a horizontal position. That'll hurt ya.
For the record, we don't remember any accidents taking place at the end of Wall Street. Doesn't mean one hasn't happened.

Leading the upper ledge

On the move around the corner
Here is the video:
Rounding the corner on the upper ledge
You'll notice that she crosses her feet as she rounds the corner. Some will move one foot forward and let the other foot follow behind as they hug the wall. That's slower but it might lessen the tilt and it's possibly safer for an inexperienced climber.

Upper Ledge
He takes the gloves off.....

Notice his tilt toward the camera

Another look
The upper ledge narrows considerably as you round the corner. It's narrower than it appears in some pictures.
.JPG)
Let's take a look at the lower ledge variation......

The ledge disappears once he rounds the corner. There are several ways to move off the lower
ledge.

The lower and upper ledges

This climber is set to cross the gap instead of going around it.


Finger holds on upper ledge
There are no monkey bar holds

The climber's right foot is on a solid foothold. It's a stretch to reach it from the lower ledge area. The handhold is the
fingertip hold on the upper ledge.

View of lower ledge from upper ledge
Sticky shoes certainly make it quicker, easier and safer to move around the lower ledge. Long legs help, too.
Glenn Exum had leather-cleated football shoes two sizes too big on his first ascent. In the photo, our shoes are rubber-cleated specials from Ross Dress for Less.


Looking down from the eastern side of the "Step Across" gap

Same view with David on the lower ledge
David was in some heavy fog.
 In the next video, a young climber dips
down off the lower ledge to round the corner. It would have been difficult for her to use the hand holds on the upper ledge. Rather quickly, she demonstrated more finesse than many adults rounding this corner. Small kids sometimes have an advantage in that their bodies better match the configuration and size of the holds; however, it still takes a good eye to move efficiently and safely like this young woman did.
In the next video, a young climber dips
down off the lower ledge to round the corner. It would have been difficult for her to use the hand holds on the upper ledge. Rather quickly, she demonstrated more finesse than many adults rounding this corner. Small kids sometimes have an advantage in that their bodies better match the configuration and size of the holds; however, it still takes a good eye to move efficiently and safely like this young woman did.
We have seen newbie climbers slip off the lower variation while on a rope. If you have an inexperienced climber in your group, they might be better off using the lower ledge while sitting in the harness and using their feet on the wall to gently more over to the inside corner. It's like a tension traverse or mini pendulum traverse. Or, they could use the upper ledge. Many consider the end of Wall Street to be the crux of the climb just like ol' Glenn did on his maiden voyage. Everyone's different.
.


Looking down from David's position on the western side of the gap
We have seen newbie climbers slip off the lower variation while on a rope. If you have an inexperienced climber in your group, they might be better off using the lower ledge while sitting in the harness and using their feet on the wall to gently more over to the inside corner. It's like a tension traverse or mini pendulum traverse. Or, they could use the upper ledge. Many consider the end of Wall Street to be the crux of the climb just like ol' Glenn did on his maiden voyage. Everyone's different.
.
Smooth operator
When the video ends, she is climbing out of the
inside corner:

Inside corner off lower ledge
The first foothold and handhold that the young woman used in the previous video as she rounded the corner is also used by the climber in the next video. He steps across the gap and avoids moving to the inside corner. This is the "Step Across" move, and a named feature.

Again, they're using the same footholds, and the same crack as a handhold to leave the lower ledge. Watch the next video to see the move across the gap.
The "Step Across"
You'll find yourself below the Golden Staircase after passing the end of Wall Street. It's a very short climbing pitch. Directly below you is the Lower Exum climbing route. To the east is top of the Petzoldt Ridge.
Let's look at the Golden Staircase (AKA Golden Stair):

Soloing the
Golden Staircase
In the image above, Brody Leven is out with Robin Hill. They sailed up the GS like it was a sidewalk.

BTW: It's Golden Stair, not 'staircase' if you go by the book "A Climber's Guide to the Teton Range"; however, there are often many different names for the same features on this mountain. Old-timers used different names and spellings so feel confident that your name works just fine. We have no idea why the Climber's Guide used 'stair' but the authors had a habit of changing some names around. A case could be made that it has one big step or stair. Orrin H. Bonney and Lorraine Bonney used 'Golden Staircase' in their guidebooks and it's common to hear that name. They made it into the Wyoming Outdoor Hall of Fame in 2019 — JHN&G story. Update: Renny Jackson offered up both names in the 2023 edition of his guidebook.
The Golden Staircase has many good holds and sticky rock. It still requires
careful climbing. Hannah Marshburn, 24, of Jackson took a fall at the Golden Staircase and sustained a facial injury and possibly
a head injury in 2013.
In the image above, Brody Leven is out with Robin Hill. They sailed up the GS like it was a sidewalk.
BTW: It's Golden Stair, not 'staircase' if you go by the book "A Climber's Guide to the Teton Range"; however, there are often many different names for the same features on this mountain. Old-timers used different names and spellings so feel confident that your name works just fine. We have no idea why the Climber's Guide used 'stair' but the authors had a habit of changing some names around. A case could be made that it has one big step or stair. Orrin H. Bonney and Lorraine Bonney used 'Golden Staircase' in their guidebooks and it's common to hear that name. They made it into the Wyoming Outdoor Hall of Fame in 2019 — JHN&G story. Update: Renny Jackson offered up both names in the 2023 edition of his guidebook.

Typical line on the GS
Variations that are not usually taken but might be worth a try....

The
cracks variation

This is just around the corner from the base of the Golden Staircase. It's harder but not by much, especially with sticky shoes. If you go even further to the NE, you'll find
even more cracks/slabs/etc to play with. They may be easier, or not, for you. They're shown below...
Another variation further NW - grippy
Climbers coming off the Petzoldt Ridge sometimes use this area to access the Exum Ridge. Maybe 5.6ish climbing for them to get here. Some join the Exum Ridge by the Wind Tunnel's entrance - going up a gully.
Speaking of the Petzoldt Ridge, Jane Constantino and Ralph Hill were climbing the Petzoldt when a large thunderstorm rolled into the mountain from the west just after noon. They got zapped by ground currents and suffered burns everywhere they were in contact with the rock. The current rendered them helpless for about an hour.
Speaking of the Petzoldt Ridge, Jane Constantino and Ralph Hill were climbing the Petzoldt when a large thunderstorm rolled into the mountain from the west just after noon. They got zapped by ground currents and suffered burns everywhere they were in contact with the rock. The current rendered them helpless for about an hour.
Let's get back to our standard route options....

A little step problem just above the Golden Stair
.jpg) Looking back
Looking back
These guys are at one of the locations where you can set a rap back to Wall
Street.
There's an option of going around the exposed western aspect of this step instead of going over it. It's pretty funky and we're never sure the rock is going to hold which adds to the fun of going that way. It's not harder.
There's an option of going around the exposed western aspect of this step instead of going over it. It's pretty funky and we're never sure the rock is going to hold which adds to the fun of going that way. It's not harder.
.jpg)

The scramble to the Wind Tunnel....
It's mostly a scramble to the Wind Tunnel from above here. Climbers will scramble up a gentle slope, climb a short section of rock, and then scramble down the eastern side.
Off Route Variation:
It's mostly a scramble to the Wind Tunnel from above here. Climbers will scramble up a gentle slope, climb a short section of rock, and then scramble down the eastern side.
Off Route Variation:
There's an exposed variation to reach the Wind Tunnel's entrance on the western aspect of the ridgeline...


Western variation
Back to the standard route on the eastern side of the ridge:

Approach
from the eastern side of the ridge
The gully at the bottom-right side of photo drains toward the
Petzoldt Ridge.
.JPG)
The large detached flake at the WT's entrance

Wind Tunnel entrance

Looking back


Looking ahead - Wind Tunnel Gully

Wind Tunnel's chockstones & boulders

The last big chockstone
Climbing directly into
the left side of the white chockstone is a greater challenge but certainly worth trying. Most people go right (like the climber above) and then step into the channel on the left side.
We will point out that no one was spotting this lead climber. If you're in a group, it's usually wise—and a common courtesy—to spot climbers when it's easy to do so. This certainly isn't a difficult move for the lead, but bad things sometimes happen when people think bad things won't happen. Be careful where you're spotting.....
We will point out that no one was spotting this lead climber. If you're in a group, it's usually wise—and a common courtesy—to spot climbers when it's easy to do so. This certainly isn't a difficult move for the lead, but bad things sometimes happen when people think bad things won't happen. Be careful where you're spotting.....
On July 27, 2014, Brett Verhoef was in the Wind Tunnel when he pulled on a loose boulder which caused him to fall backwards as the 800 pound boulder impacted his foot causing soft-tissue damage, two puncture wounds, and significant bone bruising.

Another look


The climbers shown here are bypassing the chockstone mentioned above by climbing along the eastern
wall of the Wind Tunnel Gully.

Wind Tunnel Gully
above the chockstone problems
 Exum Ridge
.JPG)
 Top of Carman's Pinnacle 5.5 to 5.6 in some guidebooks
Ascend the drainage and climb out of the Wind Tunnel Gully to an open ledgy
area. It's where the gully ends and the ridgeline rises out of it. From
there you can assess various options.
Most climbers simply head for the
right-facing (east-facing) Jern Dihedral near the very top-center of the above image to gain the Friction
Pitch.
We will look at several variations first.

.JPG)
Carman's Pinnacle
Carman's is a detour. It's fun to run up even if it's just for a lookie loo. Carman's Pinnacle has had several names but Carman's has stuck. That name comes from Dave Carman or his
brother.
Dave was an Exum Guide
and happened to help build the
JHMR Via Ferrata
climbing area. In 2024, the Mountain Resort was charging $495 for "the first 2 people" to climb the VF, unless it was a full day which ran $775 for the first 2 people (guided trip). The public Via Ferrata in Telluride is still free, fyi.

.JPG)
Overview

A look at your options
After exiting the Wind Tunnel Gully, we often start along the eastern side of the ridge to access the Jern Dihedral. That eastern approach sees less action and it's quick and it's mostly a scramble—if you choose the easiest lines. The Western Chimney variation used to be a common route to reach the Friction Pitch. The Jern Dihedral gets the most attention these days. And from the Jern's base, you can use variations to the east or west such as the Double Cracks or the Jern's western crestline instead of entering the dihedral.
You can also bypass this entire area by scrambling up the Friction-Pitch Bypass Chimney or by climbing the more challenging Puff-n-Grunt variation. We're not sure what line Glenn Exum used on his first ascent. There are many variations on this ridge and many provide greater challenges should you seek them.
Let's take a quick look at a few of the less common options before looking at the Jern. We'll start by looking at the Puff-n-Grunt...

The Puff-n-Grunt. Most of it's very easy climbing
 PNG's crux.
In the book "A Climber's Guide to the Teton Range", the authors call it a "difficult (5.6 to 5.7) corner". We tried it in hunting boots. It requires careful climbing at the crux.
You can start the PNG and exit to the base of the Friction Pitch shortly after the passing the crux. Some solid but smallish holds take you across the PNG's left wall on an horizontal traverse to the base of the Friction Pitch. That traverse may make a novice uncomfortable.
You can bypass the crux by going
around its right side for a much easier line of attack. The left side is the only cruxy part of the PNG that may get up to 5.7 (old trip report on the PNG).
~~~~~~~~~~~~~~~
Enough of the Puffy route. Here's the Western Chimney.

The Western Chimney

Western Chimney
Climbing the entire Western Chimney is an uncommon line. It exits at the top of the Friction Pitch. That line is a little convoluted. It's not for
beginners. You need to get past a very large overhanging chockstone and
much of the rock is crappy by the overhang. And the actual exit to the ridgeline is, um, interesting. We keep waiting for that
chockstone to shed off the mountain like the one that used to be in the Stettner Couloir.
The most common exit from the Western Chimney is to the base of the Friction Pitch. That exit is by a very old cam stuck in a crack. The cam might get removed at some point but it has been there for years. Still there in 2025.
 Exit
Exit

Climb the short wall out of the chimney. You'll land on a ledge that runs along the base of the Friction Pitch. The chimney is a fairly quick ascent. The exit is the only thing that might slow you down.
You can also exit the chimney before reaching the jammed cam via some other awkward steppy holds on the eastern wall of the chimney. That's maybe 10 feet away (haven't measured it but it's an obvious line). And another line is a tad further south of that (maybe the better one - we like it). It's probably easier if you have some upper body strength but there are plenty of solid holds. Some finesse is involved on all the lines.
The most common exit from the Western Chimney is to the base of the Friction Pitch. That exit is by a very old cam stuck in a crack. The cam might get removed at some point but it has been there for years. Still there in 2025.
This exit is right before a big down-step in the chimney. This is the 2nd big down-step in the chimney. You'll see the massive chockstone in the chimney just above this down-step.


Climb the short wall out of the chimney. You'll land on a ledge that runs along the base of the Friction Pitch. The chimney is a fairly quick ascent. The exit is the only thing that might slow you down.
You can also exit the chimney before reaching the jammed cam via some other awkward steppy holds on the eastern wall of the chimney. That's maybe 10 feet away (haven't measured it but it's an obvious line). And another line is a tad further south of that (maybe the better one - we like it). It's probably easier if you have some upper body strength but there are plenty of solid holds. Some finesse is involved on all the lines.

Another overview of variations around the Friction Pitch
Click to enlarge
Click to enlarge
Let's look at the easier Friction-Pitch Bypass before
looking at the Jern & Friction Pitch.


Friction-Pitch Bypass Chimney on right (PNG at far left)
A dry FP Bypass Chimney
is the easier than climbing the Jern & Friction Pitch. If 60 mph winds are crossing the Friction Pitch, this may be a wise choice. You'll access the Friction-Pitch Bypass Chimney from the top of the Wind Tunnel. Scramble east into the big chute. The Notch Gully at the top of the chimney drains into here. That adds to the collection of loose rocks. The loose rocks are
mostly by your feet. They're a real safety hazard. There are plenty of solid handholds. Also, the
bypass may not be a good travel line early in the season when there's a mix of ice and snow.
Near the top of the chimney, you'll probably want to exit to your left (west). It involves moving into a smaller
parallel chimney. It's above you and slightly hidden. There's a small step and a short ledge that gets you to the parallel chimney. You can also climb a more
direct and harder line to the parallel chimney. And you can stick to the right side of the main chimney and try an awkward exit that way. You need to be there.
Let's finally look at the most common route up the ridge. The Jern
Dihedral to the Friction Pitch.

Climber just below the Jern Dihedral


Many climbers use protection on the Lower Exum Ridge and then free-solo the upper ridge. This young woman is soloing past other climbers who are waiting on their lead to set a belay. The climbers below us (using the green rope) were using an approach from the Western Chimney area.


Soloing the Jern
The Jern Dihedral is named after climbing guide Ken Jern. He slipped on
ice and fell 50 feet down its face. You can
watch Ken point out the location
in the soloing video we highlighted above. The moniker for the Jern Dihedral used to be the "double cracks" as
two cracks run along its western wall. There's a long history of
features in the Tetons taking on the names of people who have a special
relationship with said feature, and sometimes that involves an accident
or death. The Double Cracks along the eastern crest are a different line to reach the Friction Pitch.
.JPG)
This photo was taken from the western crest of the Jern Dihedral.

Jern Dihedral on left, Friction Pitch on right
The three climbers in the Jern are soloing. The Double Cracks just below the Friction Pitch are shown above and below...

The Double Cracks on the eastern crest
Sticky shoes are helpful
Sticky shoes are helpful
Let's look at the Friction Pitch..
.JPG)
The photographer is on the Double Cracks line. The Puff-n-Grunt is to the right of the ridge crest. The crux of the Friction Pitch is very short, just a couple moves. The climber in the red shirt is approaching it.
.JPG)
This climber is using the Knob Line and moving right off the top knob (by bottom foot). There are two knobs that many climbers use before entering the friction zone. Some move left from the knobs, some right. Both are common. Neither better. When you're on
the rock, your perspective is different. The footholds seem less secure.
The depressions smaller. The angle steeper. Death closer.
"A Climber's Guide to the Teton Range" and both of Richard Rossiter books, "Teton Classics: 50 Selected Climbs in Grand Teton National Park", and "Best Climbs Grand Teton National Park", suggest going up from the knobs and "right to a shallow grove and upward to the top of the slab."
In the book
"Teton Rock Climbs" by Aaron Gams, he suggests that going left off the knob is the
better option. Climbers are all over the place on the friction zone so don't feel tied to any one line. With sticky shoes all lines are pretty similar.


The two knobs - not the best perspective
If you're standing on the top knob with an outstretched arm in front of you, you may find a nice fingertip hold between 10 and 2 o'clock. That hold will help you move into the 'shallow grove' if you move right, also good for going left. There's also a nice fingertip hold at arm's length to the left at 9 o'clock — more likely to be used by climbers left of the Knob Line but sometimes used by climbers moving left. You might be able to palm the edge of the Vaginal Line (discussed below) if you move left.
The above climber stays to the west of the topmost knob (used only as a handhold). He used the bottom knob as a foothold. He stays closer to the Vaginal Line to his left. Many climbers use the upper knob as a foothold to get a little higher on the slope before they commit to the friction section.
Usually, the real crux of the Friction Pitch is in your mind if you have sticky rubber underfoot. And, for the record, people have climbed the ridge in trail running shoes, work boots, bare feet, and whatever old-timers used in the 1930s. Of course, if it's icy, it's just dangerous. Wet rock isn't much better.
The Friction Pitch is often rated as a 5.5 pitch. Some rate it at 5.4. If you're the guy slipping down the rock in the next video, you may have a very different opinion. You wouldn't be alone. The climber's bible upped the class rating for the Friction Pitch to 5.6 in the 2023 edition. Maybe everything seems harder for Renny. Maybe everyone was complaining. Maybe he saw people struggling. We don't know.
This climber slips three times on the Friction Pitch (37 seconds)
The gentleman who slips is at a more difficult location (slightly harder without grippy shoes), and he's at a more dangerous location (edge of the crest). It's unclear how sticky his soles are. He moves away from the edge of the crest and ends up by the knobs. He had no further problems off the Knob Line.
.JPG)
We usually go left from the upper knob and don't even think about where we're planting our left foot. We may use the fingertip holds to maintain balance. That helps if the wind's blowing.
On June 25, James McDonald, Larry Susanka and Dan Sola were climbing the Exum Ridge in icy conditions during a storm. Sola fell while leading the Friction Pitch with crampons on icy rock. He was blown over backwards by a gust of wind. But, that's not the best part of the story. The park's medical PA, Lanny Johnson, talked them through a dislocated shoulder reduction and they self-rescued.
On July 26, 2003, at 3:35pm, lightning struck the ridge and fatally injured Erica Summers (27) while climbing the Friction Pitch. One of her partners, Rod Liberal, was having trouble with the now wet, smooth rock. He was about halfway up when lightning struck and blew him off the ridge, swinging him about 30 feet. He survived.
Around 11:30 on August 5, 1999, Ranger Janet Wilts and Chris Goodhue were struck by lightning at the top of the Friction Pitch. Wilts reported that the lightning entered her right elbow, traveled down her arm, and exited her right thumb and forefinger, with accompanying numbness, tingling, and weakness. Goodhue reported that the lightning entered her buttocks, traveled down her right leg, and exited her middle toe, leaving a small exit wound.
Around 11:30 on August 5, 1999, Ranger Janet Wilts and Chris Goodhue were struck by lightning at the top of the Friction Pitch. Wilts reported that the lightning entered her right elbow, traveled down her arm, and exited her right thumb and forefinger, with accompanying numbness, tingling, and weakness. Goodhue reported that the lightning entered her buttocks, traveled down her right leg, and exited her middle toe, leaving a small exit wound.
Let's take a quick look at the Vaginal Line.

Western side of Friction Pitch
The area west of the Vaginal Line provides good rock for climbing but it's
rarely used. The obvious crack runs to a fatter
crack that's just out of view. This lower crack/face is not for the beginner climber.


Inside the Vaginal Line
Just a different line. Plenty of
small depressions. We once got a boot stuck in the vaginal line and had fun popping it out. Classic mistake. The knob line might be best if you are using mountaineering boots.

The Vaginal Line
Some climbers will move rightward onto a narrow foothold instead of traveling through the slot.
The next few pics were taken from just above the area where protection options are limited, and holds are mostly friction.

At this point, the photographer is on a small ledge just above the faith-based part of the Friction Pitch. There's an
old piton just to the west of the photographer that some will clip into ... test it if you use it.
.JPG)
Hmmm. Still holding up in 2025


Soloing off the knob line

Small ledge above crux


Ellen soloing with speed up the FP crux on Labor Day 2025

Friction Pitch - past the friction zone.
(Puff-n-Grunt Dihedral on climber's right)

Friction Pitch - approaching the top

The
Notch Gully
 Notch Gully - looking back down
Climb the western ridgeline above the Friction Pitch or run up the gully to the east - both easy. The ridgeline
is a great option with sketchy snow in the gully.

This is the gully that drains into the Friction-Pitch Bypass chimney.

The common line out of the Notch Gully is an easy scramble up some
rock to the east (see picture).
Off Route Variation and Escape Option:
Off Route Variation and Escape Option:
Another variation leaves the notch and climbs the exposed face below an escape ledge. Test your holds! Regain the ridgeline at the south end of the ledge if you go that way. That exposed variation is a fun climb on blocky rocks but it's probably not for beginners. It's not hard, it's just more dangerous. Loose rocks on the face and ledge could dislodge due to rope drag so some climbers may wish to avoid it. Stick to the most common exit if you're looking for the safest line. The safer line will also get you to the escape ledge if you actually need to escape the ridge.
All of the escape options above here take you to the Owen-Spalding Route.

Escape options

The escape ledge below the V-Pitch
The escape ledge to the Owen-Spalding route is easy 4th and low 5th class scrambling over many loose rocks.


Overview - just above the Notch Gully
The access to the escape ledge will be fairly obvious if you're looking for it.
It's not obvious if you don't know about it. Black-colored rock litters the ground at the southern end of the ledge where it meets the ridgeline.
Another Off Route Variation:
Another Off Route Variation:

If you're really bored with all
the 5.5 climbing, head for the escape ledge just above the Notch Gully and find the 5.7 chimney with a
chockstone. It takes you to another ledge higher up that runs back toward the ridgeline to gain the V-Pitch. This is the top of the 5.8 West Face of the Exum Ridge climbing route which Bob Merriam and Dick Pownall put up in 1954. A 5.8 move is above the 5.7 chimney on that route if you climb the face.
Bob Merriam was another victim of a lightning strike on this mountain while guiding a mom and her teenage daughter up the Grand. He was on the mountain's upper horizontal ridgeline. It knocked him unconscious to the horror of his clients.
Back to the standard route....
Back to the standard route....

The approach to the V-Pitch was the location of one of the more perplexing free-soloing
accidents in recent history.
On August 8, 2014, 60-year-old Steve Markusen's last memory
was "of climbing the easy slabs to the exposed so-named “V Pitch,” at 10:00
a.m.". He was found by other climbers standing on his feet and wobbling with
three broken ribs, a punctured lung, a lacerated spleen, and lacerations
that ultimately required 42 stitches and staples. It's not known what
caused the accident.
Steve might have been hit by falling rock but the odds seem low given the area. Ice seems unlikely. The easiest lines are not difficult to climb (mostly scrambling). Perhaps he choose a challenging line and slipped. Those lines are usually easy to spot if he wanted to avoid them. It's quite possible he just lost his balance and fell hard. It's a mystery. This was Steve's 3rd time up the ridge solo and he was an experienced climber. He first climbed the Grand with his dad Dave Markusen in 1969. As they say, anything can happen anytime, anywhere. 54-year-old Conrad Anker had a heart attack while climbing at 20,000 feet.
Steve might have been hit by falling rock but the odds seem low given the area. Ice seems unlikely. The easiest lines are not difficult to climb (mostly scrambling). Perhaps he choose a challenging line and slipped. Those lines are usually easy to spot if he wanted to avoid them. It's quite possible he just lost his balance and fell hard. It's a mystery. This was Steve's 3rd time up the ridge solo and he was an experienced climber. He first climbed the Grand with his dad Dave Markusen in 1969. As they say, anything can happen anytime, anywhere. 54-year-old Conrad Anker had a heart attack while climbing at 20,000 feet.

The crack variation is probably easier than the V-Pitch when it's dry, but the V-Pitch isn't very difficult. Variations further east of the bypass crack
are mostly used to go under the eastern aspect of the ridgeline and are
considered off-route variations.

.JPG)
View to the SW
The climbers are approaching the V-Pitch. We're below the
eastern aspect of the summit ridgeline climbing slabs. We're off route.

The V-Pitch - center right
The snow in June can be sketchy on this face. It depends upon the weather, time of day, etc.

Soloing the V-Pitch

Unsoeld's Lieback
Unsoeld's Lieback runs along the eastern crest of the V-Pitch (sticky shoes helpful). The bypass crack and the V-Pitch might be covered in snow (or filled w/ ice) during the start of the summer season. The lieback is usually the first thing to burn off.

Another look
.JPG)
V-Pitch

Take time to enjoy the views

The western aspect above the V-Pitch
The yellow route is another escape route off the Exum Ridge. There are times when five
minutes can be the difference between life and death on this
mountain especially with incoming weather. The ability to quickly escape the upper mountain is an asset for soloing parties who can do so safely. It's not just the threat of thunderstorms, sometimes it's falling temperatures and a wet mountain. Quite suddenly, ice can be everywhere with an incoming cold front, or after the sun sets.

West-Leaning Chimney
The friction slabs below the prow are a little sketchier than they look. Climbers have taken slips there as they try an eastern approach to bypass the West-Leaning Chimney. And some have taken falls on the eastern variation...
 West-Leaning Chimney
.JPG) Better than ice but still awkward
Better than ice but still awkward
.JPG)
The West-Leaning Chimney has many many names: Petzoldt's Lieback, Black Alcove, West-Leaning Crack, etc. The Jackson Hole Mountain Guides like to call it The Dark Side.
The
West-Leaning Chimney has an oddball collection of holds to choose from. One might use lieback, friction,
and stemming moves to get up
it. It's awkward if slick. This area does stay shaded for much of the morning so icing is more common here than on the sunny parts of the ridge. Getting up the West-Leaning Chimney with a large backpack limits climbing
maneuvers. That can make life a living hell in a tight space if it's really icy.
If that's the case, climbers can always scramble down the
broad western escape ledge to reach Sargent's Chimney on the
Owen-Spalding route. Takes just a minute or so. That option adds a
little extra time to reach the summit but not too much for a soloing
climber. The Owen-Spalding might be in far worse shape than the Exum if
you find ice here.
Variations usually avoided by climbers:
On the right
side of the photo is an option to access the ridgeline for stronger climbers along the prow. BTW, there's an old rap station a short distance atop the prow.
The friction slabs below the prow are a little sketchier than they look. Climbers have taken slips there as they try an eastern approach to bypass the West-Leaning Chimney. And some have taken falls on the eastern variation...
Russ Soderlund was above the V-Pitch when he decided to go
down the 5.4 friction slabs to the eastern side of the ridge. After passing the
slabs, he slipped while navigating the eastern aspect and fell into the Ford
Couloir, stopping at a point about 60 meters above the Petzoldt Ridge where he
was found dead.
Back to the regular route....JPG)
.JPG)
Exiting the West-Leaning Chimney
The West-Leaning Chimney has many many names: Petzoldt's Lieback, Black Alcove, West-Leaning Crack, etc. The Jackson Hole Mountain Guides like to call it The Dark Side.

An oddball collection of handholds are to her right, some deep inside the void. It's a little puzzle when dry or wet.

Climbers heading for the ridgeline after leaving the WLC
After
getting above the West-Leaning Chimney, climbers are usually heading east toward the
ridgeline which will take them to the
Boulder Problem in the Sky.

Instead of heading directly for the ridgeline after exiting the
West-Leaning Chimney, you can also head for the L-Shaped Rock. This feature has
also been called the V-slot. The Boulder Problem in the Sky's southern jam crack is on the ridgeline directly above the L-Shaped Rock. It's the crux of the BPITS.
A gully on the north side of the L-Shaped Rock is sometimes used as a bypass to avoid the Boulder Problem in the Sky. You'll scramble down to the gully and look for a place to safely cross the gully. Sometimes that's easier said than done.

Exiting the bypass under the Boulder Problem in the Sky.
This bypass can be really slow going with icy conditions. This area is shaded for much of the day.

Looking toward the BPITS from the L-Shaped Rock
Just head for the ridgeline.

Another look
The BPITS's bypass is not highlighted


Boulder Problem in the Sky's Southern Jam Crack

Boulder Problem in the Sky's Southern Jam Crack
 Many ways to ascend.
The short face with the crack faces southeast and it has exposure to the southeast.

Take your time and examine all your options. The climbing guide is making the easiest start to the ascent. If you're tall enough to reach the edge, it's helpful.
There's no way this is a 5.6 climb in our mind. But, Renny Jackson changed it to 5.6 in the 4th edition of his guidebook.
There's no way this is a 5.6 climb in our mind. But, Renny Jackson changed it to 5.6 in the 4th edition of his guidebook.

David at the Boulder Problem in the Sky's Southern Jam Crack

Alex and Gage
This dip may challenge a small child but there's another line of attack to the east (left side of image) that will work for a small child on a short rope.
At some point before the 2022 climbing season, the Boulder Problem In The Sky shed some rock features above the southern crack. Such activity can leave unstable rocks in its wake. One is highlighted in the above picture. We made the mistake of brushing against that rock and it started to wobble. It was later stabilized to some degree afterward.

Looking back at climbers exiting the BPITS
You might see climbers to the northwest while approaching and leaving the BPITS. They're most likely on the Owen-Spalding Route.
Exum Mountain Guides had a group of high school students on the ridgeline when a blast of white lightning shot through the air. They hightailed it for the Owen rappel. Sometimes clouds pass by with a whisper of cool air and nothing else. Other times, they catch you off guard with a bolt out of the blue. Quite often, you can feel and hear the electricity in the air before strikes. If you do, it may be too late for you.
Exum Mountain Guides had a group of high school students on the ridgeline when a blast of white lightning shot through the air. They hightailed it for the Owen rappel. Sometimes clouds pass by with a whisper of cool air and nothing else. Other times, they catch you off guard with a bolt out of the blue. Quite often, you can feel and hear the electricity in the air before strikes. If you do, it may be too late for you.

The summit ridgeline
Run along the ridgeline and go under the eastern aspect of
the Horse
to gain the summit. When dry, this may be the easiest path for kids. Or, cross
over to the Owen-Spalding route in front of the Horse (go left) and approach the summit from the western side. That's usually quicker for us when dry. You can
also climb the Horse (start on the SW side by a detached rock) but few climbers do. Many are mentally or physically exhausted and just want to reach the summit ASAP.

Eastern Aspect Summit Ridgeline
The next picture shows a common path to the summit under the eastern aspect of the Horse......
Scramble to the summit and enjoy the views.

The Owen-Spalding (purple route) is highlighted to the bottom of Sargent's Chimney. Green lines are OS variations. Gold lines are possible travel lines for Upper Exum climbers and one highlights an escape to Sargent's Chimney. The "Crux BPITS" text is highlighting the location of the Boulder Problem in the Sky's jam crack.

FYI: Bailing via the
Ford,
Chevy
&
Stettner Couloir
can be a gamble and it's
not recommended. Most narrow couloirs should
be avoided during bad weather due to runoff, and they should be avoided
when high temperatures may cause flushing. Flushing can include rocks, snow, ice, and water. Some couloirs can hold ice and snow all year long. It can be very difficult to avoid hazards from above such as avalanches or rockfall.
The Ford Couloir is named after 25-year-old Fred Ford who lost his life in the couloir after being struck by two large blocks of ice and a rock. Ford was struck in the head by the ice and struck on an arm by the rock. What followed after that resulted in his death.
The Ford Couloir is named after 25-year-old Fred Ford who lost his life in the couloir after being struck by two large blocks of ice and a rock. Ford was struck in the head by the ice and struck on an arm by the rock. What followed after that resulted in his death.

Every so often, someone will be eschewing clothes on the summit. Well-known locals and out-of-townees have snapped birthday-suit photos and posted them on social media. It's not exactly normalized but don't be surprised if you're up here often.
The Grand has been skied in the same manner. Couples have been married and gotten engaged on the summit. Look closely and you may find a lost engagement ring. No doubt someone has made whoopee on the summit. There's probably a record for the most attempts. It's Jackson Hole.
Glenn Exum is credited with taking the first pictures of people on the summit sans clothes.

Looking South
.JPG)
Looking NW into Cascade Canyon

Jackson & Jenny Lake, Teewinot etc

Jackson Lake at upper right

South

Pano

Little hazy

Pano
Little hazy
If you're traveling under darkness, you may see a surprising amount of particulate matter in the beam of your headlamp. Sometimes it's windblown dust from Idaho. It's probably more common during harvest or planting season. Sometimes it's wildfire smoke. Often it's just localized particulate matter. During periods of heavy smoke, it's not worth climbing the Grand.

Eastern lakes & canyons below summit
The Grand's Second Tower lost a large part of its summit spire in 2022, and again in 2025.....

Second Tower

Another look at the lakes to the east
~ The Downclimb ~
 The Main Rap area AKA Owen Rappel
As previously mentioned, descending the entire Owen-Spalding route is what most free-soloing climbers do. That's also the backup plan for roped parties when they can't use the Owen Rappel to reach the Upper Saddle (compromised rope, lost gear, too many people waiting
in bad weather — has happened). It can be downclimbed with a pretty short
rope if you need protection and you still have some rope. It's quicker for most soloing parties to downclimb the entire route than use the rap when everything's dry.
Let's look at the rappel back to the Upper Saddle, AKA the Owen Rappel.
Most roped parties will use a dynamic 60m rope thrown south from the main rappel's sling. The longest drop is stamped "40m" from the
bolted
chain. The rap off the sling is shorter but you'll still want to throw your rope to the south. The landing zone slopes
downhill so the distance to the Upper Saddle varies from different
setups. The 70' rappel is funky and rarely used but it's an alternative.

.jpg)
Click to enlarge

If you click on the image from a PC's browser, the bigger full-sized link will open up. On a phone, Apple, etc, you may need to tap the image and select the option to open the LINK (not image) in a new tab to see the full-size image.

NW & West Aspect - Click to enlarge


Click to enlarge images

Southern Aspect & Exum Ridge
Click to enlarge
Click to enlarge

~~~~~~~~~~~~~
A few trip reports for April through October
~~~~~~~~~~~~~~~
Kids & Seniors

1) the exact location of the injured party
2) the time of the accident
3) the nature and extent of injuries & medical care being provided
4) equipment at the scene (ropes, hardware, first-aid kit, etc.)
5) the number of people with the injured party
6) the plan of action (if any)
~~~~~~~~~~~~~~~~
Kids & Seniors

Maybe
Most
single-digit kids would rather visit McDonald's than be sugar-drugged
up this mountain. But, kids start skiing and climbing seconds after
birth in Jackson Hole and there's a long history of attention-seeking
adults in the Tetons who supercharge these activities.
6-year-old Beo Charette climbed the Upper Exum Ridge in 2014, and claimed the record for the youngest person to summit via the Exum route. Jimmy Chin's
7-year-old daughter
Marina climbed the Upper Exum route in 2021. That's her in the above screenshot from a CBS Sunday Morning show. Supposedly (we haven't corroborated the claim), Leigh
Ortenburger's daughter
Carolyn previously held the girls' age record on the Grand Teton
after climbing the Exum Ridge at the age of seven in '69 or '70. Between 1956
& 1958,
Jeff Lowe
(age 7),
Greg Lowe
(age 8), and
Mike Lowe
(age 10) all climbed the Exum Ridge with their father
Ralph. Those are just a few of the many kids who have climbed (to various degrees) the Exum route.
Peter Eubank climbed the Owen-Spalding route (your descent) at the age of 6. We mention that because it's sometimes reported that he was 5-years-old. However, after some digging into several sources, it seems that he climbed Teewinot at 5, not the Grand. Peter's family has had notable ripped-from-the-headlines life experiences that span the globe so he certainly wasn't your average kid. Nonetheless, if someone's bringing their 5-year-old preschooler on the Grand, it's probably all about the adult's needs and desires instead of the kid's age-appropriate needs & desires.
Peter Eubank climbed the Owen-Spalding route (your descent) at the age of 6. We mention that because it's sometimes reported that he was 5-years-old. However, after some digging into several sources, it seems that he climbed Teewinot at 5, not the Grand. Peter's family has had notable ripped-from-the-headlines life experiences that span the globe so he certainly wasn't your average kid. Nonetheless, if someone's bringing their 5-year-old preschooler on the Grand, it's probably all about the adult's needs and desires instead of the kid's age-appropriate needs & desires.
Highlighting the youngest or oldest to do something in the Tetons has a long history. The Salt Lake Telegram proclaimed 10-year-old Fred Eriksson of Stockholm, Sweden, was the youngest to summit the Grand on August 27th, 1934, and Dr John H. Strong (76) as the oldest. Climbing at 76 is pretty uncommon but Paul Horton
and
Irene Beardsley
climbed the Exum Ridge the day before her 76th birthday
back in 2011. Former JHMR owner 81-year-old Connie Kemmerer and her 81-year-old long-time climbing partner Kay Wilson climbed the Grand's Owen-Spalding route with Exum Mtn Guides in 2025. We find that way more impressive than most ascents by very
young kids.
Climbing permits are not required as of 2026.
The park's climbing rangers provide search and rescue services at no charge to visitors. You can join the local community in supporting these services by making a donation to the Grand Teton National Park Foundation, a 501(c)3 non-profit organization, which administers the Jenny Lake Rangers Fund. Or make a donation directly to the park for those services.
~ Best time for Soloing ~
We sometimes post updates about conditions to our Wyoming Whiskey Home Page. Before social media took off, we climbed weekly and posted weekly updates. There's less of a need nowadays. It's always useful to keep tabs on valley rainfall, upper-elevation temperatures, and valley webcams leading up to a climb.
Jenny Lake Climbing Rangers
The Jenny Lake ranger station is staffed by the Jenny Lake climbing rangers. Most of the rangers are very familiar with the Grand's moderate routes and
some are familiar with the most challenging routes in the range. They post updates about backcountry conditions to Instagram.
Climbers who are backcountry camping must pick up their backcountry camping permits at the Jenny Lake ranger station when it's open during the summer.
The climbing rangers might be hard to reach by phone but you can try calling them: 307-739-3343 — summer only. Or, stop by the ranger station if you're in GTNP. The ranger station is open 8 to 5pm daily (map). Their opening and closing dates change yearly. They usually open in early June and close in early September. Off-season info: 307-739-3399.
Climbing permits are not required as of 2026.
The park's climbing rangers provide search and rescue services at no charge to visitors. You can join the local community in supporting these services by making a donation to the Grand Teton National Park Foundation, a 501(c)3 non-profit organization, which administers the Jenny Lake Rangers Fund. Or make a donation directly to the park for those services.
~ Best time for Soloing ~
The
best time for soloing is usually between mid-July and mid to late
August. Varies yearly. Of course, fresh snow and ice can cover the mountain at
any time of year. The Tetons got hammered with 6 feet of snow at the Lower Saddle in July of 1993.
You'll always find mixed conditions on the Upper Exum in June. The degree to which those conditions affect climbers toward the end of the month and into early July depends upon the weather. It's common to find remnants of winter snow and ice on the Upper Exum in early July, and conditions on the Owen-Spalding may be far worse.
You'll always find mixed conditions on the Upper Exum in June. The degree to which those conditions affect climbers toward the end of the month and into early July depends upon the weather. It's common to find remnants of winter snow and ice on the Upper Exum in early July, and conditions on the Owen-Spalding may be far worse.
September's conditions are less
predictable than June's but you should be prepared for greater
challenges with each passing week. It's not unusual to start September
with fresh snow or ice. It might clean up in a day or stick around.
Sometimes the weather and conditions cycle between good and bad well
into October.
~ Conditions ~
Besides the climbing rangers Instagram account, there's always Mountain Project's forums for beta about conditions. Local sources include the AAC Climber's Ranch, Teton Mountaineering, Black Diamond, and Teton County's climbing gym at the Rec Center.
The trailhead is a great source of beta as climbers return from a
climb. You will certainly cross paths with descending climbers on your
way into Garnet Canyon during summer daylight hours. If you live here,
just ask
around. The Teton Climbers’ Coalition might be another resource if you attend one of their events.
We sometimes post updates about conditions to our Wyoming Whiskey Home Page. Before social media took off, we climbed weekly and posted weekly updates. There's less of a need nowadays. It's always useful to keep tabs on valley rainfall, upper-elevation temperatures, and valley webcams leading up to a climb.
Weather
 Lower Saddle Weather Station 11,600'
*** NWS Hourly Lower Saddle Forecast 11,600'
Mulit-Day Lower Saddle Forecast
Forecast Discussion Western WY
^A Must-Read For Climbers^
Forecast Discussion Eastern ID
Jackson KJAC Dashboard
NWS Forecast: GTNP / JXN
~ SUMMER ONLY ~
(usually mid-June to mid-Sept)
(usually mid-June to mid-Sept)
The seasonal Lower Saddle's station was offline for the entire 2025 summer.
MesoWest
provides us with the Lower Saddle weather data. If its servers are down
for maintenance during the summer, try the National Weather Service's Lower Saddle weather page. The saddle's station is
dismantled around mid-September once the summer climbing season wraps up. Examine another high-elevation weather station at that time.
*** NWS Hourly Lower Saddle Forecast 11,600'
Mulit-Day Lower Saddle Forecast
Forecast Discussion Western WY
^A Must-Read For Climbers^
Forecast Discussion Eastern ID
Jackson KJAC Dashboard
NWS Forecast: GTNP / JXN
Lower Saddle Weather Station 11,600'
(Summer Only^^)
A summer forecast is good for about 6 hours. This is especially true if there's any instability in the atmosphere. Even within 6 hours, there's
often too much vagueness and uncertainty to ascertain real threats and
timelines. Because none
can make the call on exactly when, or if, vague threats will
materialize, alpine climbers are reading the weather as they travel. Most get an early start to avoid localized
precipitation due to orographic lift which tends to develop in the afternoon & early
evening hours. That common threat is not always in a forecast.
You may want to reconsider your plans if the forecast discussion mentions monsoon moisture, low pressure or a cold front hitting the range.
Emergency Contacts
307-739-3301
GTNP Emergency Dispatch
GTNP Emergency Dispatch
(Open 24/7, June 1 to Sept 30)
GTNP's Emergency Dispatch Center
is open 24 hours every day during the summer high season
(usually June 1 - Sept. 30). Outside of the high season, hours are 6 a.m. to 10 p.m.
(subject to change).
911 works for voice calls and texting in Teton County, WY & ID, 24/7/365. Calls go
to the Teton County Sheriff's dispatch center, not the park's dispatch
center. If you're closer to an Idaho cellular tower, your voice call or text message might
be transferred to the Teton County, Idaho, dispatch center.
1) the exact location of the injured party
2) the time of the accident
3) the nature and extent of injuries & medical care being provided
4) equipment at the scene (ropes, hardware, first-aid kit, etc.)
5) the number of people with the injured party
6) the plan of action (if any)
625 E. Broadway
(east of Town Square)
(east of Town Square)
307-733-3636
Open 24/7
(south end of town)
307-739-8999
Open 9am to 6pm
Hrs subject to change
Closed Thanksgiving & Christmas
Route Details - Owen-Spalding
The Approach to the Lower Saddle
Wyoming Whiskey Home Page
~~~~~~~~~~~~~~~~~~
1947
Silent Film of Glen Exum, Paul Petzoldt, and Virginia Garner on the Upper
Exum
Virginia's husband, Raymond C. Garner shot the movie which stands out
as an impressive effort for a non-commercial climbing film. The original
16 mm version of
The Mountain
is in the National Archives.
According to the
Academic Film Archive of North America, Ray Garner began his photographic career in 1935, filming Boy Scouts
(or assistant scout masters) on a climbing expedition in the
Tetons, calling the film "The Mountaineers Club Teton Expedition". Unfortunately, that film has been lost. Ray wasn't just a filmmaker
who dabbled in climbing. He was an outstanding climber for his time. He
also
guided with the Petzoldt-Exum guide service. Two years after making this film, in 1949,
Dick Pownall, Ray Garner and
Art Gilkey
made the first ascent of the iconic IV 5.8 North Face of the Grand
Teton, which soon became one of the "50 Classic Climbs of North America" (perhaps less 'classic' today).
Ray was also a member of the American Alpine Club, leading climbs in
North America, Europe, and Africa. Ray and
Virginia
(sometimes Jinny or Ginny) were blazing an unusual path through
life. Evidence of their adventures shows up in unexpected places. The
Virginia Park in Canyonlands National Park
was named for Virginia. She was made an honorary Tuskegee airman after
being taught to fly by members of
the famed African-American combat unit. Virginia's diary of her time working on the
Africa Motion Picture Project was turned into a book called
Images Out Of Africa. And the
Central Arizona Mountain Rescue SAR team
traces its beginnings back to the 1940s when
Ray and Virginia
were
climbing in the southwest.
One of the best parts of the above film is watching the three climbers slide and run down the snow fields at the end. Their summit register includes Howard Friedman, a former member of the renowned 10th Mountain Division and a photographer for Life Magazine and Sports Illustrated. Howard was also on the first ascent of the very popular North Ridge Italian Cracks variation. He spent many years climbing in the Tetons. We're guessing that Howard helped Ray with the filming. While climbing, Paul, Glenn and Virginia look like your typical slightly-out-of-their-element guided climbers that one sees every summer in the Tetons. At one point, Virginia takes what looks like a staged slip over rock as the film cuts to a calm Glenn Exum.
One of the best parts of the above film is watching the three climbers slide and run down the snow fields at the end. Their summit register includes Howard Friedman, a former member of the renowned 10th Mountain Division and a photographer for Life Magazine and Sports Illustrated. Howard was also on the first ascent of the very popular North Ridge Italian Cracks variation. He spent many years climbing in the Tetons. We're guessing that Howard helped Ray with the filming. While climbing, Paul, Glenn and Virginia look like your typical slightly-out-of-their-element guided climbers that one sees every summer in the Tetons. At one point, Virginia takes what looks like a staged slip over rock as the film cuts to a calm Glenn Exum.

The first known filming of an ascent on the
Grand was in 1930 when Paul Petzoldt guided a party of three men to the
summit and they "Took 'movies' all the way".
Where those movies ended up is a mystery. A year later in 1931, Paul Petzoldt led a group on the Upper Exum while newly minted Grand Teton National Park ranger
George L. Waters III filmed their climb. You can watch the short, grainy 1931 Grand Teton climbing video
on
Forrest McCarthy's YouTube channel. Alpinist magazine covered
the video's backstory.
All of our route images may be used without permission or attribution
for all not-for-profit purposes.
If you wish to print any of our pages into a PDF file, try the Chrome
browser (prints long PDF's better than some other browsers). Also,
choose to print "background graphics" (or "print backgrounds" in
Firefox). Our site is designed for the dark backgrounds. And you may
wish to try the "legal" paper size in portrait mode to better
accommodate the larger images.
Enjoy Safe Climbing