Images in order of appearance on July 17th, 2016.....
(except for the flowers)
Upper Exum's Puff-n-Grunt Variation
 Sign at Lupine Meadows Trailhead
 Click to enlarge


 Looking back toward the switchbacks that rise above Spalding Falls.
 Lower Saddle as seen from the Morainal Camping Zone

 Fixed Rope at the Lower Saddle's headwall

 Looking up at the Grand
 These climbers wanted to take the bootpack down the saddle's headwall
 The Central Rib's Needle at center above the Black Dike

 We followed the green route behind the Needle and over the Central Rib at its Lower Crossover.


 The Needle's Chockstone Chimney - far right
 Runner's Slab - a variation to access to Chockstone Chimney.
Below the slab is a small ledge that is a common entry/exit from the chimney.

They are just above the Briggs' Slab. The Chockstone Chimney is below the photographer.

 View from the eastern aspect of the Central Rib after passing the Lower Crossover


 Wall Street's Step Across.
 Golden Stair - we skipped this and climbed cracks around the corner to the NE just for kicks.
 We climbed this crack around the corner from the GS.
This variation is considered to be a little harder than the Golden Stair.
 Cracks...go even further to the NE for another crack if you want an even bigger challenge.
 Wind Tunnel's boulder problems

 Looking back south from the Wind Tunnel's access entrance.
 Wind Tunnel's boulder problems
 WT Boulder Problems - far left side of gully (west side)
 Wind Tunnel Gully
 Looking back down


 Carman's Pinnacle - detour along Exum Ridge in Wind Tunnel Gully
Several pictures of the Puff-n-Grunt follow.
If you want to see the traditional route, see June 19 post.
 Puff-N-Grunt (Maybe 5.6ish or so at a short crux, easier bypass on right)
 Puff-N-Grunt
 Puff-N-Grunt
 Puff-N-Grunt
 Puff-N-Grunt
 Puff-N-Grunt
 Puff-N-Grunt
 Puff-N-Grunt
 Puff-N-Grunt
 Last pic of Puff-N-Grunt
There are two cruxy moves in the PNG. The crux is a short and slightly overhanging block.
 Zoom view back to Lower Saddle

 A FP bypass on west side of ridge (harder)
 Notch Gully.
 V-Pitch at ridge top.
This is the view from the top of the gully at the notch in the ridgeline.
 Approach to VP
 Looking past the Ford Couloir
 Looking past the Dartmouth Basin

 Looking past the Dartmouth Basin
 Approach to V-Pitch.
 V-Pitch
 VP
VP
 VP
VP
 West-Leaning Chimney Crack Slab (in sunshine).
 Looking back at the approach between the V-Pitch to WLC
 Boulder Problem In The Sky - Looking back south.
 Looking north toward the Horse.
 Horse
Horse
 Horse
Horse

 Eastern aspect just below summit.

 Summit
 Downclimb

Click to enlarge
 Heading down the Owen-Spalding...western aspect.
 Ledge above Slabby Wall
 Narrow ledge above the southern half of the Slabby Wall
 Slabby Wall - Center crack points to summit and Sargent's.
The Horse (center-right) is a false summit above the Slabby Wall.
 Area at the top of Sargent's Chimney
 Hidden Exit just in front of photographer
Top of Sargent's in background.

 Three Stooges
 Chute at the top of Hidden Exit
 Sargent's Rap at the top of Sargent's main chimney
 SC
SC
 Ice above Sargent's Rap

 Middle of the Hidden Exit - see ice....
 .....and after removing ice with a loose rock
 Looking down at the bottom of Sargent's. The Main Rap Overlook is that square-shaped rock near the top-left of the photo.
 Sargent's Chimney - stay left (north) to access the Hidden Exit. Main chimney & rap line is on right.

Sargent's wide base
 Owen Chimney
 OC
OC
 Owen Chimney
 Main Rap to Upper Saddle area

 Downclimb / scramble to Catwalk
 Looking back at Sargent's from Main Rap Overlook
 Catwalk
 Catwalk
 Looking back at scramble to / from the Main Rap Overlook.
 Catwalk
 Looking toward Double Chimney from Catwalk.
 Owen Chimney Bypass Crack - right
 Owen Chimney

 Bottom of Owen Chimney. That snow was sketchy.
 Owen Chimney
 Upper exit from Double Chimney
 Looking down at the DC
 Scramble to Catwalk
 Looking into the Double Chimney....
 DC's Open-V on left, Tunnel on right side under flake.
 DC Tunnel on right, Open 'V' on left.
 Open-'V' & tunnel of Double Chimney
 DC's Tunnel and Open-V

 Middle of the Double Chimney
 Looking down at the access to the 2nd Entrance of the DC
 2nd Entrance DC
 2nd Entrance of DC on left - view toward the Crawl
 Access to the 2nd Entrance of the DC
 1st Entrance of the Double Chimney
 Crawl
Crawl
 The Crawl
 The Crawl and access to the Double Chimney - looking back.
 Ledge between the Crawl & Belly Roll
 BIC - north side of the Upper Saddle
 Valhalla Canyon
 A little percip fell.
 Belly Roll as seen from above
 NE corner of the Upper Saddle by Belly Roll (unseen)
 Belly Roll

 Secondary Rappel to the Upper Saddle - corner crack on left side.
 Main Rappel line near center-right of image
 Exit of Upper Saddle's upper eastern side
 Southern exit off the eastern side of the Upper Saddle
 Exposure below the Belly Roll & Double Chimney
 The Belly Roll is up there somewhere...near top.
 Looking back at the access to the eastern side of the Upper Saddle
 Exit off the Upper Saddle. Afterwards, follow the western side of the
Central Rib and not the drainage below the Exum ridge.
 Western side of the Central Rib
 The Patio at the top of the Central Rib

 Bowl-like opening in the Central Rib
 Owen-Spalding Couloir - main drainage on far right. Access to BRC at far left.
 Central Rib's Black Rock Chimney
 Steppy ramp to exit the Black Rock Chimney - head west during descent
 Lower access to the Central Rib's Black Rock Chimney is by the smooth slab.
 Central Rib & bench
 Scramble to/from the Black Rock Chimney just below the smooth slab.
 Looking toward the Lower Crossover

 View toward the Eye Of The Needle

 EOTN
EOTN
 EOTN
EOTN
 Southern exit from the Eye of the Needle
 View toward Briggs' Slab (center right) from CC.
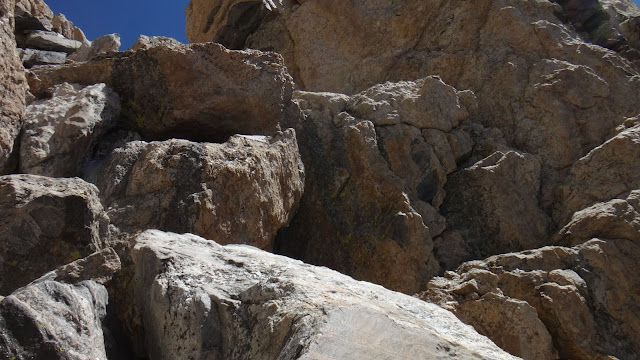
 Chockstone Chimney - NE Corner by 'headwall'.
 Runners' Slab by Chockstone Chimney


 Cliff Creek Fire
 The Needle at center. Black Dike foreground.
 View from Lower Saddle

 South aspect of Grand
 View toward the Fixed Rope.
 Fixed Rope
 Lower Saddle's Fixed Rope
 View east from the Moraines
 View from climbers' trail toward the Meadows.
 View of the Caves Camping Zone from above
 South Fork of Garnet Canyon.
Climbers take the North Fork.
 The Meadows in Garnet Canyon
 Garnet Creek


(except for the flowers)
Upper Exum's Puff-n-Grunt Variation


1st Boulder Field next to Garnet Creek (AKA Bradley Creek)
This is where trail disappears for 100' or so. Overall, you're heading southwest to regain the trail by the creek. The boulder field is 4.1 miles from the Lupine Meadows Trailhead. After passing the boulders, you're back on the trail and heading toward the Meadows' Camping Zone. Do not cross the creek at the camping zone. The summer trail stays on the north side of the creek.

Looking back at the Meadows Camping Zone (Garnet Canyon - not Lupine) from the top of Spalding Falls. At the top of the falls is a source of fresh spring water.


Looking back toward the Fixed Rope area (slightly right of center).
The Fixed Rope is on the south side of the saddle's Northern Buttress. It's at the corner where a drainage off the buttress is located.


The Chockstone Chimney is at the most-western side of the Needle. It's the only gently slanting chimney at that location. It looks easier than it is but it isn't too difficult either. With ice it can get pretty sketchy. Many climbers use the ledge & slab system to the left to bypass the lower chimney. Some will skip the chimney and use the Briggs' Slab, etc.

Below the slab is a small ledge that is a common entry/exit from the chimney.

The only other climbers heading up at noon.
They are just above the Briggs' Slab. The Chockstone Chimney is below the photographer.

Above the Briggs' Slab
This is an extension of the Chockstone Chimney which leads to the Central Rib's Lower Crossover to Wall Street.


Click to enlarge


Most climbers go around the corner. Almost nobody steps or jumps across the gap. You can take a lower ledge or an upper ledge to work your way around the corner. The lower ledge is safer if the wind is blowing hard ...in our opinion.


This variation is considered to be a little harder than the Golden Stair.


We just climbed over these rocks and back down this side to access the Wind Tunnel's entrance. You approach the entrance from above. The photographer is at the bottom of a tall tower-like wall that is part of the Exum ridgeline. It's behind him. You don't climb the massive 'tower'. You turn east at the base of it and take a V-shaped opening to access the Wind Tunnel.
Looking back at the picture: climbers can going around either side of this rock feature, or over the tippy top. The exposed western approach is almost never used but it is a good line.

This is near the middle of the boulders in the lower section of the Wind Tunnel. The Wind Tunnel's gully turns into a ridgeline as you climb out of it.

We climbed this icy mess but you can get past the last of the Wind Tunnel's boulder problems by staying on the far right side of the gully. It's not an obvious line but it was probably easier than this.


We took the Puff-n-Grunt Dihedral. It's the corner crack near the center of the image. The Friction Pitch starts near the top of the image (center-left). It runs above the left side of the Puff-n-Grunt Dihedral. The Friction Pitch Bypass Chimney is on the right side of the image.

Several pictures of the Puff-n-Grunt follow.
If you want to see the traditional route, see June 19 post.


There are two cruxy moves in the PNG. The crux is a short and slightly overhanging block.


After climbing out of the PNG, we headed west to look at conditions. This is a view of a variation to the west of the Friction Pitch.

This is part of the same gully that holds the PNG and the FP Bypass. This picture is above those features. You can stay on the ridgeline to the left, or run up the gully.

This is the view from the top of the gully at the notch in the ridgeline.


The V-Pitch Bypass Crack is plugged with snow. The crack shown to the left of the snow leads to VP.


We are above the V-Pitch and at the southern end of the summit ridgeline. There are several variations here but the West-Leaning Chimney is the quickest to reach the summit ridgeline. The WLC starts where the shade and sunlight meet in the above image on the western aspect of the ridgeline (left side of image).

Escape options: A ledge system to the right (west) takes you to the Main Rappel to the Upper Saddle. It's an easy escape off the Upper Exum Ridge. Follow the ledge system to a low point and you will be just below Sargent's Chimney. The rap will be near the end of a drainage to your left (west). The Main Rappel Overlook is a blockish diving board overlooking the Upper Saddle. Just to its north is the Owen-Spalding's Catwalk.


Most climbers bypass the Horse and head under it to the east to reach the summit. You can head for the western aspect and climb it if you wish. You can also head west here and meet up with the Owen-Spalding route.


Click to enlarge


The Horse (center-right) is a false summit above the Slabby Wall.

Folow the ledge in front of the photographer to Sargent's main chimney. Sargent's Hidden exit is right in front of the photographer - chute at center-botttom-right.

Top of Sargent's in background.


Looking back at the Three Stooges - stay north on ascent. It's a straight shot to the Slabby Wall & summit but many climbers zig-zag their way around a few features.


Sargent's wide base


We skipped the OC and headed for the Main Rap to the Upper Saddle. From there we scrambled to the Catwalk and climbed down to the Double Chimney, etc.


You can scramble / climb this rock to reach the Catwalk from the DC. While downclimbing we access the 1st opening in the Owen Chimney and downclimb that (our preference) to reach the DC.


View toward the scramble / climb to the Catwalk from just above the Double Chimney. You can also access the Catwalk from the 1st opening in the Owen Chimney.


Central Rib and not the drainage below the Exum ridge.


This is the upper access to the Central Rib's Black Rock Chimney - by larger snow patch. A drainage toward Wall Street is on the left (east) by small snow patch.


This is the drainage above Chockstone Chimney (or a continuation of the CC) that leads to the Central Rib's Lower Crossover to Wall Street.


Looking down the NE corner of the Chockstone Chimney. Follow the drainage up to the Lower Crossover to Wall Street. Briggs Slab is at bottom right of drainage and just above 'headwall' of CC.


You can take a ledge out to the south or climb up the headwall. If you follow the drainage line out of the NE corner (just above snow) it will take you directly to the Central Rib's Lower Crossover to Wall Street


West side of the Central Rib's Needle by the Chockstone Chimney (unseen). This area is usually icy or wet.


Climbers take the North Fork.


A few trip reports for April through October
July 17th, 2016 (UXM) PNG Variation
Detailed Look At Specific Route Features
All images may be used without permission or attribution for all not-for-profit purposes.
Enjoy Safe Climbing