August 9th 2015
~~~~~~~~~~~~~~~~~
In order of appearance.


The trail leading into Garnet Canyon

Early morning fog

Bradley Lake


The last switchback leading into Garnet Canyon has an easy grade.


Climbers' trail inside Garnet Canyon - looking back east

The 1st Boulder Field
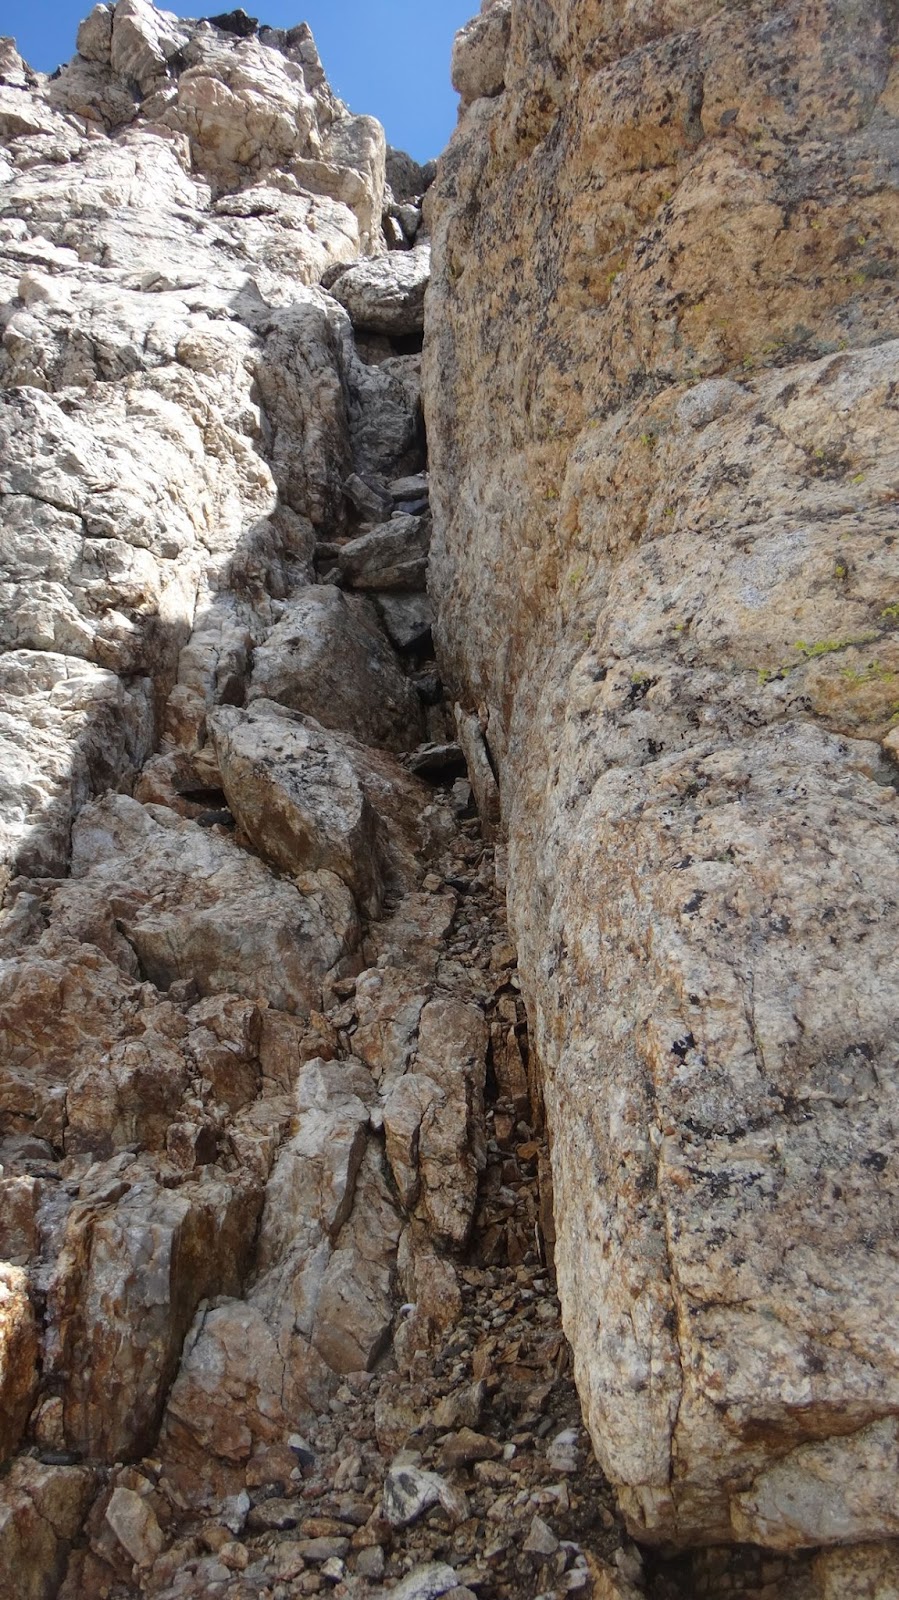
You can scramble anywhere but there are some dead-end routes by the creek. There is a common route that guides and locals take. You can see it in a little more detail here. The trail restarts to the climbers SW and next to the creek.

The middle of the1st Boulder Field.

Leaving the 1st Boulder Field. The trail is by the creek.

Entering 1st Boulder Field on descent.
Creek is on far right.
Creek is on far right.

Garnet Creek


Climbers' Trail

Middle Teton


The Meadows Camping Zone.

The Middle, Spalding Falls, Grand Teton

The Meadows in Garnet Canyon.

Enjoying the view

If you're headed for the Grand, do not cross the creek. Early in the season, climbers can go anywhere they want over the snowfields. Most early-season climbers will take a route up the Meadows' headwall near the NE aspect of the Middle Teton. They avoid the area by the summer trail if snow covers everything. Some skiers will head that way to reach Teepe Pillar or Glacier Gulch. It all depends upon conditions. If you slip on the snow by the summer route, you could go over the cliffs to your south. Keep in mind that water undercuts the snow in several places along the headwall and makes for some serious hazards.

The summer climbers' trail runs below Spalding Falls and it's north of the creek.

Spalding Falls - Garnet Canyon - Climbers on switchbacks.
The summer trail runs to the top of Spalding Falls via a bunch of switchbacks and stairs. Eventually, the trail takes you to the spring that feeds the falls.


South Fork of Garnet Canyon - Middle Teton Route.
This area sees a fair amount of rockfall so choose your route carefully if you're headed for the south col of the Middle Teton.

The Meadows
Seen from the climbers' trail which takes you to the Grand Teton's Lower Saddle via the North Fork of Garnet Canyon.


The Petzoldt's Caves Camping Zone is by the trees. This is near the top of Spalding Falls. We drink the spring water unfiltered.

Picnic Rock by the spring that feeds SF.


Spalding Falls - Garnet Canyon's Meadows below.

Spring water is by the sign. Again, this is by the top of Spalding Falls and by the Petzoldt's Caves Camping Zone.

Petzoldt's Caves Camping Zone - one of several campsites. One camping spot is above the spring feeding Spalding Falls & under a boulder. There are some very small 'caves' that you might fit in but most people just set up a tent on the flat open ground.

Looking back down at Garnet Canyon's Meadows


Backside of PCCZ by trees.
A climber slipped off the cliff and died in 2014 while looking for a camp site. There's a funky 'cave' campsite that's behind the photographer and not really recommended - by the drainage - but you never know when you might need emergency shelter.

S. Fork GC

Disappointment Peak - right side.

Middle Teton NE face.

Upper Switchbacks

Man climbing below Disappointment Peak.


Looking toward the Jackson Hole Mountain Guide's Corbet High Camp. They are by Teepe Glacier & Teepe Pillar.

The Grand Teton's Lower Saddle, the Moraines, the MT Glacier.

Sign by trail
Just after exiting the 2nd Boulder Field, you will see this sign by the trail. A camping spot is nearby.
Just after exiting the 2nd Boulder Field, you will see this sign by the trail. A camping spot is nearby.

The Second Boulder Field.
As you approach the 2nd Boulder Field during the ascent the trail will disappear. Keep walking for 40 feet or so into the boulders. Just before the biggest boulder, look for the campsite & the Morainal Camping Zone sign to your south. Scramble to the south (downhill) and regain the trail by the sign.

View back east toward the sign and the 2nd Boulder Field.

Morainal Camping Zone
Many of the camping spots are easy to miss. The camping locations blend in with the environment. Some are just out of view from the climber's trail. They are to your left and right.


View east. Moraines.


Lower Saddle's headwall.
The Fixed Rope on the Lower Saddle's headwall is at the SW corner of the reddish Northern Buttress. The climbers' trail takes you right to it. Climbers will use a bootpack up the headwall until the Fixed Rope clears of snow. After ascending the Fixed Rope, climbers head for the toe of the Middle Teton as it sits on the saddle. In other words, they will head to the S-SW across the face of the headwall. Do not climb directly above the Fixed Rope during the high season. It's too easy to kick rocks loose on climbers below.

Middle Teton Glacier


Looking back at the MCZ.

Do not climb the area to the north of the Fixed Rope. The reddish outcropping and the couloir to the far north have Bad Rock, Rockfall Hazards, Avalanche Hazards, and Sloppy Scree. Sure, you can head that way but it's not advised. If you live in the valley, it may be a good idea to get a feel for the options in case you need to alter a route in the future. Again, it's really easy to kick rocks on climbers below you. Those climbers won't like you. We will try variations on the reddish northern buttress during the shoulder season if no one else is around. It's a challenge to move efficiently if you don't know your way and it's truly loaded with some patches of crappy rock.


The early season bootpack can still be seen on the left side of the photo. Some years, the bootpack is used well into August. That's not common.

Fixed Rope area.

View back down the North Fork of Garnet Canyon.

MT Glacier


The Fixed Rope
It's fairly easy to climb up & down the headwall without using the rope. Keep in mind that this area is a drainage and that rockfall is more likely when water is flowing. Again, wet or dry, always be prepared for rockfall cause by other climbers. The rope is a great aid when this area is icy or wet. It can be icy at any time of year.


Looking back. Climbers heading for the Fixed Rope.

The water hose makes it easier to fill a hydration pack. This hose is in a drainage near the eastern-most camping spot on the Lower Saddle and near where the photographer is standing in the photo below. Many climbers touch the hose with their bare hands. The water may be clean but climbers' hands are probably not so clean. Let the water fall into you hydration pack or water bottle. Avoid placing a possibly contaminated hose into a bottle. Wash your hands here. We always drink this water unfiltered.

The Lower Saddle
The sign is by trail. A camping spot is by the big boulder on the right side of photo. The water hose is by the photographer. PLEASE: pee on the WESTERN side of the saddle. Not here. Protect the water sources for others below you. And keep it smelling natural.

View of the southern aspect of the Grand Teton.
The crest of the Lower Saddle runs toward the Central Rib's Needle. Climbers will head for the western side of the Needle.


The Needle.
The Needle is at the base of the Central Rib. Climbers stay to the west of the Needle and then head to the east after passing it to gain the Central Rib's Bench.


Eastern-most camping spot.

Bear Boxes, or more likely Marmot boxes.
Marmots & pikas live at the saddle. Bears and foxes have been seen crossing the saddle.
Marmots & pikas live at the saddle. Bears and foxes have been seen crossing the saddle.

Camping Spot

Lower Saddle Weather Station

Gear Hanger by camping area.

National Park Service hut & Exum Mountain Guides hut. These are not public facilities. A rest-stop is on the western side of the saddle. Some camping spots are also on the western side. The rest stop is not a toilet even though the sign says so. It is a place to pee but all other human waste must be packed off the saddle.

It's no longer a toilet - just a 'rest stop' to use a 'rest-stop' bag.

A trail runs up the crest of the saddle directly toward the Needle.

You must pack human waste out of Garnet Canyon. Pee on the western side of the saddle. Again, there are camping spots on the western side.

Dartmouth Basin - looking west toward Idaho.

Dartmouth Basin - looking NW

Looking toward the Vahalla Traverse

Red Rock Rib

Looking toward Middle Teton's north aspect.

Black Dike

Click to enlarge

Click to enlarge
Some common options...

The Needle - Black Dike - Exum Ridge - Enclosure SW ridge


Looking back toward the saddle.


Ice is often on the western side of the Needle. Don't let it freak you out. Don't get thinking that the entire mtn is going to be covered in ice just because this area is. It is a drainage/seepage area and it is often shaded so it may have lots of ice. Of course, sometimes everything is covered in ice around the Central Rib. Higher elevations may have snow that's easier to manage.

Needle's Chockstone Chimney - on your right (western side of the Needle)
You can climb directly up it or climb the slabby rock on the north side of the chimney to get past the lower section. You can also bypass the chimney and go further up the main drainage to gain the Briggs' Slab (the most common guided option). There are many many variations to gain the Central Rib's Bench. Some parties will bypass the bench altogether but they usually end up in a rockfall terrain trap or nasty conditions in the main couloir.

The drainage (Owen-Spalding Couloir).
The Lower Western Rib is to the west (left) of the photographer. The Chockstone Chimney is on the far right.

Chockstone Chimney - far right, OS Couloir - left.

The headwall at the top of the Chockstone Chimney.
You can take an easy ledge out to the south or climb the headwall. There is an easy 'ramp' that takes you out of the chimney but it's kind of hidden in this image. The Briggs Slab is at the very top left side of the photo. You can only see the southern side of the Briggs' Slab. There are many variations in and around the chimney & the Briggs Slab. Most people just take the chimney to the Eye of the Needle, or they use the Briggs' Slab.

The Briggs Slab center-right.

Climber just left (NW) of the Briggs Slab.
He is actually in front of the Cracks of Doom. The Chockstone Chimney is directly below the photographer.

Eye of the Needle

EOTN - Natural tunnel

Looking back at the exit from the EOTN

The 'Belly Roll Almost' is on the bottom left side of the photo.

Once out of the Chockstone, or off the Briggs Slab, you will find a small gully that takes you to the Central Rib's Lower Crossover which is used by Upper Exum climbers to reach Wall Street. The small gully or drainage is just an extension of the Chockstone Chimney and it runs 'behind' (on the north side of) the Needle.

The Central Rib's Bench.
The elevated slope above the OS Couloir is the bench.

The Central Rib's Bench - a scramble above the main drainage to the west.

On the Central Rib's Bench looking back toward the EOTN. OS Couloir is on right.
The bench is not level! It's an elevated sloping bench. Elevated above the drainage to the west.
The bench is not level! It's an elevated sloping bench. Elevated above the drainage to the west.

Looking back down toward the Eye, etc

Looking at the 'backside' of the Central Rib's Needle.
The Lower Crossover to Wall Street is just 'behind' (north of) the Needle. The Upper Crossover is at a small saddle on the Central Rib just above the Lower Crossover.

The Central Rib - loking east.
The top left saddle is the Upper Crossover to Wall Street for UXM climbers. The Lower Crossover is at the bottom right 'saddle'

The black colored rock is by the Black Rock Chimney.

Looking up the Central Rib
Access to the Central Rib's Black Rock Chimney is by the reddish orange smooth slab facing west along the Central Rib.


People on top of the Middle Teton.

Access to the Black Rock Chimney is at the very north end of the slabby area - center right.

Looking back down the 'bench'

Access to the Black Rock Chimney
The slabby rock is next to the access to the Central Rib's Black Rock Chimney. Access to the BRC is via a short chimney 2 feet north of the slab. After the very very short chimney, you turn east and go up a steppy ramp heading toward the ridge. At the top of the ramp, climb the black colored rock on the western aspect until you top out into a bowl-like opening and drainage to your east (right).
You can also climb the black-colored rock just to the west of the BRC - it's just another variation in the same area that can be useful under poor conditions.
You can also climb the black-colored rock just to the west of the BRC - it's just another variation in the same area that can be useful under poor conditions.

Black Rock Chimney

BRC

Wall Street as seen from the upper exit from the BRC.

At a 'break' in the Central Rib.
This bowl-like opening is at the upper exit from the BRC. A drainage runs to the east toward the Exum Gully / Wall Street Couloir. Just follow the Central Rib until you can easily scramble to the Upper Saddle.

Looking back at the upper exit form the BRC
The upper exit from the BRC at this 'saddle-like' opening. The drainage to WSC / EG is unseen to left (east).

The upper section of the Central Rib.
Say near the western aspect of the rib - near its base until the rib disappears into the scree. After that head to the NE to reach an obvious saddle (not seen above).

Looking back toward the drainage to the WSC / EG (left), and access to the upper exit from the BRC is near the end of the slight ridgeline on the right.

Upper Saddle. Main Rap in background.

Upper Saddle

Looking NW toward the Belly Roll
This is the view from the lower western end of the Upper Saddle. The upper eastern side of the Upper Saddle has a slight exposed challenge before you find yourself below the main rappel.

Approach to Belly Roll - as seen from below.
Zoomed view
Zoomed view

The Belly Roll is at the NE corner of the saddle
Zoomed view
Zoomed view

Looking at the Main Rappel and the eastern side of the Upper Saddle

View Northish from the lower western side of the Upper Saddle.
Looking across Cascade Canyon
Looking across Cascade Canyon


Middle Teton

View Southish

Climbers heading down the saddle
The Upper Saddle slopes downhill from east to west. You need to reach the higher eastern side from the lower western side.

One variation runs by the exposed northern side of the Upper Saddle. It runs up the snowy crack/drainage in the center of this picture.

Looking back from the Upper Saddle.

Climbers in the middle of the US

Climb over this flake/boulder on the southern side of the Upper Saddle.
This is the most common approach line on the southern side of the Upper Saddle. This feature is at the Upper Saddle's SE corner. This stem move over a flake trips up a few climbers. It is exposed on its south side. If you fall, you will go into the Exum Gully. Mary “Mimi” Conley Bilyeu fell out of sight and to her death at this location. You need be very careful while walking on the sloppy scree. Just to the left (north) of the flake is a seam that is sometimes climbed instead of this flake.

Southern exposure.

Southern Exposure

Approach to the flake - seen from above

The Enclosure as seen from the Upper Saddle

The Main Rap area

Looking back at the Middle Teton.


Overview of the Owen-Spalding Route

The Upper Saddle
Stay along the NE wall to reach the Belly Roll.

Some nice August ice.

Main Rap area.

Approach to the Belly Roll.

Approach to the Belly Roll.


Exit from the Crawl at the access to the Double Chimney.

First entrance to the Double Chimney.
Further north is the Second Entrance.
This entrance requires a pull-up move.

A little icy at the 1st Entrance

Looking at the access to the Second Entrance of the DC.

2nd Entrance of DC
Looking back toward the Crawl and looking at the access to the Double Chimney. The 2nd Entrance is shown on the left side of the photo. We do not have any ice gear. There were dry holds & the snow was sticky snow for the most part. It was not exactly safe but it could be safely climbed. It helps to know the route and all the variations. Additionally it helps to have experience with slick conditions.

Inside the Second Entrance.

Inside the middle of the DC. Tunnel and Open-'V' variations.

Tunnel

A very dangerous exit from the Double Chimney if you lack ice tools or crampons. Lucky for us, we had a screwdriver to chip away at the ice. You can always use a loose rock to chip at icy rock.

Nasty

This area can be tricky when it's icy or slick but the snow was fairly sticky.
This is the slabby rock between the Owen Chimney and the Double Chimney. We are looking back at the exit from the DC.

The Owen Chimney

The Owen Chimney

The Catwalk.

Catwalk

Main Rap staging area - sling and bolt.

Looking back at the scramble off the south end of the Catwalk to reach the Main Rap area. From the rap, it's an easy scramble to Sargent's Chimney.

Main Rap Overlook - the squarish rock outcropping. The actual rappel area is to the south.

Looking up toward Sargent's Chimney - center left.


Looking back from inside the lower half of Sargent's Chimney - looking NW toward the Owen Chimney.

Looking back from inside the lower half of Sargent's Chimney - looking SW toward the Main Rap area.

Sargent's - looking toward Hidden Exit

Sargent's - Looking up the Main Chimney, Hidden Exit at left.

Sargent's

Hidden exit to the north about mid-way into Sargent's.
Climb the NW corner crack

Part of the alternate exit (Hidden Exit) from SC & on north side of SC.


Part of the alternate exit from SC & on north side of SC.

The final scramble to the summit - follow straight line toward the Slabby Wall (unseen). You can switchback around stuff.

Looking toward the 'regular' exit from Sargent's Main Chimney and the rap location at the top of SC.

SC's Rap.

Looking down SC - the main chimney channel.
We took the alternate exit and did not come up the entire chimney. It's not too hard to climb up this area when it's dry but climbers may be rapping down it. It's more sketchy free-soloing down it than up it.


The Three Stooges.
Stay just to the north of until you reach the slabby wall. You're on a straight path. The line runs directly to the summit. The 'line' to the Slabby Wall is a pretty obvious path of least resistance. You can zig-zag around some features but you are on a fairly straight path. again stay just to the north of the Three Stooges (three squarish blocks of rock).

Looming back down toward Sargent's Chimney.

Slabby Wall. Climb it or switchback around it to the SE.

SW - center crack points toward summit and back toward Sargent's

Switchback option

South end of the Slabby Wall.
The Horse is at the top of the image. It's a false summit. You don't go above there, you go about 50 feet north of there to reach the actual summit.

Slabby Wall profile

The narrow ledge directly above the Slabby Wall.


Summit


View of the Horse just south of the summit.

View toward GT's East Ridge.


View toward Middle Teton.

The SW approach just below the summit.

Cascade Canyon

View toward Mt. Moran.


Delta Lake

Surprise & Amphitheater Lakes

Bradly & Taggart Lakes.


Frank Spalding's name carved on summit.


View down Sargent's alternate route - the Hidden Exit.

Part of the alternate exit from Sargent's Chimney.

Middle of Sargent's Chimney by the alternate exit.

Sargent's Chimney

View toward the main rappel to the Upper Saddle from Sargent's Chimney.

View of the exit from the top of the Owen Chimney.

View toward Sargent's Chimney after exiting the Owen Chimney.

View of the ledge leading south toward the main rappel area. We are just above the Owen Chimney and below Sargent's Chimney. The ledge system runs between the Exum Ridge and the Great West Chimney.

Catwalk area - odd angle hides slab.


The Owen-Chimney Bypass Chimney.

First 'opening' in the Owen Chimney - access to the Owen Bypass & the northern tip of the Catwalk.

Owen Chimney on left, Owen-Chimney Bypass on right.

Owen Chimney - very botttom.

Double Chimney's northern bypass - looking toward the Great West Chimney. Seen from the bottom of the Owen Chimney. Not a normal part of the OS Route and it's harder.

Exit off north ridge to reach the Upper Saddle.
This isn't part of the OS Route.

Access to the Double Chimney on descent as seen from the bottom of the Owen Chimney. When icy, the dip into the Double Chimney can be very hazardous if you lack crampons. You can take part of the DC Bypass for a short distance to access the top of the DC from the north. It's not necessarily better but it is an option. Knowing all the little variations on this mountain makes it easier to navigate when conditions are poor.

Looking back up the Owen Chimney.

Alternate approach to the Catwalk. We are on the slabby rock just above the Double Chimney. You scramble SE up this rock after exiting the Double Chimney.

Bottom of Owen Chimney.

Northern slot of the Double Chimney.
The tunnel in under this.

Access to the DC's tunnel. Many climbers use the Open-'V' two feet just to the south (unseen)

Looking back at the SE scramble to reach the Catwalk after exiting the DC. You can also climb up the Owen Chimney and exit at the first opening.

Looking back toward the Owen Chimney and SE scramble to Catwalk.

Double Chimney's Open-'V',

The access to the DC as seen from the Second Entrance of the DC.
Looking toward the Crawl.

Looking back up the Second Entrance of the Double Chimney.


Ledge below the access to the Double Chimney.

First Entrance to the Double Chimney.

Shower of water at the north end of the Crawl.

Looking back at the Crawl and access to the Double Chimney.

Looking toward the Belly Roll and Upper Saddle - looking south.

The Belly Roll rock jammed in the cleavage.

Lower Saddle


A few trip reports for April through October
July 17th, 2016 (UXM) PNG Variation
Overview - Upper Exum
Overview - Owen-Spalding
Detailed Look At Specific Route Features
All images may be used without permission or attribution for all not-for-profit purposes.
Enjoy Safe Climbing