The Owen-Spalding Climb
This is the quickest, safest, and easiest climb on
the Grand Teton when the route is dry and the weather is perfect. Under those conditions it's a suitable objective for many athletes who wish to climb this mountain without a rope in a single day. Previous climbing experience is not a prerequisite but it isn't for everybody. It demands agility, finesse, and vigilance.
The Jenny Lake Climbing Rangers believe that "climbers should not attempt a one-day ascent of the Grand Teton without prior experience on this LARGE mountain and familiarity with technical ascents in the Teton Range" and they warn that "soloists have been injured or killed attempting these routes."
.jpg)
The second party to summit the Grand Teton (2nd verified party) had no knowledge of the area, no similar climbing experience, and no gear. They free-soloed the Owen-Spalding route in a single day back when there was no climbers' trail, no guidebook and no internet. Quin Blackburn, Dave DeLap, and Andy DePirro did that in 1923. It stands to reason that more than a few people can follow in their footsteps with the resources available today. Indeed, many do. As Renny Jackson says in his Guide to the Teton Range, soloing in a day is "commonplace during the summer when the route is dry." And as to the first one-day ascent, he says it "was in the finest of traditions: a small, light expedition that shunned all notoriety."

While you don't need to be an "accomplished athlete" to climb the Grand Teton, it helps. Safely soloing this mountain in a single day requires aerobic fitness, muscle endurance, agility, coordination, strength, flexibility, and balance. It also helps to be acclimated to the elevation.
A climber on a multi-day guided trip doesn't require the same level of fitness but it's far easier and more enjoyable if you're fit. Having said that, this mountain has been climbed by blind people, 6-year-olds, climbers in their 80s, people missing an arm or leg, an adult with Down syndrome, and out-of-shape flatlanders with no climbing experience whatsoever. Most are guided by friends or the park's climbing concessionaires. And most of the referenced people should never free solo or try a round-trip in a single day. Not everyone on a guided trip will summit—the guides are quick to recommend an alternative if the conditions or the clients aren't in the best of shape.
Free-soloing this route under mixed conditions is not recommended. The difficulty & danger increases as does the time needed to get up and down the mountain. Of course, a little bit of snow, ice or wet rock is pretty common. Some climbers can manage those conditions with ease. Professional guides have misjudged the hazards & died on this route so don't make the decision to solo under mixed conditions lightly.
The Rangers occasionally post updates on conditions to Instagram. Our homepage sometimes has updates and news. You can keep track of the forecast for the Lower Saddle & the summit's forecast to get a feel for any changes to the conditions. If the Lower Saddle's weather station is up and running, it will share wind speeds, temps and dew point data.
It's impossible for us to know how easy the climb will be for you, how well you will manage the hazards, or how elastic your comfort zone will be. And nothing we say can convey the experience quite like being there in person. If you're looking for bubble-wrapped adventures, visit Six Flags Magic Mountain.
It's impossible for us to know how easy the climb will be for you, how well you will manage the hazards, or how elastic your comfort zone will be. And nothing we say can convey the experience quite like being there in person. If you're looking for bubble-wrapped adventures, visit Six Flags Magic Mountain.

There's less than 300 feet of climbing that might test
your natural abilities. Some of that climbing goes by a
large drop-off. It causes more than a few people to reconsider their plans. The Owen-Spalding is a Class 5.4 climb on the YDS scale of difficulty when dry, "suitable for beginners."
For the record, people often shorten the name of the Owen-Spalding route to the "OS", saying the "O" "S" when speaking. It's also common to hear "The Owen".
The Approach
Visit our webpage for The Hike to the Grand Teton's Lower Saddle if you need more details about the approach than what follows. It has tips and info not covered here. Just south of Jenny Lake in GTNP is the Lupine Meadows Rd which takes you to the Lupine Meadows Trailhead. Almost everyone starts their trip from there. It's 21 miles from the Town of Jackson.

Water
is found at many places along the trail. About 5 miles in, the
climbers' trail crosses the
source of spring water feeding Spalding Falls. We always make sure to
have enough water to get there. The water below
the
falls may need filtering because too many people use the landscape as a toilet.
The South Jenny Lake Store has a free outdoor water filling station if you need some clean tap water before leaving the trailhead.
The elevations shown on the above image are based on an out-of-date datum. The official NGS elevation of the Grand Teton is 13,775 ft. It's also outdated. It's common to see 13,781' on many online maps but the Feds haven't officially released a new elevation.
Local surveyor and climber Rich Greenwood
got an opportunity to take a Trimble 4000ST GPS receiver up the mountain in October of '91. You can read about their adventures and the original Grand Teton surveys in a PDF file of the article published by Point of Beginning Magazine in 1992. Newer Topographic Lidar Surveys have taken place over GTNP. They're available online.
Assuming you're walking fast & traveling light, these are common split times and distances from the Lupine Meadows trailhead to the Lower Saddle for athletes:
First Junction: 30 minutes, 0.5 hrs total, 1.7 miles
Second Junction: 30 minutes, 1 hr total, 3 miles
Platforms Camping Zone: 4.1 miles
Platforms Camping Zone: 4.1 miles
Meadows Camping Zone: 30 minutes, 1.5 hrs total, 4.5 miles
Caves Camping Zone: 5.2 miles
Moraines Camping Zone: 5.9 miles to sign
Lower Saddle: 60 minutes, 2.5 hrs total, 6.4 miles 2.6 mph
Caves Camping Zone: 5.2 miles
Moraines Camping Zone: 5.9 miles to sign
Lower Saddle: 60 minutes, 2.5 hrs total, 6.4 miles 2.6 mph
Summit: time varies with skill, fitness and route knowledge
(The distances are estimated from GPS tracks)
(The distances are estimated from GPS tracks)
It's
2,175 vertical feet to the summit from the Lower Saddle. The slope
distance is longer and some climbers do more zigzagging than others. It's also possible that roped parties are delayed behind other parties on the Owen-Spalding route so the time needed to reach the summit is always unknown.
A handful of runners reach the Grand's summit in under 2 hours from the
trailhead. Local athletes regularly reach the summit in under 3.5 hours just by walking at a very fast clip. Many parties take 24 hours to make a single-day round-trip. None knows how long it will take you.
Conditions, acclimation, skill set, fitness, injuries, age, route knowledge, weather, hydration, fuel, sleep, mental state and gear all play a part in how fast you'll move. The rangers warn that some climbers using protection have taken 10 hours to reach the summit from the 11,600' Lower Saddle.
The distances shown above are close to the map distances shown on p.266 of Renny's 2023 guidebook. However, on p.525 of Renny's guidebook, he says "the Lower Saddle is about 7.5 miles from the valley floor." Clearly a mismatch nobody corrected. It's not the only questionable distance. Exum Mountain Guides said it's "over 7,000-feet and approximately 8 miles" to the summit on their website in 2025, with a "strenuous seven-mile, 5,000-foot hike to the Lower Saddle" from the trailhead. We recorded a 16.18 mile round-trip on an outdated NPS-issued Garmin handheld GPS back in 2017. In the 2nd edition of Select Peaks of Greater Yellowstone, Tom had a distance of 10 miles to the summit along the OS route. That was Tom's best guesstimate when he wrote the 1st edition, and it remained unchanged in 2023's 2nd edition.
The distances shown above are close to the map distances shown on p.266 of Renny's 2023 guidebook. However, on p.525 of Renny's guidebook, he says "the Lower Saddle is about 7.5 miles from the valley floor." Clearly a mismatch nobody corrected. It's not the only questionable distance. Exum Mountain Guides said it's "over 7,000-feet and approximately 8 miles" to the summit on their website in 2025, with a "strenuous seven-mile, 5,000-foot hike to the Lower Saddle" from the trailhead. We recorded a 16.18 mile round-trip on an outdated NPS-issued Garmin handheld GPS back in 2017. In the 2nd edition of Select Peaks of Greater Yellowstone, Tom had a distance of 10 miles to the summit along the OS route. That was Tom's best guesstimate when he wrote the 1st edition, and it remained unchanged in 2023's 2nd edition.
BTW, Garmin's first GPS watch came out in 2003, the same year as Tom's 1st edition of Select Peaks. The iPhone came out in 2007. The output of a GPS watch's calculations can vary due to many factors including the number of usable satellites, user's speed, route choices, barometer vs GPS elevation, etc.

Strava tracks to lower saddle
More Garnet Canyon Data from GAIA GPS
Traveling under darkness is a bigger challenge if you don't know the area. It's not a foolproof approach. People do get off trail during daylight hours but it's less common. Be wary of letting partners run ahead or lag behind. Every year this doesn't work out well for one or more of the party members.

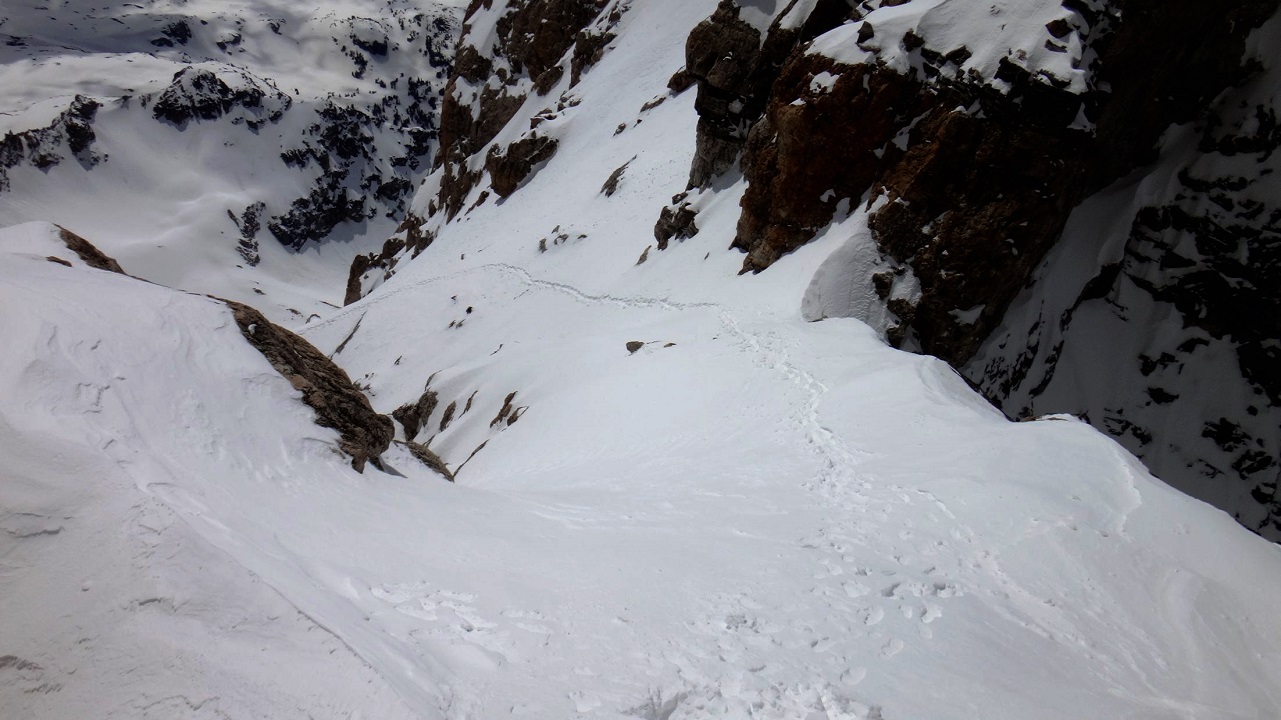
The dry summer trail to the Lower Saddle disappears for over 200 feet at two boulder fields (see above map). The trail resumes to your southwest on the ascent. Much of Garnet Canyon is a giant boulder & talus field but some areas are more bouldery than others.
The trail disappears in an insignificant way for a short distance in several locations. Usually, the trail continues just in front of you. Take the path of least resistance.

Click to Enlarge
%20(2).jpg) Meadows Headwall - Springtime
Meadows Headwall - Springtime
 Trail above the Meadows Camping Zone

Climbers use a bootpack to gain the top of the Lower Saddle as we enter the summer season, and sometimes well into the summer season. The bootpack can change from icy to perfect to a sloppy mess in a single day. An ice axe may be necessary. Maybe crampons. Some also use hiking poles.
There's a rope that's affixed to the saddle's headwall. It's used once the snow burns off the saddle's trails. The "opening date" varies each year but it's usually in July, often by mid-July. In 2011, it was the 2nd week of August (big snow year). In 2025, the fixed rope was being used during the 4th week of June.
The guides use their own rope to belay clients at the headwall.

~~~~~~~~~~
Never remove any hiking poles or ropes from this area. They are not abandoned, just set aside.


.JPG)
Climbers typically ascend the Meadows Headwall closer to the Middle Teton's NE aspect when winter snow covers
the canyon's floor. They usually avoid the summer trail by Spalding Falls because it's considered to have an elevated threat level. Either way, all areas have elevated threats with snow underfoot.
Snow and ice are the most common variables in backcountry rescues and deaths in Grand Teton National Park. Know how to travel over snow. Do not underestimate the threats be it on the approach or a climb. Avalanche hazards must be mitigated during the winter and spring. Avalanches have occurred at other times such as early November but they're less common. Wait for the trails to dry up if you wish to limit your exposure to summer snow.
Snow and ice are the most common variables in backcountry rescues and deaths in Grand Teton National Park. Know how to travel over snow. Do not underestimate the threats be it on the approach or a climb. Avalanche hazards must be mitigated during the winter and spring. Avalanches have occurred at other times such as early November but they're less common. Wait for the trails to dry up if you wish to limit your exposure to summer snow.
%20(2).jpg)
Parts of the Grand Teton's Lower Saddle can be seen from a few areas as you approach the Meadows Camping Zone but the Lower Saddle mostly hides behind the Meadows Headwall.

Shortcutting the switchbacks just above the Meadows (to the right of Spalding Falls) contributes to erosion, rockfall, and damages
sensitive vegetation. Stay on well-traveled paths whenever possible for everyone's safety and to protect park resources. Above the falls, it's best to stay on the trail when it's safe to do so.
You may see side trails just above and just below the top of Spalding Falls (or Caves Camping Zone). Some trails go to climbing areas like Irene's Arete. Others are used to avoid early-season snow. Some side trails are so braided that it's impossible to know the outcome of choosing any one spur—and some have sketchy sections.

Lower Saddle Headwall - June
Climbers use a bootpack to gain the top of the Lower Saddle as we enter the summer season, and sometimes well into the summer season. The bootpack can change from icy to perfect to a sloppy mess in a single day. An ice axe may be necessary. Maybe crampons. Some also use hiking poles.
There's a rope that's affixed to the saddle's headwall. It's used once the snow burns off the saddle's trails. The "opening date" varies each year but it's usually in July, often by mid-July. In 2011, it was the 2nd week of August (big snow year). In 2025, the fixed rope was being used during the 4th week of June.
The guides use their own rope to belay clients at the headwall.
Lower Saddle's Fixed Rope
This is a rockfall zone. Stay alert.
~~~~~~~~~~
~~~~~~~~~~
Never
travel directly above the Fixed Rope to the west or northwest during
the summer. There's a high probability of causing rockfall on climbers
below you. In some locations the rock is too unstable to remain in place no matter how carefully you move. Head southwest toward the Middle Teton. If it's off-season and none is around, do whatever you want but stay off the vegetation.
~~~~~~~~~~
The
fixed rope drapes over a drainage. Climbing the headwall without using
the rope is common when the drainage is dry but most will use the rope
to some degree. If you struggle with the climbing at the fixed rope then free-soloing is not for you. You can contact the Jenny Lake Climbing Rangers to find out if the approach is free of snow or if the fixed rope is being used. Or check their Instagram page.
Never remove any hiking poles or ropes from this area. They are not abandoned, just set aside.
Upon leaving the fixed rope, climbers head for the southeast corner of the saddle and they end up by a camping site and a source of water.

Lower Saddle Rules
The sign faces toward the saddle's water source which is about 50 ft away:

Location of the water hose
.JPG)
Gathering by the saddle's water hose
The water source is at the toe of the Middle Teton's rocky slope. Just to the north of the hose is a large seepage area. Look for the well worn landscape near the southern edge of the vegetation. You'll find a section of garden hose in a shallow drainage. In the above photo, the hose is by the climber in the red shirt.
People have been drinking this water unfiltered (and untreated) for decades. We never filtered it; however, there's no guarantee it's always safe to drink. And the hose may become contaminated by unwashed hands. Sometimes it needs filtering for particulates but it's usually fine. BTW: Symptoms of giardiasis normally begin 1 to 2 weeks after becoming infected. It won't happen quickly.
It's possible for the saddle's water source to dry up, usually in September. It can spring back to life with the changing weather. You can get water from the Middle Teton Glacier if water disappears at the saddle. Make sure you have enough water for the trip to the summit. Rainstorms and lingering snow can put water in the drainages between the Grand's lower & upper saddle but don't count on that.

Two huts are assembled at the saddle every season. A third hut—used by the JH Mountain Guides—sits above the trail to the Morainal Camping Zone. Look toward the east face of the Grand Teton by Teepe Pillar to see that hut.
There's a gear hanger just north of the huts should you wish to drop some weight. A "bear box" is available to store food from critters like marmots and pikas. They will happily destroy your gear to get food. In addition to them, you might see chipmunks, ravens or an invasion of butterflies. It's rare to see bears, foxes, bighorn sheep and mountain goats at the saddle but they have made visits (mountain goats are considered non-native and the park has culled them).

The rest stop on the western aspect of the saddle is for privacy. It's not a functioning toilet. It's west of the Exum hut. You're required to pack out human waste using WAG bags, etc. If you ran out of WAG bags, the rangers might have an extra bag in their hut. The rangers aren't always at the saddle. Do not pee anywhere near camping spots. Use the toilet, or somewhere else on the western aspect of the saddle.
Do not leave trash, food or WAG bags in the bear boxes upon starting your return trip to the valley floor. Pack it out.
There are small rock shelters on the western aspect of the saddle including one next to the rest stop. Most are north of it. Those shallow caves are attractive places to seek shelter during a storm but they might increase your chances of getting hit by lightning. We don't remember anyone being injured by lightning at the saddle but plenty of people have been zapped on the Grand.
Most people get cellular service at the saddle & above it. It's a good place to check the forecast. Saddle temperatures
can stay in the 50's on the warmest summer nights. On the coldest summer
nights, temperatures dip below freezing and it can snow at the saddle. In July of 1993, 6 feet of snow fell
at the Lower Saddle and it was the coldest & wettest summer on
record. The saddle also has a well-earned reputation for strong winds. 117.5 mph gusts were recorded on June 16, 2016.
The Owen-Spalding Climb
From the Lower Saddle, you're heading north along the saddle's crest toward the Black Dike. There's a trail along the Saddle's crest that leads to a mix of scrambling, uphill hiking and some basic climbing moves to reach the more technical parts of the Owen-Spalding which start at the Upper Saddle.
You're headed for the western side of the Central Rib's Needle once you pass the dike. Don't head toward the Needle's eastern side. Also, the Idaho Express and the Wall Street Couloir are not good routes to reach the Upper Saddle.

Many climbers leave hiking poles by the dike. Once again, leave all gear where you find it. The dike is
made of black diabase which formed from molten material. It's the same type of dike as seen on the Middle Teton and Mt Moran.
You're headed for the western side of the Central Rib's Needle once you pass the dike. Don't head toward the Needle's eastern side. Also, the Idaho Express and the Wall Street Couloir are not good routes to reach the Upper Saddle.

The area between the Lower (11,600ft) & Upper Saddles (13,200)
The main drainage sees weekly rockfall events caused by other climbers. Bowling alley is the favored description. Most climbers stay out of the drainages whenever possible. Crossing them is common.
Just a quick safety note to non-climbers:
If you're unfamiliar with climbing etiquette, the appropriate thing to do if you kick rocks down the mountain, or see rocks falling down the mountain, is to holler 'ROCK'! even if you see none below you. It's like saying FORE! when you make an errant golf shot. Your safety and the safety of others is everyone's responsibility when it comes to falling rock.
Don't let down your guard on the scrambles. On August 9th, 2005, a 47-year-old local woman climbing with Exum Mtn Guides tumbled about 15
to 20 feet while descending by the Needle and sustained injuries to her
knee and ankle.
Bootpacks up drainages are useful when encountering stable snow; however, the drainages are one of the most common locations for serious snow-travel accidents due to the steepness, small cliff bands and rock outcroppings.
On July 30, 1995, Clay Roscoe (26) and Megan T. Piper (25) were descending from the Upper Saddle when they decided to use the “Idaho Express” couloir instead of the standard routes by the Owen-Spalding Couloir. Piper slipped on snow, went over cliff bands and died from trauma to the head and neck.
On June 23, Slovenian national Amer Beslagic (38) was nearing Upper Saddle when he presumably fell on icy snow and slid between 1,000 and 1,500 feet down the Idaho Express. He was wearing crampons and carrying an ice axe. The cause of death was severe head injury and total body trauma.
Back to our climb...
As you move past the western aspect of the Central Rib's Needle, you'll come across the Chockstone Chimney on your right. It's the first opening along the Needle's western aspect. It allows us to access the Central Rib's Bench. The bench usually provides a safer line of travel to the Upper Saddle.

Many variations to gain the Central Rib's Bench
click to enlarge
.JPG) This is the Central Rib's "bench" we're trying to access
This is the Central Rib's "bench" we're trying to access
click to enlarge
The two most common variations to access the
Central Rib's Bench are:
1) the Eye of the Needle via the Chockstone Chimney
2) the Briggs' Slab
The Briggs' Slab is a common
guided variation. They also use others. The slab is easy to get to when dry and it's easy for guides to
quickly belay clients across the slab. You can reach the slab from the chimney but most climbers take an easier, safer and longer approach to reach the Briggs' Slab. The Middle Ledge variation is a good alternative to both the slab and the lower chimney.
If you're an experienced mountaineer, you can reach the Upper Saddle
without getting into the fine details shared below.
.JPG)
Let's look at the two most common options in greater detail, starting with the chimney...

Western side of the Needle by the Chockstone Chimney
The
guided climbers in the above image are descending from the Briggs' Slab and
about to pass the Chockstone Chimney. They're staying on a slightly elevated path above the actual
drainage. Staying just above the drainage sometimes provides an extra measure of safety. The clients are less likely to kick loose rocks down the slope, or slip on them, or be hit by them. And the drainage can be wet and icy.
Anyone can follow the guides. It's everyone's mountain. They're not in charge of other climbers. People head off in questionable directions all the time so don't just follow any climber.
Anyone can follow the guides. It's everyone's mountain. They're not in charge of other climbers. People head off in questionable directions all the time so don't just follow any climber.

Take the Chockstone Chimney or go for the Briggs' Slab
Scrambling up the ledge/step/slab system just to the left of the chimney is common. Most reenter the chimney just above the lowest chockstones. That's often safer and faster. Choose any line that looks good for you. The
chances of rockfall from those above you is something to consider in the chimney. We avoid going straight up the chimney with weaker climbers or young kids. If these options look unappealing, just head for the Briggs' Slab. Or use the Middle Ledge variation which runs just below the Briggs' Slab.

Let's look in the chimney...

A few variations near the bottom half
Many people who take the "Narrow Ledge" variation end up climbing an easy southeast corner inside the chimney. Others climb to the Runner's Slab along the chimney's northern side.

Mid-chimney
On August 31, 2003, two climbers got stuck on the mountain for three days during a snowstorm. On their third day, climber Joe Hestick broke his hip and several ribs after taking a fall while descending the Chockstone Chimney.

(red line is most common route)
The Eye of the Needle is a natural tunnel. It's a tight fit if you have a big backpack. And watch your head. The Eye's tunnel may be plugged with snow early in the season. Once out of the tunnel, climbers traverse under or over the Belly-Roll Almost. Both variations work fine. If you go under the Belly-Roll Almost, you'll be looking for a small foothold that's out of view until you're directly above that foothold. There are excellent handholds.
On Aug 10, 1994, Chris Schneider fell down the Chockstone Chimney from the Eye of the Needle area and sustained serious injuries to his head and back.
On Aug 10, 1994, Chris Schneider fell down the Chockstone Chimney from the Eye of the Needle area and sustained serious injuries to his head and back.
On Sept 5th, 2025, a 57-year-old male climber had to be short-hauled from the Eye of the Needle area (possibly at the Belly Roll Almost); and then on the very next day, a 31-year-old female was short-hauled after experiencing a head injury from rockfall by the Briggs' Slab area.


While Emelie Forsberg was attempting a woman's fastest known time (FKT) on the Grand Teton, she used the Eye of the Needle variation during her descent and took the Runners' Slab near the bottom of the Chockstone Chimney. It wasn't the shortest way off the bench but she did it pretty quickly running with Kilian Jornet the day before he ran his FKT on the Grand.
Kilian also took a 3:23 round-trip training run up the Grand with Anton Krupicka. About a month later, Anton took the FKT for Wyoming's highest peak, Gannett, on September 18, 2012: 8h46m32s car-to-car from Green River Lakes. His time was beaten (barely) in 2020, by Aaron Robson of Lander, WY, with a time of 8h 39m 26s.
Kilian also took a 3:23 round-trip training run up the Grand with Anton Krupicka. About a month later, Anton took the FKT for Wyoming's highest peak, Gannett, on September 18, 2012: 8h46m32s car-to-car from Green River Lakes. His time was beaten (barely) in 2020, by Aaron Robson of Lander, WY, with a time of 8h 39m 26s.
Emelie & Kilian on her FKT in 2012 (Chockstone Chimney)
Everyone scrambles at a different pace over different types of terrain so it's hard to say what line is fastest for any one person. Many variations are available including early-season snow lines. BTW: In 2013, a NY Times reporter said Kilian rolled "one of his thick ankles to a tendon-straining angle, then began to hop up and down on it nonchalantly" while he watched in horror. That oddball ability to withstand a rolled-ankle injury is one reason he's fast on his feet over questionable terrain.
Let's look at the access to the Briggs' Slab and variations near it.


Expanded Overview - click to enlarge
The green travel line is the most common approach to the Briggs' Slab

(Click to Enlarge)

Another look
There are some shortcuts by the rockfall zone but they're usually avoided.


View from another angle

View from Briggs' Slab of the Middle Ledge variation

The Briggs' Slab is named after Bill Briggs. Guides use a friction
belay over rock to quickly move clients over it. It's a good choice for kids when roped.
.JPG)
The Briggs' Slab

Let's look at the area above the slab...
.JPG)
The three climbers in the background are nearing the Belly-Roll Almost after leaving the Eye of the Needle. The guided climbers are descending and getting ready to be belayed over the Briggs' Slab (unseen to your right - west).
The drainage between the two groups is just an extension of the Chockstone Chimney. Climbers heading for the Upper Exum Ridge will follow the extension and cross over the ridgeline. Do not follow them.
You're heading north for the Upper Saddle.
The drainage between the two groups is just an extension of the Chockstone Chimney. Climbers heading for the Upper Exum Ridge will follow the extension and cross over the ridgeline. Do not follow them.
You're heading north for the Upper Saddle.
.jpg)
Conditions on the Briggs' slab may force you to choose another variation. Or the slab may be busy with guided climbers. The Cracks of Doom variation is pretty easy but harder than the slab. There are several lines on the face which vary slightly in difficulty.
The steppy Mini Black Dike runs directly to the Sack of Potatoes chimney. The High Line going over the top of the chimney can be accessed from the SOP's chimney if you exit to the north instead of taking the direct line up the chimney.
The steppy Mini Black Dike runs directly to the Sack of Potatoes chimney. The High Line going over the top of the chimney can be accessed from the SOP's chimney if you exit to the north instead of taking the direct line up the chimney.
The "High Line" is good for an ascent
or descent but stepping over the chimney along the High Line requires extra care. It's a little awkward. Loose dirt and rocks make it sketchier. The "Southern Line" is your third option. Sunseri considered exiting the SOP chimney to the High Line to be the fastest option on his FKT run.


Ascent out of the SOP chimney area - Exit to the High Line variation
Now that we're on the Central Rib's Bench, let's head for the Upper Saddle.

The CR's Bench area
It's wise to choose a path that provides
some protection from rockfall. That path can change when other climbers
are above you. There's a small chute-like travel line that guides often follow to reach the Upper Western Rib or the Black Rock Chimney variations. It's not necessarily the fastest line but
it's often a safer line. It sits higher than the travel lines through the bench's low spots.

Looking back down the Central Rib

Another look
You may see scrappy footpaths between here and the Upper Saddle. Some are useful, some not so much.

Central Rib Overview
Click to enlarge

There are three common variations to reach the Upper Saddle once you're on the Central Rib's Bench. They are the Upper Western Rib, the Black Rock Chimney and the Rosenberg Variation by the Black Rock Chimney. Let's take a look at the Upper Western Rib variation first.
The Upper Western Rib Variation

Climbers
leave the Central Rib's Bench and cross the slope above the couloir's drainage
chimney to reach the Upper Western Rib. The drainage chimney is not considered to be a safe approach or descent
path due to rockfall hazards. And it's often wet or icy.

The Upper Western Rib is a natural line to follow so most climbers choose it.

A snowy Owen-Spalding Couloir
Climbers have taken slides to their death due to the tricky snow conditions.
In June of 1992, H. Kammeyer (33) lost control in soft wet snow near the top of the
Owen-Spalding Couloir. He went over some rock bands and ended up on the
snow about 100 feet above the Black Dike with bilateral wrist fractures,
a right side pneumothorax, and fractures of T-8, T-12 and C4-7 vertebrae. A helmet probably saved his life.
In 1977, Jackson Hole Mountain Guide Thomas Raymer was guiding Robert Slater
down the mountain from the Upper Saddle in fresh snow when Slater's
pack caught on a rock and they both fell 200 feet. Slater suffered minor
injuries but Raymer was seriously injured and was carried out the
following day. Raymer had a broken femur & talus, and severe scalp lacerations with part of the skull exposed.

Overview of the upper Central Rib - looking SE.
If you're on the Upper Western Rib, you'll want to cross the drainage once the couloir opens up and it's easy to regain the Central Rib. The marked paths are a general direction of travel in the above image.
At the top of the Central Rib is the Patio (seen above). It's a
natural flat area where guides often take a
break. The Patio's a good place to add an extra layer and grab something to drink or eat before the technical climbing begins. The winds tend to pick up speed at the Upper Saddle, and the shaded aspect of the Owen route feels colder. The Patio is also called the Dance Floor; you might here Ballroom.
The Black Rock Chimney
& Rosenberg Variation
& Rosenberg Variation
Let's go back down the Central Rib and take a look at the Black Rock Chimney area. We'll look at the Rosenberg variation first.

BRC & Rosenberg Variation
You can't miss the black-colored rock on the Rosenberg variation when everything's dry. It
sticks out from the Central Rib like a sore thumb. It tops out at the same location as the Black Rock Chimney.

You can gain the
Rosenberg from many locations so choose any that suits you. You're
heading toward the Central Rib's ridgeline and exiting just south of a
tower-ish rock outcropping on the ridgeline (see picture above).
On September 3rd, 1964, Mrs. Rosenberg was descending this line while on a guided trip. She fell into the main couloir and tumbled for several hundred feet down a snowfield where she was found dead.

Let's look at the Black Rock Chimney variation:
The Black Rock Chimney was considered for removal as a guided option by Exum Mountain Guides in 2022, due to increasing hazards from loose rocks. Back in 2024, it looked like someone sent in the housekeeping team and cleaned up some of the hazards. But, hazards remain and you'll want to exercise caution because the erosion also continues.
On June 17, 2013, Grand Teton National Park rangers rescued 57-year-old climbing guide Jim Williams after the snow that he was standing on near the Black Rock Chimney collapsed and he took a short fall, catching a crampon on the ice and sustaining an injury.
On June 17, 2013, Grand Teton National Park rangers rescued 57-year-old climbing guide Jim Williams after the snow that he was standing on near the Black Rock Chimney collapsed and he took a short fall, catching a crampon on the ice and sustaining an injury.

Access to the BRC
The last 50 feet or so of the approach to that large slab of reddish-orange rock from the south has plenty of loose rocks which are a hazard. We often travel up the bench a little further west of the ridgeline and then head east to reach the BRC & Rosenberg variation.
The short chimney by the slab leads to a steppy ramp that rises above the slab. The ramp ends at the bottom of the Black Rock Chimney. The chimney runs just under the ridgeline's western crest. The BRC meanders more than the Rosenberg variation.
.jpg)

Jeff at the bottom of the Black Rock Chimney
The
yellow and green arrows in the above picture are two travel options
right above the ramp. For young kids, the yellow line might be easier to
manage with an adult by a child. Just depends.
If you're heading for the Steppy Ramp on the descent, go all the way down the BRC until the ridgeline opens up and you're suddenly on the eastern aspect of the ridgeline. The Steppy Ramp is right at that demarcation or transition point. From there, you're forced to take the eastern aspect of the ridge or the ramp to the west. Take the ramp to the west.
If you did miss the exit to the Steppy Ramp during the descent, you would end up on the eastern aspect of the rib where you'd find some slow-moving climbing over some slabs and ledges compared to the ramp. You can regain the Central Rib's Bench further down the rib's eastern aspect by using the crossovers that Upper Exum Climbers use. You can certainly go that way. We sometimes use that line if it's dry when we're doing a lap on the Upper Exum Ridge.

The young child in the green helmet looked to be 6-years-old or younger and rather unhappy with the whole adventure, or too exhausted. And moving at a snail's pace - truly snail's pace. While very young kids have summited the Grand, most find feeding chipmunks more interesting, fun, and rewarding. Think twice before bringing very young children on this mountain. Same with some adults.

Black Rock Chimney
The western side of the chimney may prove safer for passing loose rocks in the drainage line.
.JPG)
The bowl-like opening above the BRC and Rosenberg variations- looking SSE
Do not take the bowl's drainage to the Wall Street Couloir. It's not a time-saving shortcut — it's a little funky and has no advantages for free-soloing climbers. You can sometimes see climbers on the Upper Exum's Wall Street shelf or along the ridgeline from this location. After exiting the "bowl" on the ascent, you'll stay pretty close to the
western aspect of the Central Rib until you come to the Patio.
Before we leave the "bowl", let's take a closer look at the exit from the top of the Black Rock Chimney & Rosenberg variation.....
Before we leave the "bowl", let's take a closer look at the exit from the top of the Black Rock Chimney & Rosenberg variation.....

Top of BRC & Rosenberg
In the photo, the top of the Rosenberg is immediately to your right on a descent as you exit the bowl. Once again, the Black Rock Chimney runs just below the Central Rib's ridgeline along its western aspect.
.jpg)

The view from the top of the Central Rib
 The Middle Teton
There's a small, circular rock formation on the Enclosure's summit that was most likely left by Native Americans. At times, non-natives have rearranged it. It's a nice place to
watch climbers on the western aspect of the Grand Teton. The Enclosure
is the consolation prize that guides dish out when the
Owen-Spalding route is a questionable
proposition. They'll talk it up as if it's a treasure of biblical
significance to help everyone feel better about not tagging
the Grand's summit. It's an oddball scramble and it rises higher than any peak in the Teton Range other than
the Grand. The scramble to the Upper Saddle from the Patio area has some foot traps that are easily hidden by unconsolidated snow. Take the time to check your footing. Of course, any kind of snow can cause trouble.
Late on the afternoon of June 11, 1994, Mike Tucker and Bill McDonald of Pocatello, ID, were a short distance below the Upper Saddle when McDonald slipped on moderately steep snow and began sliding. McDonald slid approximately 300 feet before going over a 150 foot cliff-band, then continued sliding another 500 feet down a couloir. He sustained massive head trauma in the fatal fall.
In August 17, 1993, Corbin Rich (17) from Idaho Falls was a short distance below the Upper Saddle when he slipped on snow, failed to self-arrest, and fell about 1,000 feet down a steep couloir containing mixed rock and snow. He died of massive head injuries.
On August 1, 1995, a 25-year-old woman from Portland, Oregon, lost her footing below the Upper saddle, slid about 60 feet, went over a low angle rocky area, and fell another 40 feet into a moat. She died from head and neck trauma suffered in the fall. See "Thursday, August 10, 1995" report in link.
On October 10, 1978, Carlos Medrano was crossing a hard steep snow patch on his way to the Upper Saddle when he slipped and fell over 800 feet over snow, rock and several short cliffbands. He died.

At
this point, you're above the Middle Teton. Enjoy the views. The Grand
Teton rises about 1000 ft higher than the 12,809' elevation of the
Middle Teton. The Upper Saddle is near 13,200 ft.
Upper Saddle - looking W & SW


Variations to access the eastern side of the Upper Saddle
 Looking back down

.JPG) Another look at the southern line
Another look at the southern line
The middle line is very useful when conditions make the other options too sketchy (unstable snow, icing, etc), or everything's backed up. It has small holds but it works fine. It might make a novice climber uncomfortable without protection or spotting.
View from above....


The southern line
The ascent over the chockstone challenges many climbers on the southern line. The guides will sometimes place a stepping stone below the chockstone to
help climbers get over it. Young kids may need a leg up.
In July of 2014, Mary “Mimi” Conley Bilyeu was above the chockstone when she fell into the gully directly below here. She did not survive. She may have slipped on loose rocks, lost her balance or tripped over her own feet. No one really knows. She was not roped up. She was an experienced climber and being guided at the time.
In July of 2014, Mary “Mimi” Conley Bilyeu was above the chockstone when she fell into the gully directly below here. She did not survive. She may have slipped on loose rocks, lost her balance or tripped over her own feet. No one really knows. She was not roped up. She was an experienced climber and being guided at the time.
.JPG)
A rare variation runs along the seam on the south-facing wall just before the common southern line. It's seen above and below....


The northern route might be the easiest and fastest ascent line for most climbers. The biggest issue with this line is its exposure to the north and the awkwardness of a descent for novice climbers.
On August 4, 1977, Doug Calloway (17)
was climbing the Owen Spalding Route on the Grand Teton a short
distance above the Upper Saddle. A rock was dislodged by his partner’s
rope striking him on the back of the head causing a small laceration,
and a large bump upon the back of his head.
On July 21, 2015, Tucker Zibilich, 26, was desending from the Upper Saddle when a large boulder dislodged and rolled over his arm, causing severe injury to his limb and prompting a rescue by rangers.
On July 21, 2015, Tucker Zibilich, 26, was desending from the Upper Saddle when a large boulder dislodged and rolled over his arm, causing severe injury to his limb and prompting a rescue by rangers.
SAFETY REMINDER
Some people get summit fever when they should be bailing. Or making a temporary retreat (depending on the circumstances). If the weather, conditions or skill sets aren't in your favor, it's time to turn around. It's never the wrong call to bail even if you're wrong about the threat. This is especially true if you're responsible for the safety of others. A few groups who couldn't outrace the weather experienced life-changing injuries and death.
Test your holds to make sure they'll support your full weight. Look for slip hazards underfoot like verglas and loose rocks. After crossing snow or water, make sure your shoes' soles are dry enough for the slab you're planting your foot on. If a body position or climbing line doesn't feel right, back off and consider another plan of attack. Much of the route above the Upper Saddle is a scramble but even those sections have hazards.
Take the time to be safe.
"Many of our clients are exhausted and at the limits of their abilities, and they make mistakes. What this means is that our clients are trying to kill each other, they're trying to kill themselves, and they're trying to kill you. Each of us needs to remember this at all times. That's our job." Dave Carman, Exum Mountain Guides, as told in the Outside Magazine story “The House of Rock".
If you're on a guided climb, every climber has a
responsibility to look after their own safety and the safety of
others not only because guides sometimes make incorrect assumptions
about everyone's safety but because that's your job.

1939 was an interesting time to be climbing. 19-year-old Margaret Smith Craighead was on the
first manless ascent of the Grand Teton
in 1939. It took them 4 hours and 30 minutes to reach the summit from
the Lower Saddle. By the age of 16 she had climbed most of the major
peaks in the Teton Range. Within a week of her manless ascent,
13-year-old
Bill Johnston
from Casper could be seen
climbing the Grand Teton. And a 17-year-old Jim Crooks, who was an occasional climbing
partner of 16-year-old
Fred Beckey,
was guiding a group of 19 people up the
Owen-Spalding route. Beckey also started climbing in the Tetons in 1939. Fred's Summit Register.
40-year-old Joe Hawkes made his 5 hour and 21 minute FKT round-trip in 1939. That was also the year that Lloyd and Mary Anderson, who founded REI in 1938, descended on the Tetons with a group of over 100 members of The Mountaineers. Their trip was documented in the above-mentioned 1939 Annual of The Mountaineer.
40-year-old Joe Hawkes made his 5 hour and 21 minute FKT round-trip in 1939. That was also the year that Lloyd and Mary Anderson, who founded REI in 1938, descended on the Tetons with a group of over 100 members of The Mountaineers. Their trip was documented in the above-mentioned 1939 Annual of The Mountaineer.
Kids were climbing the Grand back in the early 30s, too. A 13-year-old Jay P. Bartlett and his 11-year-old brother Frank of Ogden, UT reached the summit on July 15th, 1933 with Paul Petzoldt
as the guide, and in a single day from the valley floor. One year
later, 10-year-old Fred Eriksson of Stockholm, Sweden, bagged the summit
on August 27th, 1934. The Salt Lake Telegram
covered that ascent. At least three 13-year-olds and three 11-year-olds
cruised to the summit in the early 30s according to the 1937 version of GTNP's Autumn Nature Notes published on npshistory.com.
You can peruse the old
GTNP Summit Registers
on
Paul Horton's great website if you want a glimpse into the
climbing history of the Tetons.
Let's get back to our climb
The Upper Saddle is approximately 600 feet below the summit.

The Owen-Spalding Route
Click to Enlarge
Click to Enlarge
AVOID STANDING DIRECTLY BELOW THE RAPPEL AREA
THAT IS A ROCKFALL ZONE
THAT IS A ROCKFALL ZONE

The exposed Belly Roll is at the very NE corner of the Upper Saddle
This area can be windy, freezing, and backed up with climbers. Waiting makes the cold worse. Morning temperatures in the 30s are not uncommon around the Upper Saddle
during the summer. Sometimes 20s with a cold front. That's before wind chill is calculated. People have bailed because they didn't have gloves during the peak
summer season and the climbing rangers have rescued climbers who lost dexterity and grip strength due to low temperatures. While it's not always freezing or clogged with climbers, you should be prepared for that possibility.

Most free-soloing climbers can safely pass other climbers by the exposure. It's good etiquette to make sure those climbers are comfortable with the idea, and that those climbers don't put your safety at risk, or vice versa.
Variation that's not for beginner climbers:
In the above photo, the Wittich Crack (video & first ascent) is rated a 5.6 (CGTTTR) to 5.7 (MP). It's not uncommon to run into slick conditions near the top of the Wittich after a cold, wet spell because it's well shaded. However, it's not part of a major drainage area like the 1st Entrance of the Double Chimney. It's a variation for stronger climbers who don't want to wait behind OS climbers. The crux is the exit from the top (climb left).
In the above photo, the Wittich Crack (video & first ascent) is rated a 5.6 (CGTTTR) to 5.7 (MP). It's not uncommon to run into slick conditions near the top of the Wittich after a cold, wet spell because it's well shaded. However, it's not part of a major drainage area like the 1st Entrance of the Double Chimney. It's a variation for stronger climbers who don't want to wait behind OS climbers. The crux is the exit from the top (climb left).
Let's get back to our standard route options....
OS's Exposure
The above video takes a look at the Owen-Spalding's exposure between the Belly Roll and the 2nd Entrance of the Double Chimney. It's redundant with multiple members of a local coed soccer team making similar moves; however, it gives you a good feel for what to expect. Many of the soccer players had no prior climbing experience.

Belly Roll - going over the detached rock


Willow riding the bottom of the Belly Rol

Belly Roll - climbers using the lower ledge
Video of two climbers going under the Belly Roll
Video of two climbers going under the Belly Roll
We're not aware of any accidents ever happening while passing the Belly Roll.
The ledge directly below the Belly Roll is tiny at its southern end. In the video above, the first climber jumps off the southern end. Had he landed on a small patch of ice, or lost his balance, he could have sailed over the cliff. You can gently step off the end if you're tall. Obviously, taller climbers have greater flexibility in their choices since their reach is longer. The shorter climber climbs over the lip of the cleavage once he passes the Belly Roll.
The ledge directly below the Belly Roll is tiny at its southern end. In the video above, the first climber jumps off the southern end. Had he landed on a small patch of ice, or lost his balance, he could have sailed over the cliff. You can gently step off the end if you're tall. Obviously, taller climbers have greater flexibility in their choices since their reach is longer. The shorter climber climbs over the lip of the cleavage once he passes the Belly Roll.

The ledge between the Belly Roll and the Crawl. Upper Saddle in background

Looking toward the Crawl from the ledge.

The Crawl with access to the Double Chimney in background - descent
Go outside, inside, or partly outside & inside the Crawl.

Glenn is below the First Entrance of the Double Chimney and he has one foot on the ledge variation used to access the 2nd Entrance of the DC.

Entering the Crawl

The Crawl - descent

The area right behind the climbers and in front of the photographer can be sketchy. Loose rocks, snow, water and ice are common at this location. Additionally, the rock face is sloping into Valhalla Canyon. Be careful as you leave the Crawl — see below....


Climber at the Crawl
This picture will give you a feel for what's underneath you if snowy conditions hide features. Unstable snow can slide off the slope and take you with it. Stay close to the wall. FYI: There's an old piton on the wall above you as you come out of the Crawl. A few small handholds are along the wall.


A questionable 'cornice' over the exposure

You have a couple of options to choose from to gain the interior of the Double Chimney. The 1st Entrance is the crux. The 2nd Entrance is considered to be the fastest and easiest variation. And it's the most common variation taken by soloing climbers. The two entrances are about 12 to 15 feet apart.
Let's look at the variations in more detail starting with the 1st Entrance..

1st Entrance of the Double Chimney

Too many climbers were backed up at the 1st Entrance in the above image. And more were behind them. Using the 2nd Entrance would have been a better choice to speed things along. On the Owen-Spalding route it's important to keep things moving if others are behind you. This is a trade route. If a more efficient variation presents itself, please consider taking it. Novice climbers will have a much easier time utilizing the 2nd Entrance when it's dry and it's the recommended option.
 Albert Ellingwood on top
There's a variation directly above the horn at the 1st Entrance (directly above Ellingwood's right arm). It runs up a tiny chimney/drainage. It can be used to access a ledge that runs along the top of the Double Chimney's Open-V variation (discussed further below). It's a good way to bypass slow climbers if this variation is dry. It can also be used as a shortcut to the Catwalk. It's fairly easy; however, it's usually avoided because it's a drainage for water flowing off the Catwalk. It can be dangerously wet, icy and slimy. Downclimbing that variation has exposure with holds that look questionable above a drop to your death. Non-climbers may find it intimidating even when dry.
 Drainage variation
The above guide is grabbing a horn and muscling her way over it with some stemming behind her. There's a small depression near her rear foot to use for leverage. Notice she is only wearing approach shoes. Or trail running shoes with a solid grip.
This is one spot where sticky rubber can make a big difference on how you judge the difficulty of the route. Many climbers give this entrance a rating higher than 5.4, including us. The 2023 edition of A Climber's Guide to the Teton Range gives the Double Chimney a 5.5 rating; however, it doesn't even highlight the 1st Entrance on its marked up route image. And it keeps the overall route rating at 5.4. Go figure. Some feel the entire route only has a 5.4 rating because of the 1st Entrance. Either way, it's still a cruxy, exposed maneuver for many OS climbers. If you're more runner than climber, you might find the 1st Entrance quite challenging.
The 1st Entrance is often wet or icy. During the winter, snow can build up here and provide a nice step below the horn which makes this an easy option.

1st Entrance seen from above
Too many climbers were backed up at the 1st Entrance in the above image. And more were behind them. Using the 2nd Entrance would have been a better choice to speed things along. On the Owen-Spalding route it's important to keep things moving if others are behind you. This is a trade route. If a more efficient variation presents itself, please consider taking it. Novice climbers will have a much easier time utilizing the 2nd Entrance when it's dry and it's the recommended option.
FYI: Roped parties with more than 3 people are not appreciated on the trade routes and they're strongly discouraged from assembling. But, there's no rule against it. And some move with speed. The rangers discouraged it on their old blog, and the guidebook does. Free-soloing parties usually don't care. They'll pass when it's safe to do so.
Downclimbing the 1st Entrance isn't common but it's a good option under some circumstances. Goes quicker if you're tall and you can lower yourself off the horn.

Albert Ellingwood is atop of the Austrian mountaineer
Hermann Buhl. They're at the 1st Entrance of Double Chimney. The American mountaineer
Carl Blaurock
took the photo in
1924. Carl was the first person to summit all fourteeners in the
contiguous United States. Ellingwood made his first climb of the route a year earlier with the first woman to summit the Grand Teton, Eleanor Davis. Eleanor and Albert were the 3rd party to officially summit. They were actually on the 4th ascent up the Grand because members of the Owen party climbed twice in 1898. This shoulder stand is called a courte-échelle (short ladder). In the 1960s, this was the recommended climbing move in Bonney's guidebook.
Reinhold Messner wrote this about the legendary Austrian climber Hermann Buhl: “Had Hermann Buhl been born forty years later he would surely have been one of the leading sport climbers, and a classic mountaineer without equal.”
Reinhold Messner wrote this about the legendary Austrian climber Hermann Buhl: “Had Hermann Buhl been born forty years later he would surely have been one of the leading sport climbers, and a classic mountaineer without equal.”
Variation that's not usually taken by novice climbers:
There's a variation directly above the horn at the 1st Entrance (directly above Ellingwood's right arm). It runs up a tiny chimney/drainage. It can be used to access a ledge that runs along the top of the Double Chimney's Open-V variation (discussed further below). It's a good way to bypass slow climbers if this variation is dry. It can also be used as a shortcut to the Catwalk. It's fairly easy; however, it's usually avoided because it's a drainage for water flowing off the Catwalk. It can be dangerously wet, icy and slimy. Downclimbing that variation has exposure with holds that look questionable above a drop to your death. Non-climbers may find it intimidating even when dry.

Let's look at the 2nd Entrance variations.....

Climber heading for the 2nd Entrance
This climber's handholds are along the obvious
cleavage above the sloping rock. Some
footholds are low on the slope, some high.
The crux is the last move off the sloping face as he gains the
interior of the chimney. It demands attention. The footholds are small and some might be more frictiony than you're
expecting.

Gaining the 2nd Entrance
Climbers have fallen to their death around this area. One involved a lightning strike which took the life of Brandon Oldenkamp (21) and sent 15 others to the local hospital. Another involved Don Ivie (44) who was soloing the route. He was alone and his exact location & the cause of his fall is unknown. There have been others.
In the video below, Bob takes a slip as he tries to enter the 2nd Entrance of the Double Chimney. He recovers and goes on to make some GT climbing history.
A big slip that didn't slow him down
Watch for loose rocks as you enter the chimney.
Watch for loose rocks as you enter the chimney.
We will take a moment to say something about departure times from the trailhead. In August of 2017,
Bob Harris, seen above, made the first known ascent up the Grand by an individual with Down syndrome. His team departed the
trailhead around daybreak and arrived at the summit around 5:15
p.m. Had they arrived at the Upper Saddle in the morning it would have
been a much longer day and more dangerous. The climbing was cold and
icy in the morning. Some climbers turned around. The weather was nice
and warm later in the day with much safer conditions. After climbing,
they camped overnight at the Lower Saddle. Not every day will provide
great afternoon weather for a delayed start; however, a late start is a common tactic with a thin layer of overnight icing.

The small ledge below these climbers is shown in the next photo. It's the Lower Ledge variation.

Lower Ledge Variation - heading for the 2nd Entrance
From the 1st Entrance, downclimb to a narrow
ledge that runs toward the 2nd Entrance. Directly below the 2nd Entrance
you'll find
a small step and some small holds on the wall in front of you.
Just a quick aside to say that climbers can be below you anywhere on the Grand. Certainly below the climber shown here. Be mindful about rockfall.

This is a funky spot for belaying. We ascended the 1st Entrance to avoid these climbers. Waiting on four climbers might take more time than it takes to reach the summit. As discussed later, some climbers get to the summit in under 15 minutes from here.
A ledge system between the two climbers continues to the north. It goes to the Great West Chimney and eventually connects to the 2nd Ledge of the North Face. Many climbers on the North Ridge will traverse to the Owen-Spalding to finish their climb. There's also a Double Chimney Bypass that they can utilize which goes directly to the Owen Chimney. The DC Bypass is sometimes useful if you wish to avoid a busy Double Chimney. For example, we have used it when the 1st Entrance was too wet and the 2nd Entrance was clogged with people. The DC Bypass is off-route and we won't rate it but it's pretty easy to ascend if you have sticky shoes and dry rock. It's shown below:

Double Chimney Bypass (green line)
If the first step in the wall at the start of the bypass looks too difficult just go a little further to the north and you'll be at a series of smaller steps. You might find a nice snow-step early in the season. This area can get icy and slimy during the summer.

Renny

Lower ledge variation below 2nd Entrance

The 2nd Entrance
 Jane looking up from the 2nd Entrance
The climber looking at the photographer is at the location where the 1st Entrance tops out. The next photo shows what he sees as he looks down at the 2nd Entrance....
We will look at several variations to move around the Double Chimney:


Stemming to move in or out of the Open-V is common. On a descent, some climbers are facing the opposite direction but still throwing a leg in the same spot to the north. It's kinda awkward, and challenging if it's icy.
 RJ
RJ

The rarely used crack along the southwest corner of the Open-V ends on a nice ledge. Just walk off to the east above the Open-V.

Stemming to move in or out of the Open-V is common. On a descent, some climbers are facing the opposite direction but still throwing a leg in the same spot to the north. It's kinda awkward, and challenging if it's icy.


The Open-V. Tunnel variation below.
 Climber in the northern slot
Photographer is on a ledge above the Open-V.
 Jane Maus on her 2025 Grand Teton FKT run using the Northern Slot
 They went up the Upper Exum, down OS

The tunnel variation is considered easier. It's sometimes clogged with ice or icy snow. Take your time and consider the best variation for you.

The climber on the flake's edge is heading for the northern slot (left side).

Two free-soloing climbers, one descending
The climber on the flake's edge is heading for the northern slot (left side).

Photographer is on a ledge above the Open-V.

She wiggled her way down the opening at the very bottom of the slot. She went up the Open-V, stepping into it like it was a stair. That was much faster than her downclimb. Jane said this about her climbing: I'm not a traditional rock climber. More like, scrambling that pairs nicely with running. That’s really my bread and butter.


Exiting the Open-V to the southeast (right)
Many climbers exit in the opposite direction. Choose any.
On July 4, Jackson Hole Mountain Guide Allan Bard (44), who was also a guide of the Palisades School of Mountaineering in Bishop, California, died after slipping on ice and falling 130 feet on a rope while leading the Double Chimney.
When icy, ice is almost always where you don't want it in the Double Chimney.

Taking a break at the entrance to the Open-V

North Slot directly below photographer
Rope in Tunnel. Open-V at top of image. The detached flake used to be upright, creating two chimneys.
Let's go back and look at the tunnel variation.

Downclimbing the tunnel variation.


.JPG)

Back to our regular route options...

.JPG)

 Another look
.JPG)
 The Catwalk - looking northish - downclimb
 The scramble between the Catwalk & Main Rap area
Climbers sometimes crab craw down the rock during the descent to reach the flattest part of the Catwalk variation. You probably won't recover (YOU WILL DIE) if you lose your balance, slip or trip in this area. So, at the very least stay low and go slow if you're new to this. Gravity and momentum are two hazards working against you as you downclimb this area. FKT runners move very quickly but their hands are brushing the rock along the way.
 The "stay low, go slow" scramble between the Catwalk and the Rap Overlook

You're likely to see many more people above the
Owen Chimney & Catwalk. No matter their route to the summit, almost
everybody uses the same descent path off the summit which is the upper
half of the Owen-Spalding route.
 The Owen Chimney
 Lower part of the Owen Chimney
 Another look up

 Placing multiple cams in an icy Owen Chimney (mid-July)
You'll pass an old piton or two through the crux. If it's really icy, overlooked holds along the northern wall may prove useful. Depending upon your location in the Owen Chimney, it's sometimes possible to climb out of the chimney and access the bypass to your south, or vice versa.
If you wish to climb with crampons but don't have any, they can be rented from Teton Mountaineering in Jackson. Make sure they fit, and fit securely. Large boots may need a longer extension bar.

Exact same location as above
The free-soloing climber is exiting the lower part of the tunnel (she went up the Exum Ridge). The DC's tunnel variation is a tight fit with a backpack. You're on your hands and knees once inside. When dry, it's a very popular variation. Fairly quick and easy. Well, we say that but it's not easy and quick for everyone.
This is where you pop out of the tunnel on the ascent.

Some struggle, some cruise along

Exiting the tunnel

The common exit from the DC

The slabs by the climber have modest handholds when dry but they work fine. Those holds can become plugged with ice. Consider a slightly more northern exit when icy.

The woman is exiting the DC just above the tunnel
The rope is coming out of the tunnel variation. The belayer is at the bottom of the Owen Chimney. The Owen Chimney runs slightly sideways
to the southeast so you won't be able to fully see its interior as you exit the
Double Chimney.
Again, we think the holds to the left of the young woman are better than those along the direct line by the rope, especially under icy conditions. A tiny collection of pebbles sometimes litters the slabs. They're also a slip hazard.
Just to her right begins a shortcut to the Catwalk for climbers using that variation (see below).

Overview Owen Chimney & Catwalk
 Variations
We're going to start by looking at the Owen Chimney's Southern Bypass that forks off of the Owen Chimney. We'll look at the Catwalk and the Owen Chimney in more detail in just a second.
The Southern Bypass variation is not usually taken:
 Climber at the start of the Southern Bypass The climber's rope is coming out of the Owen Chimney. He took the first "opening" in the chimney to reach the start of the Owen Chimney's Southern Bypass.
.jpg)

We're going to start by looking at the Owen Chimney's Southern Bypass that forks off of the Owen Chimney. We'll look at the Catwalk and the Owen Chimney in more detail in just a second.
The Southern Bypass variation is not usually taken:

This bypass has been used for decades and mentioned in older guidebooks. You probably won't see anyone using it. The very bottom of this variation doesn't get much sunshine and it's often icy when the Owen Chimney is icy. A novice climber will probably find the bypass more
difficult than the Owen Chimney when both are dry.
.jpg)
OC's Southern Bypass
You can also access the sunnier part of the bypass from the Catwalk if you travel a short
distance up the Catwalk and look for the easiest location to gain a
small ledge above you. That ledge runs above the entire length of the Catwalk's flat section. The climber above is standing on it.
.JPG)
Sunnier (usually) part of the Southern Bypass

View from the top
Back to our regular route options...
The Catwalk Variation
We'll look at the Catwalk variation before looking at the Owen Chimney variation.

Two ways to the Catwalk
The climbing line that runs directly to the Catwalk from the Double Chimney goes by a detached rock that looks suspicious (see break in line) It's been a reliable climbing rock for decades but
there are options on both sides in case you wish to avoid it. Easy climbing. This is
the fastest line to the Catwalk.
.JPG)
The
climber in the blue jacket is taking the direct line to the
Catwalk from the Double Chimney. The climber in the red jacket is at the
base of the Owen Chimney.

Looking back from inside the Owen Chimney
 Downclimbing to the Catwalk (unseen)
This is the view from just above the first opening in the Owen Chimney. See the word "Access" in yellow type? In the next image, the climber is by that spot.

The photographer is at the Owen-Chimney Bypass. The access to the Catwalk is behind the climber and around the corner (see below). There's an old piton in the wall where he turns the corner.

.JPG)
The Catwalk - looking southish. Climbers are descending.
The Catwalk is the preferred descent route for most free-soloing climbers and for almost all free-soloing FKT runners. FKT runners who are strong climbers should consider the Owen Chimney during an ascent if it's dry and empty. It might be their fastest option. Kilian Jornet used it while training for his FKT.
Ice is common near the location where the last climber is. It's a significant drainage area. The climbers went past a sheet of ice covering about five feet of the Catwalk and the wall. If you do find ice, it might be easy to step over top of it while using a hold on the wall. Sometimes you can scramble away from the wall to the west and find enough dry patches to pass a difficult section of ice. Not everyone is comfortable moving away from the wall but this is often an excellent option. You can always chip away at the ice if it strikes your fancy. Try a loose rock. A couple old pitons run along the Catwalk's eastern wall.
At times, verglas can be hard to quickly recognize if it's a tiny patch. It's common on the Owen-Spalding.
At times, verglas can be hard to quickly recognize if it's a tiny patch. It's common on the Owen-Spalding.

Climbers sometimes crab craw down the rock during the descent to reach the flattest part of the Catwalk variation. You probably won't recover (YOU WILL DIE) if you lose your balance, slip or trip in this area. So, at the very least stay low and go slow if you're new to this. Gravity and momentum are two hazards working against you as you downclimb this area. FKT runners move very quickly but their hands are brushing the rock along the way.


Looking up at Sargent's southern approach
If
you take the Catwalk, you'll end up by the photographer's location
in the above picture. These climbers
are heading for
the rappel back to the Upper Saddle.
The Owen Chimney variation
Let's go back and look at the Owen Chimney variation for those who don't want to take the Catwalk.
The Owen Chimney is part of the original route. It can get backed up pretty quickly with a group of climbers. We strongly recommend the Catwalk if things are going slowly.
The 75 foot Owen Chimney was referred to as the Spalding Chimney in Bonney's guidebook from the 1960's. And the entire route was sometimes called the Spalding-Owen Route. Both were more fitting names in our opinion as Spalding led the first ascent, was more modest about the achievement and was the better climber. Owen seemed a little too infatuated with a grandiose sense of self-importance when it came to his climbing.

The
Owen Chimney is not very difficult when dry. It's a mix of steppy &
sloping rock. Many of the flat steppy footholds are small and thus much more
challenging under icy conditions. And there aren't too many monkey-bar handholds where you would want them when it's icy.
As always, soloing under icy conditions is not recommended but stuff happens, or perhaps you have the experience to handle it. The soloing climber's rule of thumb is to not go up what you can't get down. Getting up an slick & icy chimney is usually easier than going down one.
As always, soloing under icy conditions is not recommended but stuff happens, or perhaps you have the experience to handle it. The soloing climber's rule of thumb is to not go up what you can't get down. Getting up an slick & icy chimney is usually easier than going down one.

The bottom of the chimney sometimes collects icy snow that sticks around well into summer, or accumulates again after cold, wet weather. Additionally, it's not always easy to tell if ice is covering critical footholds in the chimney as you look at it from below. You might be surprised by heavy icing as you near the upper section.
Sublimation is the most
common way for snow and ice to disappear when temps remain below
freezing. It's one reason why nice conditions in October can never be ruled out.


The Owen Chimney


On July 20, 2023, Braydan DuRee of Kuna, Idaho died after falling 40 to 50 feet from the Owen Chimney. DuRee was wearing a helmet, using a rope and leading the route when he fell. No word on what caused the fall but conditions weren't totally dry, and the route was icy before the climb. When he fell, his protection popped out of its placement. The Accident Report was included in a story on the JHN&G website.

You'll pass an old piton or two through the crux. If it's really icy, overlooked holds along the northern wall may prove useful. Depending upon your location in the Owen Chimney, it's sometimes possible to climb out of the chimney and access the bypass to your south, or vice versa.
If you wish to climb with crampons but don't have any, they can be rented from Teton Mountaineering in Jackson. Make sure they fit, and fit securely. Large boots may need a longer extension bar.

Exact same location as above

More thin snow than ice. Maybe tacky snow. These are manageable conditions for an experienced alpine climber who's soloing without crampons but the slick conditions often require greater care, skills and creativity in this chimney.

Owen Chimney
.jpg) Ledge at base of Sargent's Chimney
Ledge at base of Sargent's Chimney
We're looking north in the photo. This ledge system runs between the Great West Chimney and the Exum Ridge.
You might find some privacy by the Great West Chimney if you need to take a piss. There isn't much privacy on this route but there are a few nooks and crannies. You can also head in the opposite direction, see below. You may run into some climbers if you head south because the ledge system runs by the top of the Pownall-Gilkey route which is regularly guided by JHMG.


 Another look when dry.
.jpg) The Hidden Exit variation is in the first alcove on your left
The Hidden Exit variation is in the first alcove on your left

.jpg)
We're looking north in the photo. This ledge system runs between the Great West Chimney and the Exum Ridge.
You might find some privacy by the Great West Chimney if you need to take a piss. There isn't much privacy on this route but there are a few nooks and crannies. You can also head in the opposite direction, see below. You may run into some climbers if you head south because the ledge system runs by the top of the Pownall-Gilkey route which is regularly guided by JHMG.

Overview of Sargent's Chimney
Sargent's
Chimney fans out at its base. The southern wall at the base of
Sargent's points toward the Main Rap. The northern wall points toward
the top of the Owen Chimney. Climbing the southern side of Sargent's is the
quickest line to and from the Catwalk. The northern access from the top
of the Owen Chimney might be the easiest for children but we can't
really say with certainty that one line is better for any age or skill
group. There are many ways to fully enter and exit this chimney.
Sargent's Chimney is named after Jessie Sargent.
Her husband, Frank Sargent, was of the Governor of Massachusetts from
1969 to 1975. On Aug 9, 1960, she broke her ankle in an accident while on a guided climb in the chimney. Sargent's was often called the
Fissure Chimney before then.
On August 4th, 1988, a Centerville, Utah, man was leading his two sons up the Owen-Spalding Route when he slipped on verglas near the 13,400' level and fell about 45' onto a ledge, fracturing his radius, pelvis and ribs and sustaining a hemopneumothorax. The call for help might have been the first time a cell phone was used to report a climbing accident in GTNP (using another party's phone: commercial guides). If true, that was during the dark ages of analog cell phones with fewer towers. Others have said the first emergency call from a cell phone was on Aug. 18, 1994, after a rappel anchor failed and a person fell 200 feet while on the Exum Ridge.
On August 4th, 1988, a Centerville, Utah, man was leading his two sons up the Owen-Spalding Route when he slipped on verglas near the 13,400' level and fell about 45' onto a ledge, fracturing his radius, pelvis and ribs and sustaining a hemopneumothorax. The call for help might have been the first time a cell phone was used to report a climbing accident in GTNP (using another party's phone: commercial guides). If true, that was during the dark ages of analog cell phones with fewer towers. Others have said the first emergency call from a cell phone was on Aug. 18, 1994, after a rappel anchor failed and a person fell 200 feet while on the Exum Ridge.

The snow often makes the scrambling easier and faster. In the middle of the image, there's a triangle-shaped tip of a rock sticking out of the snow with a black rectangular inlay. Can you find the inlay in the next photo?...


The rock on the bottom-left side of this image is usually drier when the approach to the alcove is icy. And that more direct line is often better than the center line to access the NW corner of the alcove.

The Hidden Exit
The Hidden Exit out of Sargent's is the most common ascent line. This variation appears to be the original line climbed by the Owen-Spalding party when you look at Owen's marked-up photo of the route they took (seen further below).
Since the main chimney is often used for rappelling and because guides sometimes belay clients down the Hidden Exit, you'll need to decide what climbing line is best for you once you arrive. The fastest and safest option depends upon your climbing skills and how busy it is.
There's always a chance of rockfall caused by climbers in the main chimney. Pick lines that offer some protection if climbers are above you. Or wait for the threat to pass.
Let's examine the Hidden Exit in more detail first.

It helps to pay attention to all the
possible holds during an ascent to speed up the descent. This is an awkward corner to race down quickly. There's a big foothold near Cannon's upper body that's often overlooked. Cannon's wearing the green helmet.

Hidden Exit
Just below the woman in the white shirt is a feature called "the bathtub". She needs to cross over the tub and gain the slope above her. It's a little funky. Some will climb over the detached boulder.

Andrew is in a small chute that gets you out of the Hidden Exit. That's the most common line of travel. You could also climb the short wall just north of the tub as seen below. That might be helpful if the area is backed up with climbers.

Another look at the Hidden Exit area

Andrew on a different day
This is the chute that gets you out of the Hidden Exit. The square-shaped Owen Rappel overlook is just above the climbers in the background. The rappel is south of them (your left as you look at the image).

.jpg)


Let's take a closer look at Sargent's upper chimney

This is the exit location that most climbers will utilize if they climbed directly up Sargent's Chimney. It's at the first opening in the upper chimney and just above the rap slings. Sargent's Chimney actually continues for a short distance further up the mountain. This photo was taken on Aug 4, 2012. Pretty dry. Sargent's Chimney can hold ice all year long in shaded pockets.
Some climbing parties will drop their climbing gear around here and scramble the rest of the way to the summit. It's usually safe to do that with most climbers under dry conditions; but, while rare, accidents have happened between here and the summit. Tired people make mistakes.


South side of bulge
Both sides of the bulge can be a little funky for novice climbers to tackle quickly.

Rappelling climber is just below the bulge

In the late 1990s, climbing guide Jed Williamson was taking a client up the Owen-Spalding route when he was hit by a rock dislodged by a client with another guided party. Jed had given his helmet to his client at the Lower Saddle because she wasn’t happy with hers.

Overview of path to summitAnother look
The downclimbing climbers are coming from the Hidden Exit area. Climbers heading up the main chimney will make an approach by the Hidden Exit and then go for the right or left side of the bulge.
We
think both sides of the bulge are pretty close in terms of difficulty. You'll have a better feel for your safest options once you arrive. We usually take the south side if we're downclimbing. Both require careful climbing.
Six free-soloing climbers were in the chimney (including photographer). Notice that several have helmets.
In the late 1990s, climbing guide Jed Williamson was taking a client up the Owen-Spalding route when he was hit by a rock dislodged by a client with another guided party. Jed had given his helmet to his client at the Lower Saddle because she wasn’t happy with hers.
Alright, back to the climb above the Sargent's. You're headed for the Slabby Wall.

As you can see, it's a pretty straight shot to the summit after passing the Hidden Exit. This is mostly easy scrambling. You may want to zigzag around some features.

Go northish for a short distance after exiting Sargent's or its Hidden Exit and turn right as soon as it's easy to do so. It's an obvious line when you see it.

The Three Stooges is highlighted above and it's seen more fully in the next image...

The Three Stooges are easy to miss upon a descent unless you're looking back up the slope.
.JPG)
A wall of rock will be on your south side for part of the way as you head toward the Slabby Wall.

The center crack of the Slabby Wall points toward the summit and back toward Sargent's Hidden Exit. Remember that.
Climb its center crack (or its sides); or, switchback around the Slabby Wall to the south. There's a small ledge at the top of the southern half of the Slabby Wall that's often used as part of a switchback.
On the upper right side of the image is a feature called the Horse which is a false summit. The crack points toward the true summit.


These climbers are cutting short the longer switchback option on the southern half of the Slabby Wall. The photographer is at the same spot as in the previous image.

None is on a rope in the above 2 photos. Runners who are strong climbers might find it faster to climb by the center crack and skip the switchbacks. Most guided groups use the switchbacks.


Somewhere below the summit lookin' toward Cascade & Valhalla Canyon
Edgar did a single-day round-trip soloing everything on his first time up the mountain — and first time climbing — before heading off to his second job in Jackson.

After passing the Slabby Wall, the last scramble to the summit will probably include a few climbing moves if you don't find the easiest way. When this side is snowy or icy, an approach passing under the southern end of the Horse, and then under its eastern aspect, may be safer if it has better conditions—that's not always the case but it gets more sun especially earlier in the day.
SUMMIT

Geraldine Lucas 1924
In 1924, a 58-year-old Geraldine Lucas
became the second woman to reach the summit, and first local woman to
do so. She received a
Bachelor's degree from Oberlin College in 1898, when she was a divorced 32-year-old single mother. Look for her name carved into the rock below the summit monument. Descendants of the Lucas family still reside in Jackson Hole. Only six visits to the summit had taken place before her arrival.
The men standing next to her are Ike Powell, Allen Budge and Jack Crawford. Allen said of the experience, "I never lost anything up there and... never wanted to go back." And trust us, many still feel the same way. For some reason, Allen is missing from the August summit register. Members of the Budge family still live in Jackson Hole.
The men standing next to her are Ike Powell, Allen Budge and Jack Crawford. Allen said of the experience, "I never lost anything up there and... never wanted to go back." And trust us, many still feel the same way. For some reason, Allen is missing from the August summit register. Members of the Budge family still live in Jackson Hole.
16-year-old Paul Petzoldt, everyone's guide, is sitting in the photo. Paul, with almost no climbing experience,
made his first ascent up an icy Grand Teton while wearing cowboy
boots. Twenty-two days later, he made his third trip with Geraldine.
Paul founded what became Exum Mountain Guides, the National Outdoor Leadership School and the Wilderness Education Association. NOLS alumni went on to run and own Jackson Hole Mountain Guides which was started by Barry Corbet.


Kia's first time climbing
She was on the college rowing team and unsurprisingly sailed up the OS with speed. Alex was on his 2nd trip soloing. August 2017.

We skied in jeans too
Johnna & Becky soloed the OS at the end of August in 2019.

The names of the Owen party are etched into the rocks surrounding the USGS monument, along with other names from long ago.

Nice weather and mostly dry conditions after a snowy September on this day


 The Main Rappel to the Grand Teton's Upper Saddle

Click to Download or Enlarge the following images...
.jpg)


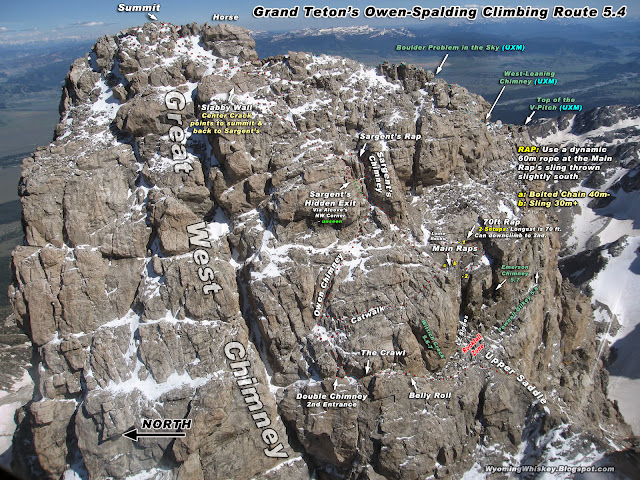


 Enclosure's summit
 View from the Enclosure
 Ditto
Ditto
 Photo taken from the Enclosure by Billy Owen


 Click to Enlarge
 Smoke seen from the Grand Teton
Overview - Upper Exum
Overview - Owen-Spalding
The Approach to the Lower Saddle
Wyoming Whiskey Home Page

Jim Huidekoper owned
Jackson Hole Mountain Guides from about
1970 to 1975. Stearnie skied Teton Pass before you did and he
owned
the original Hungry Jacks in Wilson. Schwartz was a partner in
the old Point Store
at
Hoback Junction.
Connie Kemmerer and Kay Wilson, both 81 years old and long-time climbing partners, made history by becoming the oldest climbers to reach the summit on August 22, 2025. On that same day, they briefly shared the summit with Jane Maus who was on her way to setting the woman's fastest round-trip time on the Grand. Two records smashed on one day.
Bethany at the halfway point of The Picnic in 2025
We met Bethany soloing her first run up the Grand with patches of ice underfoot. That wasn't enough of a challenge so she decided that the next time she would bike from Jackson to Jenny Lake, swim across the lake, run up the Grand; then, repeat it all in reverse. The sufferfest known as The Picnic attracts the attention of world-class athletes and more than a few brave souls who aren't. The current FKT records for The Picnic triathlon are truly impressive, but so is just finishing one.

Some of these scouts hiked to the Lower Saddle with packs almost as heavy as they were. It was a cold climb up the OS before the sun hit. A few had frozen hands. BE PREPARED
Speaking of being prepared, on Sept 16th, 2025, four climbers were stranded on the summit after a fast moving snow and ice storm caught up with them while climbing. They were unable to retreat. They had no crampons or overnight gear. And a quick rescue wasn't possible. They spent a frozen night on the summit before being rescued the following day. Always check an hourly forecast and give yourself extra wiggle room for the unexpected turn of events. Quick changes to the weather and conditions are common in alpine environments.

Two "black setters" signed the 1950 summit register with their paw prints thus marking the "first canine ascent". In Glenn's book, "Never a Bad Word or a Twisted Rope", Glenn said the dogs followed Dick Pownall to the Lower Saddle, and neither knew who they belong to. They named them Billy Owen and Lord Mallory. After they returned to the valley floor, they found out the actual owners were John and Georgie Morgan, workers at the Elbo Ranch by Cottonwood Creek. When Glenn went to return the runaway dogs to the ranch, he had certificates in hand saying they climbed the Grand and a $40 bill for their guided trip. We're assuming that Dick Pownall is on the far-right side of the image. Dick and Glenn are the guides shown on the summit register.
In 1950, Pownall, Mike Brewer and Bob Merriam were the only guides Exum employed according to the Exum History Project. Pownall made the first complete ascent of the Grand's North Face in 1949. In 2002, Pownall at 75 made his final climb up the Grand's Exum Ridge. According to Tom Hornbein,
he toyed with the idea of another climb when he turned 90. The rappel back to the Upper Saddle used to be known as the Pownall Rappel. Dick was the first to use today's rappel location.

The above image was captured by
William (Billy) O. Owen
of John Shive, Franklin Spalding, and Frank Petersen on the summit of
the Grand Teton on August 11, 1898. Two days later, members of the party
returned
to build a cairn and chisel their names in the summit boulder while Owen took photos from the Enclosure. Descendants of the Peterson family still live in Jackson Hole. According to Charlie Peterson, as told by "Captain Bob", Frank Peterson liked to take a sip of whiskey every morning to start his day. There used to be plaque on the summit commemorating the ascent of the Owen party. It was stolen in 1977.
DOWNCLIMB
The hard part isn't over. You need to get back down safely. And back to the trailhead.
Start off on the right foot and think about safety. In 2017, Evan Pack, 33, of Lehi, UT summited the Grand Teton and was beginning to descend the mountain when he lost his footing directly below the summit and fell approximately 20 feet. He suffered serious injuries requiring evacuation.
On August 17, 1985, Bruce McMurtrey took a small fall near the summit and smashed his right shoulder against a rock wall, dislocating it. A ranger performed an on-site reduction. Alpine Savvy has some tips about on-site reductions.
Once you're back at the Slabby Wall, look for its center crack. As stated before, it points down toward Sargent's Hidden Exit. Below the wall, scramble down the easiest descent line (overall straight line) until the easier scrambling comes to an end. Look for Sargent's or its Hidden Exit to your south. Downclimb either variation. Or rap down Sargent's main chimney.

Let's take a look at the rappel area that drops you back to the Upper Saddle.

The Upper Saddle's landing zone slopes downhill from south to north below the rappel. The landing zone (LZ) below the sling sits higher than the landing zone below the bolted chain. Most climbers get by with a dynamic 60m rope thrown to the south from the sling. Make sure your rope is truly 60m and dynamic (not every climber has a handle on that). Again, thrown south from the sling. It's over 30m if you go further north. If you hauled an 80m rope up here, that's impressive but most bring a 60m rope. If the area is backed up, try partnering up with another party and use two ropes from the bolted chain. The 70' rap area isn't a fan favorite but it's a third option.

As seen in the above photo, the 70' rappel area can be reached from the main rappel's sling if you climb up a very short chimney directly above the sling. You can also reach it directly from the base of Sargent's Chimney but that line may increase the chances of rockfall over of the main rappel area. And, it's harder to know where you're going. Again, move very carefully no matter your approach around all the rap lines.
Descending in January
Nowadays, winter or winter-like ascents are mostly for ski mountaineers. Very few people set out to climb without skis. The above photo has Guide Greg Collins in back, his client in the middle, and Dan Carson in front. Andrew Carson thinks he took the photo in 2008. Andrew posted it on Mountain Project. They're taking the switchback just south of the Slabby Wall. Andrew Carson used to own JHMG and he guided many winter climbs. His career took him
into real estate, conservation work, climbing, and the non-profit world. He participated in
Paul Petzoldt’s very first course at the National Outdoor Leadership School in 1965. He and his wife Nancy moved to
Wilson, WY, in the late ’60’s.
Let's take a look at the rappel area that drops you back to the Upper Saddle.

Main Rappel Area
The Upper Saddle's landing zone slopes downhill from south to north below the rappel. The landing zone (LZ) below the sling sits higher than the landing zone below the bolted chain. Most climbers get by with a dynamic 60m rope thrown to the south from the sling. Make sure your rope is truly 60m and dynamic (not every climber has a handle on that). Again, thrown south from the sling. It's over 30m if you go further north. If you hauled an 80m rope up here, that's impressive but most bring a 60m rope. If the area is backed up, try partnering up with another party and use two ropes from the bolted chain. The 70' rap area isn't a fan favorite but it's a third option.
Almost without exception, free-soloing climbers on the Owen-Spalding do
not use the rappel or carry ropes. For many, it's always quicker to
downclimb the OS route and usually safer. Free-soloing climbers might
carry a rope under adverse conditions or while exploring new areas. Some may carry a thin and light emergency rope. Some
will catch a ride on another person's rope. That's pretty easy to do
during the busy season but not common.
Be very careful while traveling around the rappels. There are many loose rocks.
On September 8, Jim Bjorken (24 ), Dick Blankenbeckler (25 ) , and Tom Creese (24) were on the descent from the summit when they took cover in a small cave above the Owen Rappel. After several close lightning strikes, a strike occurred just above the cave. All three men received burns and Blankenbeckler was knocked out. The other two men gave Blankenbeckler artificial respiration for half an hour before he fully regained consciousness.
On September 8, Jim Bjorken (24 ), Dick Blankenbeckler (25 ) , and Tom Creese (24) were on the descent from the summit when they took cover in a small cave above the Owen Rappel. After several close lightning strikes, a strike occurred just above the cave. All three men received burns and Blankenbeckler was knocked out. The other two men gave Blankenbeckler artificial respiration for half an hour before he fully regained consciousness.

Raps back to the Upper Saddle
Three climbers are at the maintained 30m+ sling and four are approaching the 1st setup for the 70' rap. The 70 foot rappel option is broken into two parts.
As seen in the above photo, the 70' rappel area can be reached from the main rappel's sling if you climb up a very short chimney directly above the sling. You can also reach it directly from the base of Sargent's Chimney but that line may increase the chances of rockfall over of the main rappel area. And, it's harder to know where you're going. Again, move very carefully no matter your approach around all the rap lines.
The first setup of the 70' rap is a short drop. You can downclimb a
tight, slanting chimney and avoid the first setup if you wish. The
second setup is a 70 foot drop. Use new slings on the 70' rap setups. Don't trust the old tat.

The man rappelling off the bolted chain is directly below
the man using the sling. He will need to travel a greater distance on
his rope compared to the man using the rope off the sling. It's unknown how long his rope was with rope stretch, but a 60m rope might not make it. Just
after leaving sight of the rappel setups, it's possible to land on a
nice ledge that can be used to adjust your position and check your rope. People have come up short of rope while rappelling here. And Exum Mountain Guide Gary Falk lost his life in a fall from the sling area.
While rare, there have been 2-hour
delays at the rappel to the Upper Saddle (perfect holiday weekend). That can be a real safety hazard with weather rolling in. Once again, share a rope, downclimb the OS, or try the 70' rap if the clouds are building.

Stamped 40m drop from bolted rap station
.JPG)

"Trad ratings in the mountains are very subjective. The Owen-Spalding route on the Grand Teton, for example, has an overall rating of 5.4, with a few moves of 5.5 in the Double Chimney. This assumes that the climb is as dry as it can be and that the climber is on what is considered by most to be the well-established route. A bit of water seepage here and there, a spot or two of verglas, or an accidental traverse slightly off-route can all contribute to a perceived increase in difficulty. Add the heightened sense of awareness that comes with considerable exposure or the threat of an approaching storm, and an “easy” climb can feel far more serious than its rating.” Renny Jackson in 'A Climber's Guide to the Teton Range'
Besides the Jenny Lake Ranger Station, local sources for beta might be found at the AAC's Climbers' Ranch in GTNP, the Teton Mountaineering store, the Lupine Meadows trailhead, Teton County's climbing gym, or the local Black Diamond store which is sometimes staffed by local climbers (and possibly JHMG staff). The Teton Climbers’ Coalition runs the Jackson Hole Town Pump. You might find beta there, or meet climbing partners. We posted weekly
updates about conditions to our Wyoming Whiskey Home Page
before social media took off. There's less of a need these days. We're
more likely to post an update in the fall when it's harder to get a good
report on conditions.
Keep an eye on the weather leading up to a climb (forecast, webcams and actual weather). Runoff from heavy rain can be active for several days. It can turn to ice during that extended time period if temperatures fall. You don't need precipitation to get icy conditions. Hoar frost occurs when water vapor directly crystalizes on surfaces (deposition). Rime ice can be created when a cloud of supercooled water droplets are freezing on contact with a sub-freezing surface. Supercooled water droplets can be found in many stratus and cumulus clouds.
Conditions in June are always mixed. New ice is being created and old ice is being exposed with June's freeze and thaw cycles. And rockfall is more common with those cycles. The snow may resemble a 7-Eleven Slurpee once the sun cooks it. It can turn to frozen snow overnight. Conditions can vary greatly with the elevation, shadiness, temps and aspect. The steeper and sunnier sections of the upper mountain might clean up before the approach. Crampons and an ice axe are often used in June. It helps to have experience with those tools before using them in high-consequence locations. At times, June's conditions can be more hazardous than April's. As we enter July, conditions vary yearly but odds favor mixed conditions on the approach & climb in early July. Quite often, there's plenty of dry rock to move safely in early July for experienced soloing parties.
June is one of the more scenic times to climb. The national park is fully leafed out below 8500' by the second week of June, or earlier. And most of the mountains remain snow-capped. The impressive arrowleaf balsamroot sunflowers reach a peak in June and fade in July. They're quickly followed by other wildflowers which come and go throughout the season. The quality and timing of the show depends upon the weather.

You can compare the saddle's forecast with actual temperatures at the saddle's weather station. Getting a feel for forecast errors helps with decision making. Forecast wind speeds are often off by a factor of 2 or more at the saddle due to the saddle's topography not being factored into a forecast. Forecast temperatures in the hourly forecast can easily be off by 10°F at any specific time. Additionally, it's not unusual to find new ice at the saddle even though overnight temperatures were reported to be above freezing. This can be due to several environmental conditions, but the most obvious reason might be a miscalibrated thermometer.
*** NWS Multi-day Lower Saddle Forecast 11,600'
*** NWS Hourly Lower Saddle Forecast 11,600'
NWS Forecast Discussion Western WY
NWS Forecast Discussion Eastern ID
Lower Saddle Weather Station 11,600'
NWS Lower Saddle data
(Summer Only)
JXN/GTNP
Let's look at a quote from an AAC accident report:

Emergency Information
Beginning in 2024, the JLCR started using the Teton County SAR helicopter and started integrating personnel on some missions. TCSAR is overseen by the sheriff's office.
In 2017, Ryan Burke, 35, made three round-trips up the Grand Teton back-to-back in 17 hours, 54 minutes. Some settle for two. Meredith Edwards made two back-to-back round-trips up the Grand in about 16 hours just before Ryan's threesome. Plenty of professional mountain runners could easily beat Ryan's time but only Ryan will actually do three round-trips. Ryan's stunt was truly impressive. A handful of people who try personal FKTs in the Tetons will share GPS tracks as proof of their elapsed time. You can find many tracks posted on the Strava website and other portals that support sharing GPS tracks.
To get a feel for the time it might take you to reach the summit, or do a round-trip, let's look at some numbers for local hill climbs. If you can top out on Snow King Mountain's Exhibition ski run in under 23 minutes then a sub-5-hour round-trip is looking possible. That's 68.3 vertical-ft/min over 0.3 miles. It's easier to sustain that pace up Snow King than all the way to the Grand's summit so we increased the maximum time to 5 hours.
 Kilian Jornet's 2012 GPS track, with the 2025 "legal route" superimposed
While rare in the Tetons, altitude sickness can become a serious health issue. On September 16, 2001, a climber on the Grand's East Ridge was unable to stand or walk and he had gurgling in his chest. He was taken to the hospital in Jackson and treated for high altitude pulmonary edema. Climbers suffering from Acute Mountain Sickness or Altitude Sickness need to stop, rest, and descend if serious symptoms don't improve.
~~~~~~~~~~~~~~~~~~~~~~~~~~~
.JPG)
A fat ledge under the main rappel area
This is a good place to check your rope after leaving the Main Rap's sling or bolt. The photographer is by the 2nd setup of the 70' Rap.

Click or tap to enlarge
"Trad ratings in the mountains are very subjective. The Owen-Spalding route on the Grand Teton, for example, has an overall rating of 5.4, with a few moves of 5.5 in the Double Chimney. This assumes that the climb is as dry as it can be and that the climber is on what is considered by most to be the well-established route. A bit of water seepage here and there, a spot or two of verglas, or an accidental traverse slightly off-route can all contribute to a perceived increase in difficulty. Add the heightened sense of awareness that comes with considerable exposure or the threat of an approaching storm, and an “easy” climb can feel far more serious than its rating.” Renny Jackson in 'A Climber's Guide to the Teton Range'
~~~~~~~~~~~~~~~~
Safest Time For Free-Soloing
The
best days for free-soloing usually arrive between
mid-July and mid-to-late August. The exact dates vary from year to year. And no date is guaranteed nice conditions or weather.
The best time to leave the trailhead for a single-day round-trip depends upon many factors. The majority get an early start to avoid the possibility of afternoon thunderstorms. Soloing parties who are moving quickly might leave the trailhead at daybreak, or later. Many can reach the summit in under 4 hours so they have greater flexibility in their schedule. Many guided groups start their climb from the 11,600 ft Lower Saddle between 3 and 4 a.m. Besides trying to avoid typical afternoon showers due to orographic lift, the guides want to avoid delays from other climbers and the associated safety hazards. They also have a work schedule. Climbers making a round-trip in a day and hauling climbing gear often leave the trailhead between midnight and 2 a.m. Stronger parties may leave at a more reasonable hour but the scheduling really depends upon the weather, the speed of the group and personal preferences.
The best time to leave the trailhead for a single-day round-trip depends upon many factors. The majority get an early start to avoid the possibility of afternoon thunderstorms. Soloing parties who are moving quickly might leave the trailhead at daybreak, or later. Many can reach the summit in under 4 hours so they have greater flexibility in their schedule. Many guided groups start their climb from the 11,600 ft Lower Saddle between 3 and 4 a.m. Besides trying to avoid typical afternoon showers due to orographic lift, the guides want to avoid delays from other climbers and the associated safety hazards. They also have a work schedule. Climbers making a round-trip in a day and hauling climbing gear often leave the trailhead between midnight and 2 a.m. Stronger parties may leave at a more reasonable hour but the scheduling really depends upon the weather, the speed of the group and personal preferences.
Exum Mountain Guides
offers a 1-day private climb of the Grand. They meet the single-day
private client at their Lupine Meadows office at midnight and drive the
short distance to the trailhead and then depart on foot. They say this about the timeline: "Plan to reach the
summit sometime during the late morning hours. Your knees will remember
the descent — over 7,000-feet and approximately 8 miles, and you will
never forget the climb. Most climbers are back to the valley before
dinner." (FYI: As pointed out elsewhere, the one-way distance of 8 miles doesn't match GPS tracks)
Current Conditions
The Jenny Lake Climbing Rangers use Instagram to post updates on conditions. Mountain Project's forums
may prove helpful. Take all reports with a bit of skepticism. And
common sense. The rangers have a habit of issuing overly ominous
statements about everything to keep people from overextending their
below-average abilities. The Jenny Lake Ranger Station is often hard to
reach by phone but you can try that option too.....
Jenny Lake Ranger Station: 307-739-3343
Winter/Off-Season Info: 307-739-3309Keep an eye on the weather leading up to a climb (forecast, webcams and actual weather). Runoff from heavy rain can be active for several days. It can turn to ice during that extended time period if temperatures fall. You don't need precipitation to get icy conditions. Hoar frost occurs when water vapor directly crystalizes on surfaces (deposition). Rime ice can be created when a cloud of supercooled water droplets are freezing on contact with a sub-freezing surface. Supercooled water droplets can be found in many stratus and cumulus clouds.
Forecast 11,600'
Hourly Forecast 11,600'
Webcams
Webcams
Shoulder Season Conditions
June, September, October
June, September, October
Conditions in June are always mixed. New ice is being created and old ice is being exposed with June's freeze and thaw cycles. And rockfall is more common with those cycles. The snow may resemble a 7-Eleven Slurpee once the sun cooks it. It can turn to frozen snow overnight. Conditions can vary greatly with the elevation, shadiness, temps and aspect. The steeper and sunnier sections of the upper mountain might clean up before the approach. Crampons and an ice axe are often used in June. It helps to have experience with those tools before using them in high-consequence locations. At times, June's conditions can be more hazardous than April's. As we enter July, conditions vary yearly but odds favor mixed conditions on the approach & climb in early July. Quite often, there's plenty of dry rock to move safely in early July for experienced soloing parties.
June is one of the more scenic times to climb. The national park is fully leafed out below 8500' by the second week of June, or earlier. And most of the mountains remain snow-capped. The impressive arrowleaf balsamroot sunflowers reach a peak in June and fade in July. They're quickly followed by other wildflowers which come and go throughout the season. The quality and timing of the show depends upon the weather.
Conditions
in September aren't as predictable as June's. The odds increasingly
favor mixed conditions with each passing week. Again, every year is
different. Precipitation often falls as snow or graupel
at upper elevations. Ice and snow may appear on the approach. We have
had above-average temperatures and passable conditions for numerous fast
& light round-trips in September or October. For example, in
September of 2024, the climbing rangers predicted that "north and west facing routes will likely be in winter conditions for the rest of the year";
however, by mid-October, you could easily make the summit without ever
touching snow, ice or wet rock on the west-facing Owen-Spalding route.
And the northern routes were in better shape than many climbers would
find in mid-July. The last day for soloing in a timely manner with passable conditions was on Oct 27 in 2024, when we
had a high temperature record of 65°F.
Some climbers only care about conditions so as to bring the
appropriate gear. This mountain gets
climbed year-round. Even soloed year-round. For many, the best days in the mountains are the ones with challenging conditions.
To see a variety of backcountry hazards play out, watch this classic
ski-mountaineering video with Steve Shea which took place in Garnet Canyon starting
in June of '78 over the course of six weeks; and apparently, an additional
four weeks in ’79 according to
a story in Adventure Journal...(link has been killed or moved but we keep it).
Fall Line from Bob Carmichael
Bob Carmichael's homepage has some great pictures from the filming, and his Vimeo channel has further insight into the making of Fall Line. His account differs slightly from the one in Adventure Journal.
His field crew included
Larry Bruce,
Greg Lowe,
Steve Shea, and
David Breashears who passed away in 2024. He says they camped at the Lower Saddle for 7 weeks while
making the movie.
Bill Briggs ran supplies to the saddle. After Briggs, Shea was the second person to ski the
Grand.
Larry Bruce and Steve Shea were living in Aspen, CO, in 1978, as
were many mountaineers like
Michael Kennedy
and
ski-mountaineering legend Lou Dawson. In the 70's and early 80's, Aspen was a nice place for a
lowlife skier or mountaineer. Larry, older and still climbing hard in 2021, wrote a thin guide to rock climbing in Aspen, had a habit of soloing 5.10s, and was married to the American rock climber
Molly Higgins
who made the first all-woman ascent up The Nose on El Capitan with
Barb Eastman in 1977. Barb
started working as a Jenny Lake Climbing Ranger in 1980, along
with
Anne Macquarie just a few years after the first female rangers were hired in the park: Anne-Marie Rizzi in 1977 and Jean Ruwitch Dempsey in 1978. Steve Shea now lives in Jackson.
There's a fine low-budget movie called “Teton Skiing – Legends of the Fall Line” if you're interested in learning more about the history of
Teton skiing. Both Fall Lines get covered in
Lou Dawson's review of the movie on his wildsnow blog
(read the comments). UPDATE: it seems the comments have been removed.
Weather
The Lower Saddle weather station was offline during the entire summer of 2025
Lower Saddle Weather Station
Direction from
~ SUMMER ONLY ~
- usually mid-June to mid-Sept -
@ 11,600'
Temperatures
~ SUMMER ONLY ~
- usually mid-June to mid-Sept -
The accuracy of the thermometer is unknown. We're unable to pull up weather graphics when MesoWest does server maintenance. At that time you can check the National Weather Service's Teton Saddle weather page if it's up and running. Or look for other stations on the NWS weather station map or the Synoptic weather station map.
@11,600'
Wind Speed,
Gust &Direction from
~ SUMMER ONLY ~
- usually mid-June to mid-Sept -
You can compare the saddle's forecast with actual temperatures at the saddle's weather station. Getting a feel for forecast errors helps with decision making. Forecast wind speeds are often off by a factor of 2 or more at the saddle due to the saddle's topography not being factored into a forecast. Forecast temperatures in the hourly forecast can easily be off by 10°F at any specific time. Additionally, it's not unusual to find new ice at the saddle even though overnight temperatures were reported to be above freezing. This can be due to several environmental conditions, but the most obvious reason might be a miscalibrated thermometer.
LOWER SADDLE
*** NWS Multi-day Lower Saddle Forecast 11,600'
*** NWS Hourly Lower Saddle Forecast 11,600'
NWS Forecast Discussion Western WY
NWS Forecast Discussion Eastern ID
Lower Saddle Weather Station 11,600'
NWS Lower Saddle data
(Summer Only)
JXN/GTNP
A
summer forecast is good for about 6 hours. It's often of questionable
value for the Tetons if there's any instability in the atmosphere. Perhaps
an AI forecast will improve things. For now, no one can tell you with certainty what's
going to happen within a ten mile radius of the Grand Teton when
it comes to precipitation unless
there's a big, stable, high-pressure system parked over the region and
we're in its center. Or there's a massive storm system slamming the
Northern Rockies. It's often the case that unstable weather in a
forecast never materializes and it's a great day for climbing. Or, storm
clouds drop precipitation for 15 minutes and leave the rest of the day
nice for climbing. It's typical mountain weather. Dig a little deeper into a forecast and be prepared
to read the weather as you travel.
*** You might want to reconsider your plans if the forecast discussion mentions monsoon moisture, low pressure or a cold front hitting the range ***
Let's look at a quote from an AAC accident report:
"Lightning
storms are common in the Teton Range in the summer. Although most
storms occur in the afternoon or evening and follow a distinct
progression, storms at other times of the day or night are not rare and
are often missed by professional weather forecasters."
Keep
in mind that forecast temperatures are temperatures expected in the
shade. And temperature readings from a weather station are supposed to
be shaded temperature readings.
Saddle Temps in 2018 - every summer is different
Emergency Information
(307) 739-3301 - Teton Interagency Dispatch Center
(Voice calls only)
911 works for texting in Teton County, WY & ID
(Voice calls only)
911 works for texting in Teton County, WY & ID
GTNP's Dispatch Center is open 24 hours a day during the summer season (usually June 1 - Sept 30).
They're usually open from 6 a.m. to 10 p.m. after
summer ends. Call them if you need to confirm operating
hours. For time-critical, life-threatening emergencies, you might be
better off calling the park's dispatch center instead of contacting 911
for emergency service in the park during the summer.
Beginning in 2024, the JLCR started using the Teton County SAR helicopter and started integrating personnel on some missions. TCSAR is overseen by the sheriff's office.
911 calls & text messages go to the Teton County Sheriff's Office.
Calls to the Sheriff's Office usually get transferred to GTNP if the emergency
is within park boundaries during the summer. 911 calls within sight of
Idaho might get sent to Teton County, Idaho. They can also receive text messages.
Sometimes a text message will get through to emergency services when a voice call will not. Texting 911 is also advised if your phone's battery has been severely drained. Text messages do not include location coordinates like emergency voice calls so be sure to include location information in any messages (detailed place name or GPS coordinates).
The Teton County Backcountry SOS App will drop a GPS location into an emergency text message if your phone's GPS is on.
Information needed by the rescue team includes
1) the exact location of the injured party
2) the time of the accident
3) the nature and extent of injuries & medical care being provided
4) equipment at the scene (ropes, hardware, first-aid kit, etc.)
5) the number of people with the injured party
6) the plan of action (if any).
1) the exact location of the injured party
2) the time of the accident
3) the nature and extent of injuries & medical care being provided
4) equipment at the scene (ropes, hardware, first-aid kit, etc.)
5) the number of people with the injured party
6) the plan of action (if any).
There is no charge for
rescue services. Of course, self-rescuing is paramount if it can be done safely without further injury. Rescues can be hazardous for all involved. In 2012, TCSAR member Ray Shriver died in a helicopter crash during a rescue mission.
Summer Camping
Summer backcountry camping permits can be reserved online
starting in January. First-come,
first-served, walk-in permits are available during the summer and
they're usually in high demand. Backcountry camping permits for
climbers must be picked up in person at the Jenny Lake Ranger Station.
The ranger station is open 8am to 5pm daily from early June to early
September. Garnet
Canyon has special regulations for backcountry campers such as all human waste must be packed out using Wag Bags, etc.
Many apps and websites cover every camping option in the valley in great detail. Our Jackson Hole Camping Guide covers some additional camping options if you're unable to secure camping in the park. We rarely update it. The National Elk Refuge & Greater Yellowstone Visitor Center is also a good resource for visitors who are in town. The Bridger-Teton National Forest has an office about a block or so south of the visitor center. Their Blackrock Ranger Station is located about 8 miles east of Moran Junction (<map) on Highway 26/287 (the Togwotee Pass Highway). They have a small visitor center.
Many apps and websites cover every camping option in the valley in great detail. Our Jackson Hole Camping Guide covers some additional camping options if you're unable to secure camping in the park. We rarely update it. The National Elk Refuge & Greater Yellowstone Visitor Center is also a good resource for visitors who are in town. The Bridger-Teton National Forest has an office about a block or so south of the visitor center. Their Blackrock Ranger Station is located about 8 miles east of Moran Junction (<map) on Highway 26/287 (the Togwotee Pass Highway). They have a small visitor center.
As of 2025, GTNP still has an old, orphaned webpage with GTNP backcountry camping zone maps. As far as we can tell, there is no direct link to that maps page from any other GTNP webpage, including the park's backcountry camping zones webpage. Historically, GTNP's public-facing backcountry maps have not shown camping zones in Garnet Canyon, or trails past the Platform's Camping Zone.
Speed Records & Stunts
In 2017, Ryan Burke, 35, made three round-trips up the Grand Teton back-to-back in 17 hours, 54 minutes. Some settle for two. Meredith Edwards made two back-to-back round-trips up the Grand in about 16 hours just before Ryan's threesome. Plenty of professional mountain runners could easily beat Ryan's time but only Ryan will actually do three round-trips. Ryan's stunt was truly impressive. A handful of people who try personal FKTs in the Tetons will share GPS tracks as proof of their elapsed time. You can find many tracks posted on the Strava website and other portals that support sharing GPS tracks.
To get a feel for the time it might take you to reach the summit, or do a round-trip, let's look at some numbers for local hill climbs. If you can top out on Snow King Mountain's Exhibition ski run in under 23 minutes then a sub-5-hour round-trip is looking possible. That's 68.3 vertical-ft/min over 0.3 miles. It's easier to sustain that pace up Snow King than all the way to the Grand's summit so we increased the maximum time to 5 hours.
A better test might be out at Teton Village. If you can reach the summit above the Jackson Hole Mountain Resort's tram in under 90
minutes (with or without shortcuts) then you shouldn't have a problem nailing a 6 hour round-trip like Ryan while taking a more moderate pace. That's 46 vertical-feet/min over the 4,139 ft elevation gain. A runner who competed in JHMR's Hillclimb in 2023, hit 71 vertical-feet/min,
taking under 60 minutes to finish the 6.2 mile uphill race course. If
you're doing that, you'll be closer to a 3-hour-round-trip on the Grand
assuming you can scramble and climb with speed.
A
few runners prefer to travel when stable snow covers parts of the
approach. The ones listed as the fastest had mostly dry conditions.
The Fastest Three Runners
Kilian Jornet, 2h54m01s, August 12, 2012
Fastest Women
Jane Maus, 3h45m33s, August 22, 2025
Emelie Forsberg, 3h51m, August 11, 2012
Jen Day Denton, 4h15m27s, July 9, 2022A single-track uphill race is not the same as a run up and
down the Grand but there are some amazingly fast trail runners who might have the skills to pull off a new FKT record. Maus trailed Jackson's Anna Gibson at the JHMR's 2025 Rendezvous Mtn Hillclimb by almost 8 minutes coming in 10th place, and Anna trailed Sunseri by about 3 minutes, coming in 5th place just behind Sunseri's 4th place finish. For professional runners, the risk of an injury derailing their professional trail races might be a good reason to forgo an FKT on the Grand.
You won't see Sunseri's FKT on the popular FKT website that tracks records. After Sunseri poached the old climber's trail that Bryce Thatcher used
on his FKT back when that was the common climber's trail, the National Park Service took legal action against Sunseri; and as a bonus, the FKT website owners (Outside’s parent company Outside Interactive) removed his FKT.
Jack Kuenzle of Roxbury, Connecticut ran a pretty fast time of 3:02:32 on August 16, 2023. His GPS data is on the Strava website. His round-trip was estimated to be 13.8 miles by his watch. He
took a couple shortcuts by Spalding Falls according to his GPS track. Stephen Mulherin had a nice fast time of 3:00:34, in 2015. Stephen's records for the JHMR's Hillclimb and the Targhee Hill Climb were pretty impressive. We would sometimes see him running over snow fields in Garnet Canyon—a faster option with the right snow but still sketchy on the slopes.

Kilian's GPS data used to be on Suunto's "Movescount"
website before the website was discontinued. He took several shortcuts. His watch recorded 12 miles on his
round-trip. His ascent time was about 1:51:28, and the descent time was 1:02:33.
The screenshot of Kilian's old Suunto data shows a pretty mismatched track for his ascent & descent below Spalding Falls. It's one thing for the tracks to not align perfectly, but it's a whole other ballgame for the ascent and descent to not match in scale. The old Garmin Forerunner watches did the same thing—crazy tracks; possibly using the same chip sets developed by Qualcomm, and using similar algorithms. This was back when most GPS watches did not have data from different international GPS constellations.
The screenshot of Kilian's old Suunto data shows a pretty mismatched track for his ascent & descent below Spalding Falls. It's one thing for the tracks to not align perfectly, but it's a whole other ballgame for the ascent and descent to not match in scale. The old Garmin Forerunner watches did the same thing—crazy tracks; possibly using the same chip sets developed by Qualcomm, and using similar algorithms. This was back when most GPS watches did not have data from different international GPS constellations.
~ The Short Incomplete List of Fastest Times ~
Michelino Sunseri 2:50:50 Sept 2, 2024
Michelino Sunseri 2:50:50 Sept 2, 2024
Andy Anderson 2:53:02, August 22, 2012
Kilian Jornet 2:54:01, August 12, 2012
Stephen Mulherin 3:00:34, 2015
Jack Kuenzle 3:02:32, August 16, 2023Bryce Thatcher 3:06, August 26, 1983
Luke Nelson 3:33
Gardner Heaton 3:36 mid-90's
Jane Maus, 3:45:33, August 22, 2025 (W)
Emelie Forsberg 3:51, August 11, 2012 (W)
Jazmine Lowther 3:51:12, August 11, 2025 (W)
Jock Glidden 4:11, 1973
Jen Day Denton 4:15:27, July 9, 2022 (W)
For historical reference, Holyoke & Hawkes started from the "Trail in Flats". Renny Jackson's guidebook says it was the Lupine Meadows trailhead. The Bonney guidebook says they started at Jenny Lake. Hawkes
is credited with the old round-trip record at 5:21 or 5:22 depending
upon the source. Construction on the climbers trial beyond the 4.1 mile
mark to the Lower Saddle didn't happen until 1977, so H&H were
probably rock hopping past the original trail in 1939. H&H took
between 3:22 and 3:32 to reach the summit. These days, a few Jackson
athletes in their 60s can hit that time but they have access to a
climbers' trail. Most 60-year-olds will not beat H&H's descent time.
H&H took about 2 hrs for the descent.
Jock
Glidden probably had access to a social trail used by climbers on his
4:11 round-trip back in 1973. It's been reported that Glidden got to the
summit in 12 minutes from the Upper Saddle. Rolando Garibotti, who held the Grand Traverse speed record
of 6 hours, 49 minutes until 2016, was reported to have run from the
Grand's summit to the Lower Saddle in 12 minutes on the long-gone JH
website Outerlocal.com (created by Christian Beckwith). Michelino Sunseri ran from the summit to the Lower Saddle in about 17 minutes in 2024 if we remember correctly. Kilian Jornet's descent to the Lower Saddle took about 19 minutes and he took about 48 minutes on his round-trip between the Lower Saddle & the Grand's summit (guesstimates based on his GPS track).
FWIW: The Fastest Round-Trip Ski Run on the Grand Teton was captured by Jared Inouye, Jason Dorais, and Andy Dorais who came in at 5:17 on June 28, 2011, taking couloirs to the summit. Hayden Wyatt claimed the title of the youngest to climb and ski the Grand at age 14 in June 2012 with his dad, Rick.
Exum reported that Rod Newcomb, at 75-years-old, celebrated his 55th year of climbing the Grand with a one day ascent on July 2nd, 2009. Rod left the Lupine Meadows parking lot at 2:30 a.m. and topped out on the Grand around 11:15 a.m. Might be record breaking for 75. Jack Tackle and Bill Anderson think Rod made over 400 trips up the Grand Teton. Thomas Turiano suggested that Rod made over 500 trips in his "Select Peaks" tome. Several guides clock over 300 trips. In 1984, at the age of 76, Paul Petzoldt climbed the Grand Teton to commemorate the 60th anniversary of his first ascent. No word on the time it took. We're not sure who the oldest person to solo is but a 70-year-old man from Idaho Falls gave it a shot in 2024, and several valley climbers in their 70s can easily solo the OS.
Exum reported that Rod Newcomb, at 75-years-old, celebrated his 55th year of climbing the Grand with a one day ascent on July 2nd, 2009. Rod left the Lupine Meadows parking lot at 2:30 a.m. and topped out on the Grand around 11:15 a.m. Might be record breaking for 75. Jack Tackle and Bill Anderson think Rod made over 400 trips up the Grand Teton. Thomas Turiano suggested that Rod made over 500 trips in his "Select Peaks" tome. Several guides clock over 300 trips. In 1984, at the age of 76, Paul Petzoldt climbed the Grand Teton to commemorate the 60th anniversary of his first ascent. No word on the time it took. We're not sure who the oldest person to solo is but a 70-year-old man from Idaho Falls gave it a shot in 2024, and several valley climbers in their 70s can easily solo the OS.
Supplies
Make
sure you have the supplies necessary for a safe trip before venturing
to the trailhead. Headlamp with fresh batteries? Water? Toiletries?
Proper clothing, especially shoes? Food? Sunglasses? Sunscreen? Charged
phone? First Aid? Helmet? Gloves? Hand warmers? Hiking poles? Mosquito spray? Bear
spray? Whatever. Fast and light is the objective for most free-soloing
climbers so every additional ounce is a burden if it's not essential.
The faster and more experienced you are, the less you'll need. That's especially true with nice weather & conditions. Free-soloing runners (the select few)
carry next to nothing and
wear clothing totally unsuitable for most climbers. Runners might also
start later and experience very comfortable temperatures. BTW, we never
take bear spray unless there's a sign posted about a specific and known
grizzly threat, or an aggressive black bear (both are rare but possible). Bear information
Protect your eyes and skin from the damage of high-elevation
sun exposure. The sun's intensity increases at a rate of 4 to 10
percent per 1000'
feet above sea level. The intensity varies with the time of
day, snow
cover, cloud cover, your location on the Earth, etc. The reflective intensity of the snow is a real threat. Proper sunglasses and sunblock are considered essential gear by most mountaineers.
Altitude Sickness
The body needs time to adjust to higher elevations. There are 42% fewer
oxygen molecules in every breath compared to the same volume of air
that's found at sea level when you're at 13,775 ft (4200 m). Additionally, there are 9%
fewer oxygen molecules in your blood supply while resting which means that the
blood is less efficient at circulating oxygen to the brain and other
organs. The oxygen level in the blood decreases further when any
strenuous activity is undertaken.
While rare in the Tetons, altitude sickness can become a serious health issue. On September 16, 2001, a climber on the Grand's East Ridge was unable to stand or walk and he had gurgling in his chest. He was taken to the hospital in Jackson and treated for high altitude pulmonary edema. Climbers suffering from Acute Mountain Sickness or Altitude Sickness need to stop, rest, and descend if serious symptoms don't improve.
Diamox, AKA: acetazolamide, is sometimes used to prevent or reduce the symptoms of altitude sickness.
You'll need a prescription. The CDC mentions Viagra (Sildenafil)
as a possible way to prevent high-altitude pulmonary edema.
The CDC also recommends that pregnant women avoid vigorous
activity at high altitudes unless properly trained and accustomed to the
environment. Pregnant women are seen climbing the Grand. Consult with a doctor if you're prego.
Click to Download or Enlarge the following images...
Tap or click on an image to open up the LINK to a full-size image in a new browser tab. If you right-click and open the IMAGE in a new tab, only the smaller image will pop up.
.jpg)


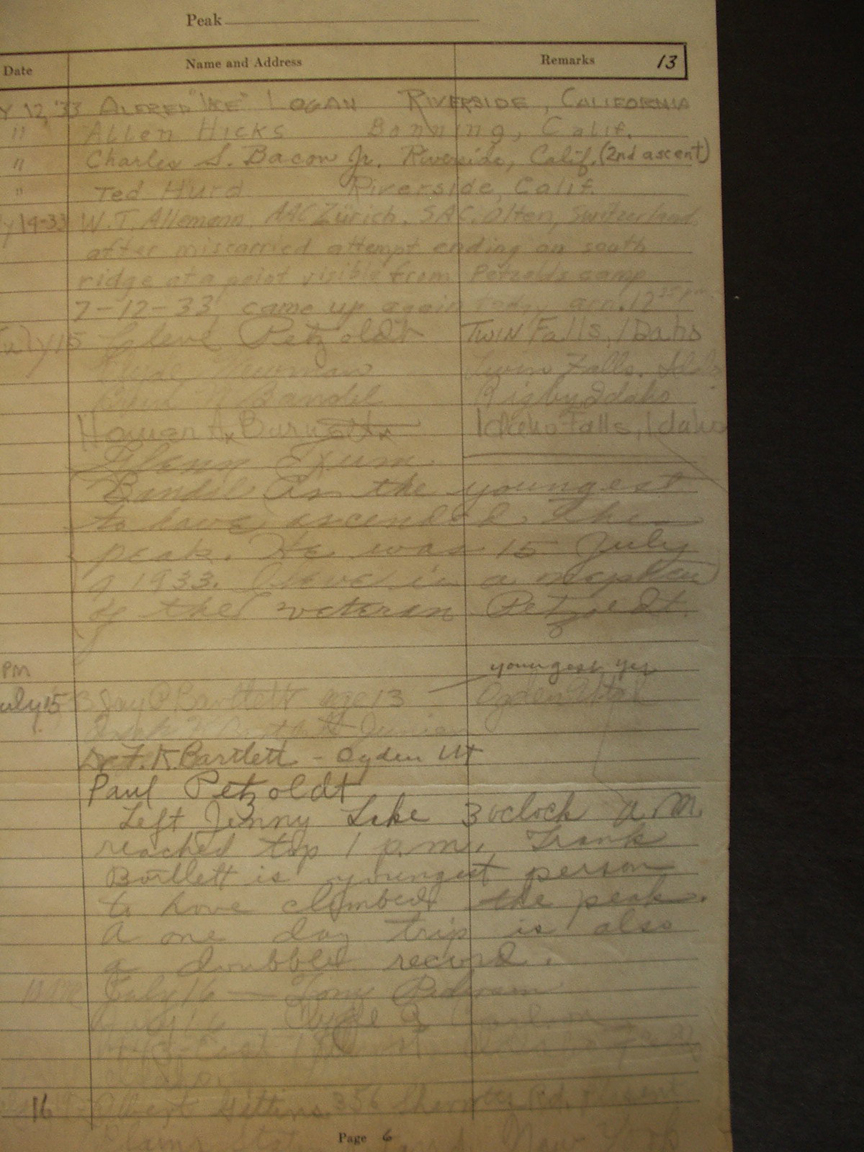
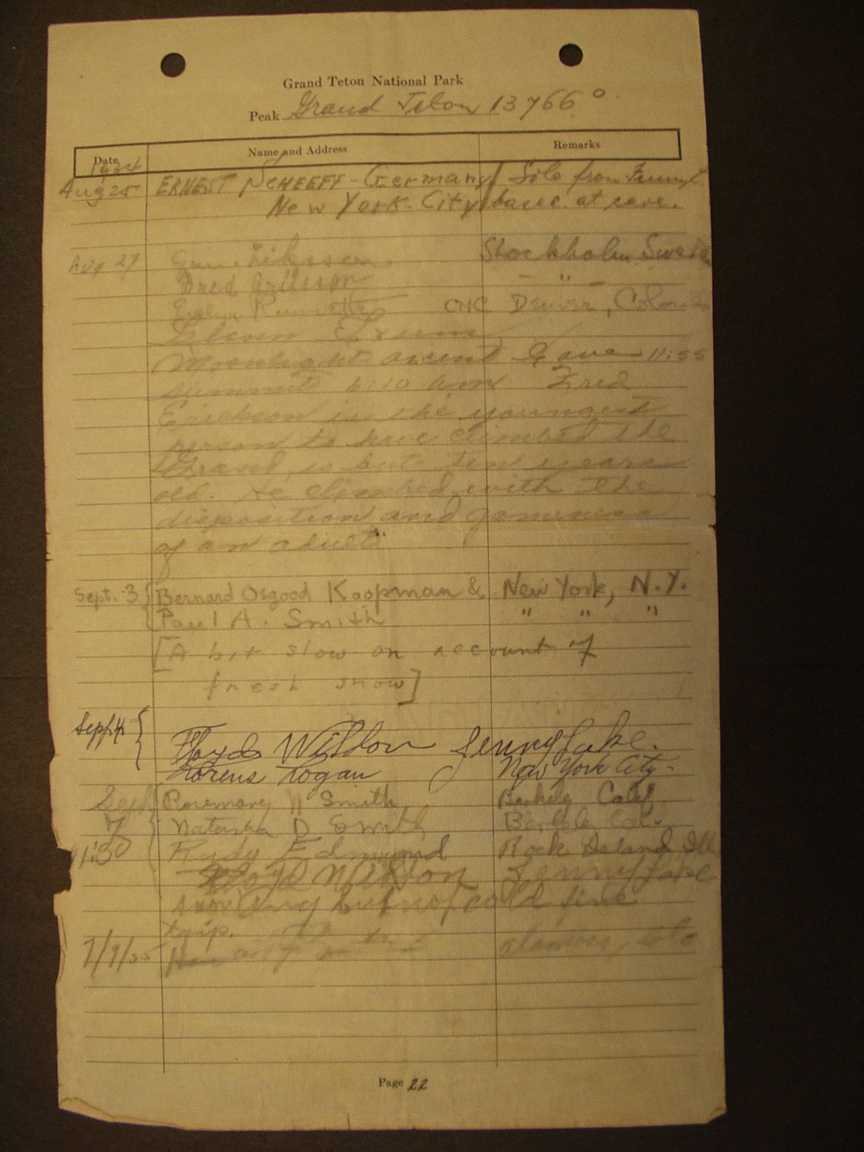
If you make it this far and change you mind about climbing the Grand, this is a great spot to scramble to. The best line for the scramble isn't obvious but you should find something that works just fine. Takes about 15 minutes from the Central Rib's "Patio" (AKA: The Dance Floor).

Mt Owen is in the shadow of the Grand on the center-left side of this image.


Original ascent path

Owen-Spalding Climbing Route
Click to enlarge


William O. Owen, of Owen-Spalding fame, surveyed a fair amount of land in Teton County. Owen triangulated the
altitude of Mt. Owen
in 1925, now his namesake. You can find
Owen's 6/30/1893 survey
of the
Town of Jackson on the BLM's GLO Records search page
(click the "Basic Viewer" button at the bottom of linked
page if needed - this website may get upgraded but this still worked in 2025). Owen might have littered Teton County with section corners but we haven't checked the records.
In other parts of Wyoming, Owen sometimes used
mastodon bones
as section corner monuments. He toured Yellowstone National Park on his Columbia high-wheel in 1883 along with some friends; "becoming the first people to ride through Yellowstone and the first to cross the Continental Divide awheel.” He'd fit right in with the crowd in Teton County today.
Wildfires

(Bad day to be climbing)
AirNow Fire & Smoke Map (adjust settings)
A few trip reports for April through October
July 17th, 2016 (UXM) PNG Variation
~~~~~~~~~~
Overview - Owen-Spalding
The Approach to the Lower Saddle
Wyoming Whiskey Home Page
If you wish to print any of our pages into a PDF file, try the Chrome browser (prints long PDF's better than some other browsers). Also, choose to print "background graphics" (or "print backgrounds" in Firefox). Our site is designed for the dark backgrounds. And you may wish to try the "legal" paper size in portrait mode to better accommodate the larger images.
All of our images may be used without permission or attribution for all not-for-profit purposes
Enjoy Safe Climbing